Pico SIM868-GSM/GPRS/GNSS
| ||
Overview
The Pico-SIM868-GSM/GPRS/GNSS is a GSM, GPRS, GNSS, and Bluetooth module designed for Raspberry Pi Pico. This small size and low power module will easily enable your Raspberry Pi Pico multiple functions including making phone calls, sending SMS, 2G communication, global positioning, as well as Bluetooth transmission.
Feature
- Standard Raspberry Pi Pico header, supports Raspberry Pi Pico series boards.
- UART communication, serial AT commands control.
- Supports SMS, phone call, GPRS, DTMF, HTTP, FTP, MMS, email, etc.
- Bluetooth3.0 support allows Bluetooth data transfer.
- RTC real-time clock, with rechargeable Li-po battery.
- Integrates 3.7V Li-po battery connector and recharge circuit, allows being powered from external rechargeable Li-po battery, or recharge it in turn.
- Onboard microphone, together with speaker header, can be used to make phone calls.
- 2 x LED indicators, for monitoring the module operating status.
- Onboard nano-SIM card slot supports 2G SIM card *
* Depending on the local network service provider.
Specification
| Product type | SIM868 | SIM7080G | SIM7020E |
|---|---|---|---|
| Working frequency | |||
| NB-IoT | N/A | B1/B2/B3/B4/B5/B8/B12/ B13/B18/B19/B20/B25/B26 /B28/B66/B71/B85 |
SIM7020C: LTE-FDD: B1/B3/B5/B8 SIM7020E: LTE-FDD:B1/B3/B5/B8/B20/B28 |
| Cat-M | N/A | B1/B2/B3/B4/B5/B8/B12/B13 /B14/B18/B19/B20/B25/ B26/B27/B28/B66/B85 |
N/A |
| 2G | GSM 850/EGSM 900/DCS 1800/PCS 1900 MHz |
N/A | N/A |
| GNSS | GPS, GLONASS, BeiDou | GPS, GLONASS, BeiDou, Galileo | N/A |
| Available Area | Most of Countries and areas | Global | SIM7020C:China SIM7020E:Europe/Africa/Australia/Southeast Asia |
| Data transmit | |||
| NB-IoT(Kbps) | - | 136(DL)/150(UL) | 26.15(DL)/62.5(UL) |
| Cat-M(Kbps) | - | 589(DL)/1119(UL) | - |
| 2G(Kbps) | 85.6(DL)/85.6(UL) | - | - |
| Other specification | |||
| Communication protocol | TCP/UDP/HTTP/SSL/FTP /POP3/SMTP/MQTT, etc. |
TCP/UDP/HTTP/HTTPS/TLS/DTLS/PING/LWM2M/COAP/MQTT, etc. | |
| Power type | External Li-po battery OR Raspberry Pi Pico USB port | ||
| Li-po battery | 3.7V ~ 4.2V | ||
| Logic level | 3.3V | ||
| Module standalone current | Idle mode: 12mA | Idle mode: 10mA | Idle mode: 5.6mA |
| Sleep mode: 0.65mA | Sleep mode: 1.2mA | Sleep mode: 0.4mA | |
| Backup Mode:8uA | PSM Mode: 3.2uA | PSM Mode: 3.4uA | |
| Audio input/output | onboard microphone,with speaker header | N/A | |
| Indicator | NET: network indicator Charge:recharge indicator | ||
| Switch | Li-po battery and USB power supply switch | Li-po battery power supply switch | |
| SIM card | 2G SIM card (1.8V/3V) | NB-IoT/Cat-M card (1.8V ONLY) | NB card (1.8V/3V) |
| Antenna connector | LTE, GNSS, BT | LTE, GNSS | LTE |
| Dimensions | 76.15 × 24.00mm | 73.5 × 24.00mm | |
Pinout
Dimensions
Hardware connection
- Pico-SIM868-GSM/GPRS/GNSS x 1 (Pin header should be soldered)
- Raspberry Pi Pico x 1
- SIM card x 1 (Support supports 2G service)
- Micro USB cable x 1
Description:
If you need to use audio, you need to connect a speaker.
When in use, it is recommended to connect to the lithium battery: when there is no additional USB power supply, turn on the USB to turn off the lithium battery power supply, switch to VBAT to use the lithium battery power supply; When connected to USB power, the USB can be used to charge the lithium battery, power the Pico or write firmware and programs.
How to Use
Python Examples
Use in Windows
- 1. Press and hold the BOOTSET button on the Pico board, connect the pico to the USB port of the computer through the Micro USB cable, and release the button after the computer recognizes a removable hard disk (RPI-RP2).
- 2. Copy the pico_micropython_xxxxxxxx.uf2 file in the python directory to the recognized removable disk (RPI-RP2)
- 3. Open Thonny IDE (note: use the latest version of Thonny, otherwise there is no Pico support package, the latest version under Windows is v3.3.3).
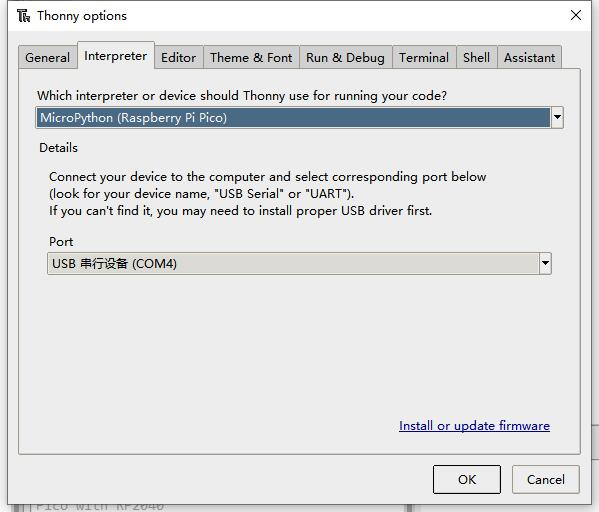
- 4. Click Tools->Settings->Interpreter, select Pico and the corresponding port as shown in the figure.

5.File -> Open -> main.py, click to run, as shown below:

This demo provides a simple program...
Use in Raspberry Pi environment
- 1. The process of flashing the firmware is the same as that on Windows, you can choose to copy the pico_micropython_xxxxxxxx.uf2 file into pico on PC or Raspberry Pi.
- 2. Open Thonny IDE on the Raspberry Pi (click the Raspberry logo -> Programming -> Thonny Python IDE ), you can check the version information in Help->About Thonny.
To make sure your version has a Pico support package, you can also click Tools -> Options... -> Interpreter to select MicroPython (Raspberry Pi Pico and ttyACM0 port).
As the picture shows:

If your current Thonny version does not have the pico support package, enter the following command to update the Thonny IDE.
sudo apt upgrade thonny
3. Click File->Open...->python/main.py to run the script.
AT Test
This demo is mainly to facilitate the user can through the Thony software, directly test and verify the AT instruction transceiving module. The main program will start the module directly first and then check the network condition. After that, it will check the AT instructions entered by the user, send them to the module through the serial port, and then send the AT instructions back to the Pico serial port for printing.
For more details about AT commands, please check the manual: SIM800 Series_AT Command Manual_V1.11
Expected result
GPS Positioning
This example mainly demonstrates GPS positioning-related tests. To perform this example, the GPS antenna receiver must be placed outside (or in a window where the sky can be seen), and the GPS location cannot be obtained on rainy days。
For more details about AT commands, please check the manual: SIM868 Series GNSS Application Note V1.02
Expected result
Taking calls
This example mainly demonstrates the phone call test. The module has an onboard microphone so that calls can be made directly to each other, and speakers are needed to hear the sound.
For more details on AT commands, please check the manual: SIM800 Series_AT Command Manual
Expected result
TCP
In this example, the Raspberry Pico is connected to the Internet through NB-IoT, and the data is transmitted through TCP and the server. The server that obtains the public network IP needs to be used (this example uses the Alibaba Cloud server):
- Description of the instructions
AT+CSQ   #Query the network signal quality, the first parameter is that the network signal quality which the maximum value is 31, the larger the value, the stronger the network signal
AT+CREG?  #Query the network registration status, where the second parameter is 1 or 5, it means the registration has been successful.
AT+CGATT?   #Query whether the module is attached to the GPRS network
AT+CSTT="CMNET    #set the APN according to the actual network, here we take CMNET as an example
AT+CIICR    #activates the mobile scene
AT+CIFSR     #get the local IP address
AT+CIPSTART="TCP","113.81.232.4",5000    #Establish a TCP/IP connection, as shown in the following figure
- Download the Python demo: the TCP part of the code is as follows:
def tcp(sms_info="qixi"):
    send_at('AT+CIPSHUT', 'OK')
    send_at("AT+CSQ", "OK")
    send_at("AT+CREG?", "OK")
    send_at('AT+CGATT?', 'OK')
    send_at('AT+CSTT=\"CMNET\"', 'OK',5)
    send_at('AT+CIICR', 'OK')
    send_at('AT+CIFSR', 'OK')
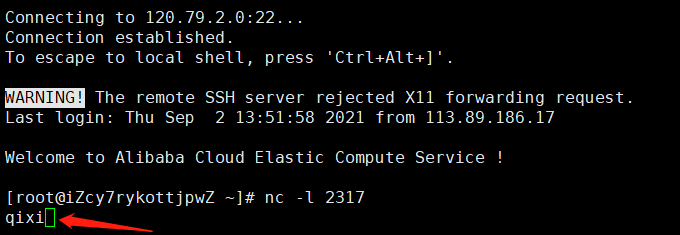
    send_at('AT+CIPSTART=\"TCP\",\"120.79.2.0\",\"2317\"', 'OK')
    send_at('AT+CIPSEND', ">",5)
    uart.write(bytearray(sms_info))
    uart.write(bytearray(hexstr_to_str("1A")))
Expected result
- Screenshot of Pico running on Thonny client:
- Server receives data
HTTP
Description
In this example, Raspberry Pico is connected to the Internet through NB-IoT and gets the weather information from the weather website through HTTP GET. Meanwhile, the temperature information on Pico is pushed to the server through HTTP POST.
Users can access the website and view the data uploaded in real-time. The software schematic is as follows:

Server Web Page Deployment
User http://pico.wiki/esp-chart.php as an example.

1. Server setup PHP, mysql, and other environments create database files. For example:
- Database: example_esp_data
- Password: your_password
- user name: your_username
- Create database table:
CREATE TABLE Sensor (
   id INT(6) UNSIGNED AUTO_INCREMENT PRIMARY KEY,
   value1 VARCHAR(10),
   value2 VARCHAR(10),
   value3 VARCHAR(10),
   reading_time TIMESTAMP DEFAULT CURRENT_TIMESTAMP ON UPDATE CURRENT_TIMESTAMP)
2、Example PHP files on the server are post-data.php and esp-chart.php
- post-data.php: HTTP POST API that the SIM7080G module can call to POST data to the server.
- esp-chart.php: The latest data uploaded by SIM7080G can be obtained from a web page accessed by the client and displayed in a graph.
Pico software setup
Download Python example: Demo codes, Part of the HTTP codes:
- HTTP GET:
# HTTP GET TEST
def http_get():
   send_at('AT+HTTPINIT', 'OK')
   send_at('AT+HTTPPARA=\"CID\",1', 'OK')
   send_at('AT+HTTPPARA=\"URL\",\"'+http_get_server[0]+http_get_server[1]+'\"', 'OK')
   if send_at('AT+HTTPACTION=0', '200', 5000):
       uart.write(bytearray(b'AT+HTTPREAD\r\n'))
       rec_buff = wait_resp_info(8000)
       print("resp is :", rec_buff.decode())
   else:
       print("Get HTTP failed, please check and try again\n")
   send_at('AT+HTTPTERM', 'OK')
- HTTP POST:
- HTTP POST TEST
def http_post():
   send_at('AT+HTTPINIT', 'OK')
   send_at('AT+HTTPPARA=\"CID\",1', 'OK')
   send_at('AT+HTTPPARA=\"URL\",\"'+http_post_server[0]+http_post_server[1]+'\"', 'OK')
   send_at('AT+HTTPPARA=\"CONTENT\",\"' + http_content_type + '\"', 'OK')
   if send_at('AT+HTTPDATA=62,8000', 'DOWNLOAD', 3000):
       uart.write(bytearray(http_post_tmp))
       utime.sleep(5)
       rec_buff = wait_resp_info()
       if 'OK' in rec_buff.decode():
           print("UART data is read!\n")
       if send_at('AT+HTTPACTION=1', '200', 8000):
           print("POST successfully!\n")
       else:
           print("POST failed\n")
       send_at('AT+HTTPTERM', 'OK')
   else:
       print("HTTP Post failed,please try again!\n")
- For more details on the HTTP function, please refer to the manual: SIM800_Series_IP_Application_Note_V1.05.pdf
Expected result
Results of web page access on the server:http://pico.wiki/esp-chart.php
C
Environment Setup
【C/C++】 Windows Tutorial 1——Environment Setup
【C/C++】 Windows Tutorial 2——New project
Demo
1. Open the C demo folder.

2. Open through Vs coed, select the corresponding compilation tool and the demo to be run (annotate the demo you don't use, delete annotation in the demo you need, and run one demo each time).


3. Click compile.

4. Press and hold the BOOT button of Pico and then power it on, and enable Pico to enter the disk mode. Drag the UF2 file under the build file to the RPI-RP2 drive letter.

5. At this point, Pico starts to run the corresponding demo, and you can check the running status through the serial port assistant.
Resources
Document
Sample Demo
Tools
- sscom
- SIMCom GPS
- NetAssist
- u-centerV8.12
- TCP232
- Chinese characters and Unicode code conversion
- Serial_Bluetooth_Terminal_v1.zip
SIM868 Documents
- File:SIM868_Series_Hardware_Design_V1.07.pdf
- File:SIM800 Series_AT Command Manual_V1.11.pdf
- File:SIM800 Series_TCPIP_Application Note_V1.03.pdf
- File:SIM800 Series_MQTT_Application Note_V1.03.pdf
- File:SIM800 Series_Bluetooth_Application Note_V1.09.pdf
- File:SIM868 Series_GNSS_Application Note_V1.02.pdf
- File:SIM800 Series_Email_Application Note_V1.02.pdf
- File:SIM800 Series_GSM Location_Application Note_V1.03.pdf
- File:SIM800 Series_IP_Application Note_V1.05.pdf
- File:SIM800 Series_MMS_Application Note_V1.02.pdf
- File:SIM800 Series_NTP_Application Note_V1.03.pdf
- File:SIM800 Series_PCM_Application Note_V1.02.pdf
- File:SIM800 Series_SSL_Application Note_V1.05.pdf
- More...
Development Softwares
- Zimo221.7z
- Image2Lcd.7z
- Font Library Tutorial
- Image Extraction Tutorial
- Thonny Python IDE (Windows V3.3.3)
FAQ
You need to connect the PICO board with Pico SIM868 GSM/GPRS/GNSS, connect PICO with the PC via USB cable you can see the charging LED indictor turned on.
{{{5}}}
Support
Technical Support
If you need technical support or have any feedback/review, please click the Submit Now button to submit a ticket, Our support team will check and reply to you within 1 to 2 working days. Please be patient as we make every effort to help you to resolve the issue.
Working Time: 9 AM - 6 PM GMT+8 (Monday to Friday)


