10.1inch HDMI LCD (B) (with case)
| ||
Overview
Introduction
- 10.1-inch IPS screen, hardware resolution is 1280 × 800.
- 10-point capacitive touch control, tempered glass panel, hardness up to 6H.
- When used with Raspberry Pi, supports Raspberry Pi OS / Ubuntu / Kali and Retropie.
- When used as a computer monitor, supports Windows 11/10/8.1/8/7.
Video
EDID Sequence Parameter
If the main control board's system can automatically recognize EDID for display, there is no need to configure additional timing parameters.
Otherwise, you can refer to the following EDID settings:
| Pixel Clock | H Adressable | H Blanking | V Adressable | V Blanking | H Front Porch | H Sync Width | V Front Porch | V Sync Width | H Image Size | V Image Size | H Border | V Border |
|---|---|---|---|---|---|---|---|---|---|---|---|---|
| 75.00 | 1280 | 128 | 800 | 45 | 40 | 48 | 13 | 3 | 108 | 68 | 0 | 0 |
Working with PC
This Support PC version Windows 11/10/8.1/8/7 system.
Instructions:
- Connect the Power Only port of the touch screen to a 5V power adapter.
- Use a type A to micro USB cable to connect the Touch interface of the touch screen and any USB interface of the PC.
- Connect the touch screen and the HDMI port of the PC with an HDMI cable. After about a few seconds, you can see the LCD display normally.
- Note 1: Please pay attention to connecting cables in order, otherwise it may not display properly.
- Note 2: When the computer is connected to multiple monitors at the same time, the cursor on the main monitor can only be controlled through this LCD, so it is recommended to set this LCD as the main monitor.
Working with Raspberry Pi
Software setting
Supports Raspberry Pi OS / Ubuntu / Kali and Retropie systems on Raspberry Pi.
Please download the latest version of the image from the Raspberry Pi official website.
1. Download the compressed file to the PC, and extract the img file.
2. Connect the TF card to the PC and use SDFormatter to format the TF card.
3. Open the Win32DiskImager software, select the system image prepared in step 1, and click write to burn the system image.
4. After the programming is completed, open the config.txt file in the root directory of the TF card, add the following code at the end of config.txt and save it
hdmi_group=2
hdmi_mode=87
hdmi_cvt 1280 800 60 6 0 0 0
hdmi_drive=1
Backlight Adjustment
wget https://files.waveshare.com/upload/0/01/Brightness-HDMI.zip
unzip Brightness-HDMI.zip
cd Brightness-HDMI
sudo chmod +x install.sh
./install.sh
#lite version Enter the lite directory:
#cd lite
#./Raspi_USB_Backlight_nogui -b X
# X range is 0~10, 0 is the darkest, 10 is the brightest.
#For example: ./Raspi_USB_Backlight_nogui -b 3
Note: Only the Rev4.1 version supports the USB dimming function.
Hardware connection
- The Power Only interface of the touch screen is connected to a 5V power adapter.
- Connect the touch screen to the HDMI port of the Raspberry Pi with an HDMI cable.
- Use a type A to micro USB cable to connect the Touch interface of the touch screen to any USB interface of the Raspberry Pi.
- Insert the TF card into the TF card slot of the Raspberry Pi, power on the Raspberry Pi, and wait for more than ten seconds to display normally.
Resource
Document
- 10.1inch-HDMI-LCD-B-with-Holder-assemble.jpg
- 10.1inch HDMI LCD (B) Display Area
- 10.1inch HDMI LCD (B) 3D drawing
- CE RoHs certification information
- Raspberry Pi LCD PWM Backlight Control
Note: Under normal circumstances, we do not recommend customers modify the hardware by themselves. Modifying the hardware without permission may cause the product to be out of warranty. Please be careful not to damage other components when modifying.
Software
FAQ
- This may be due to the customer turning on the option for hdmi_drive in config.txt
- The method is to comment out this line and reboot the system. After rebooting, the screen may not be fully recovered, just wait a few minutes (sometimes it may take half an hour, depending on the time of operation under abnormal conditions).
- Make sure that the HDMI interface of the PC can output normally.
- PC only connects to LCD as display device, not to other monitors.
- Connect the power cable first and then the HDMI cable.
- Some PCs also need to be restarted to display properly.
You can try compiling the general touch driver "hid-multitouch" into the kernel, which generally supports touch.
Using a 5V power supply, the working current of the backlight is about 750mA, and the working current of the backlight is about 300mA.
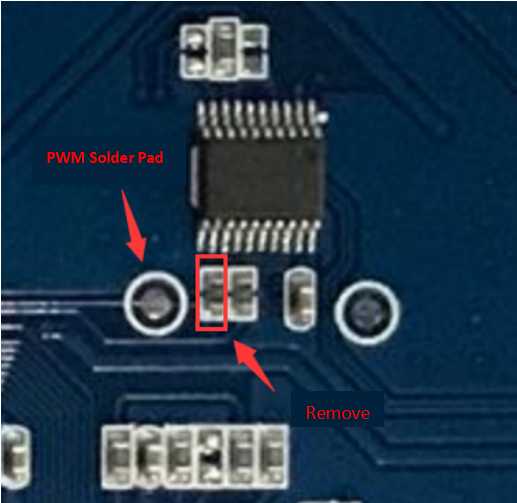
Remove the resistor as shown below, and connect the PWM pad to the P1 pin of the Raspberry Pi.
Execute the following command in the Raspberry Pi terminal:
gpio -g pwm 18 0
gpio -g mode 18 pwm (the occupied pin is the PWM pin)
gpio pwmc 1000
gpio -g pwm 18 X (X value in 0~1024),0 represents the brightest, and 1024 represents the darkest.
{{{5}}}
Support
Technical Support
If you need technical support or have any feedback/review, please click the Submit Now button to submit a ticket, Our support team will check and reply to you within 1 to 2 working days. Please be patient as we make every effort to help you to resolve the issue.
Working Time: 9 AM - 6 PM GMT+8 (Monday to Friday)


