2.23inch OLED HAT
| ||
Overview
Instruction
This is a 2.23inch OLED display with a controller. You can directly add it on Raspberry Pi by the 40 PIN pinheader, or connect it to another hardware platform via the IIC and SPI interfaces. The interface of 2.23inch OLED HAT is the default SPI, you can also switch to I2C by soldering the resistors on the back of the OLED.
Specification
- Controller: SSD1305
- Interface: SPI/I2C/OLED
- Resolution: 128 * 32
- Display size: 2.23inch
- Pixel size: 0.41mm x 0.39mm
- Display color: White
- Working voltage: 3.3V
- Working temperature: -40~70℃
PINS
| PIN | Description |
|---|---|
| VCC | 3.3V/5V |
| GND | GND |
| DIN | Data input |
| CLK | Clock input |
| CS | Chip select (Low active) |
| DC | register / Data selection (SPI) |
| RST | Reset (Low active) |
The module uses the SPI communication mode by default, that is, BS1, BS2, DIN, CLK, CS, and DS connect the 0R resistor to the upper two pads by default. The welding method shown in the figure above is to select the I2C communication method. The specific hardware connection is shown in the following table: Note: The above picture is the welding on the hardware, the following table is the actual hardware connection.
| Communication | BS1 | BS2 | DIN | CLK | CS | DC |
|---|---|---|---|---|---|---|
| SPI | GND | NC | MOSI | SCLK | CS | DC |
| 12C | 3V3 | DIN | SDA | SCL | GND | GND |
- I2C communication, hardware modifications are as follows:
Working principle
- SSD1305 is a 132*64 pixel OLED controller, but the OLED only has 128*32 pixels, so the screen only uses the first part of the SSD1305 cache;
- The OLED supports 8bit 8080 parallel, SPI and I2C, and other communication methods, but considering the size of the module and saving the precious IO resources of the microcontroller, the 8bit 8080 parallel method is abandoned and supports the communication method of I2C and SPI.
Communication Protocol
I2C
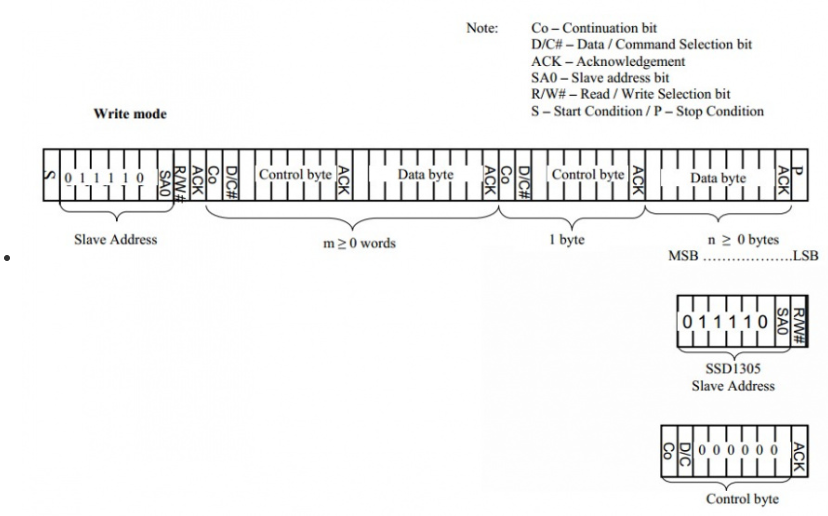
- During I2C communication, first send a 7-bit slave device address + 1 bit read and write bit, and wait for the device's response.
- After the slave device responds, a control byte is sent, which determines whether the following byte is a command or data, and then waits for the slave device to respond.
- After the slave device replies again if a command is sent, only a one-byte command is sent. If data is sent, only one byte can be sent, or multiple bytes of data can be sent together, depending on the situation.
- See Datasheet Page 22 Figure 8-6 for details.
SPI Communication Timing
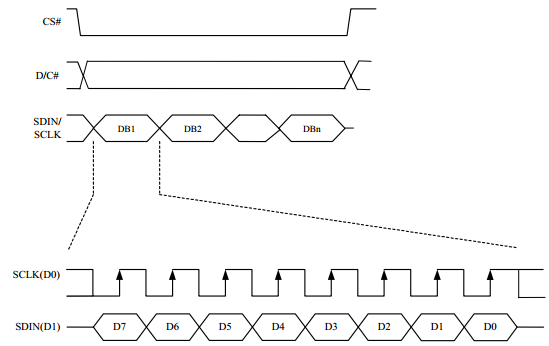
- As shown in the figure above, the data on SDIN is shifted into an 8-bit shift register on each rising edge of SCLK in MSB first LSB last order.
- D/C# is sampled at every 8th clock, and the data in the shift register is written to the Graphics Display Memory (GDDRAM) or command register, at the same count clock.
- In serial mode, only write operations are allowed. Write operation process in 4-wireSPI mode.
- See Figure 8-5 on Datasheet Page 21 for details.
Raspberry Pi
Provides C and Python demo
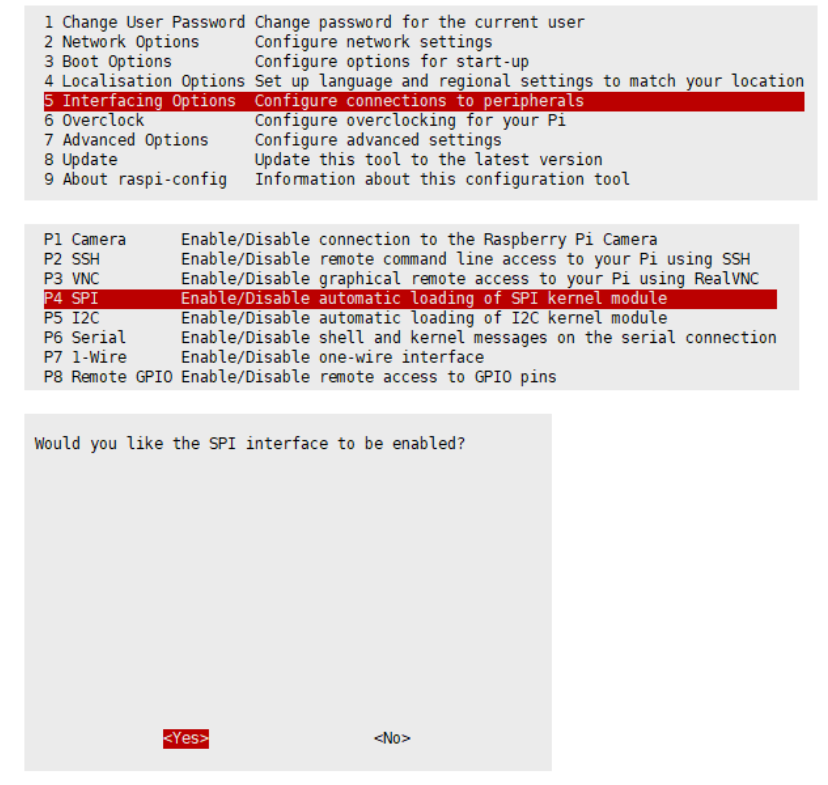
- Open the Raspberry Pi terminal and enter the following command to enter the configuration interface
Enable SPI Interface
sudo raspi-config
chooseInterfacing Options -> SPI -> Yes Open SPI Interface
Then reboot Raspberry Pi:
sudo reboot
- Check /boot/config.txt, and you can see 'dtparam=spi=on' was written in.
- To make sure SPI is not occupied, it is recommended to close other drivers' coverage. You can use ls /dev/spi* to check whether SPI is occupied. If the terminal outputs /dev/spidev0.1 and /dev/spidev0.1, SPI is not occupied.
Enable I2C Interface
- Open the Raspberry Pi terminal and enter the following command to enter the configuration interface.
sudo raspi-config
choose Interfacing Options -> I2C ->yes Start the i2C kernel driver
Then reboot Raspberry Pi:
sudo reboot
Install Library
If you use bookworm system, only the lgpio library is available, bcm2835 and wiringPi libarary cannot be installed or used. Please note that the python library does not need to install, you can directly run the demo.
BCM2835
#Open the Raspberry Pi terminal and run the following command
wget http://www.airspayce.com/mikem/bcm2835/bcm2835-1.71.tar.gz
tar zxvf bcm2835-1.71.tar.gz
cd bcm2835-1.71/
sudo ./configure && sudo make && sudo make check && sudo make install
# For more, you can refer to the official website at: http://www.airspayce.com/mikem/bcm2835/
WiringPi
#Open the Raspberry Pi terminal and run the following command
cd
sudo apt-get install wiringpi
#For Raspberry Pi systems after May 2019 (earlier than that can be executed without), an upgrade may be required:
wget https://project-downloads.drogon.net/wiringpi-latest.deb
sudo dpkg -i wiringpi-latest.deb
gpio -v
# Run gpio -v and version 2.52 will appear, if it doesn't it means there was an installation error

# Bullseye branch system using the following command:
git clone https://github.com/WiringPi/WiringPi
cd WiringPi
. /build
gpio -v
# Run gpio -v and version 2.70 will appear, if it doesn't it means there was an installation error
lgpio
wget https://github.com/joan2937/lg/archive/master.zip
unzip master.zip
cd lg-master
sudo make install
#for more details, you can refer to https://github.com/gpiozero/lg
Python
sudo apt-get update
sudo apt-get install python3-pip
sudo apt-get install python3-pil
sudo apt-get install python3-numpy
sudo pip3 install spidev
sudo pip3 install smbus
Download demo
Run the following command in the Raspberry Pi terminal
sudo apt-get install p7zip-full
wget https://files.waveshare.com/upload/c/c5/2.23inch-OLED-HAT-Code.7z
7z x 2.23inch-OLED-HAT-Code.7z
sudo chmod 777 -R  2.23inch-OLED-HAT-Code
cd 2.23inch-OLED-HAT-Code/
- Raspberry Pi demo use (the following SPI routine is used as an example).
- The scrolling display is to enable all the pixels in the RAM of SSD1305 (132X64) and display it on the screen (128X32) by scrolling.
- The scrolling demo provides two scrolling methods, you can only choose one or none of them, set it to '1'.
#define VERTICAL 1
#define HORIZONTAL 0
Based on the use of BCM2835
#normal display
cd Without scrolling/Raspberry\ Pi/SPI/bcm2835
make clean
make
sudo ./oled
# scroll display
cd Scroll/Raspberry\ Pi/SPI/bcm2835
make clean
make
sudo ./oled
Based on the use of Wiring Pi
#normal display
cd Without scrolling/Raspberry\ Pi/SPI/wiringPi
make clean
make
sudo ./oled
#scroll display
cd Scroll/Raspberry\ Pi/SPI/wiringPi
make clean
make
sudo ./oled
Based on the use of Python
#normal display
cd Without scrolling/Raspberry\ Pi/SPI/python
sudo python3 stats.py
sudo ./oled
#scroll display
cd Scroll/Raspberry\ Pi/SPI/python
sudo python3 stats.py
Precautions
The WiringPi and Python demo operate by reading and writing the device files of the linux system, while the BCM2835 is a library function of the Raspberry Pi cpu chip, which operates on registers. Therefore, if the BCM2835 library is used first, the WiringPi and Python demo will fail to use, in this case, you need to restart the system and run it again.
Arduino
Hardware Configuration
The expansion board for the demo: UNO PLUS
IIC Connection
| Pin Function | Expeansion Board |
|---|---|
| VCC | 3.3V |
| GND | GND |
| DIN | SDA/D14 |
| SCL | D15 |
SPI Connection
| Pin Function | Expeansion Board |
|---|---|
| VCC | 3.3V |
| GND | GND |
| DIN | D11(MOSI) |
| CLK | D13(SCK) |
| CS | D10 |
| DC | D8 |
| RST | D9 |
Software Configuration
- Install Compilation Software (Windows Tutorial)
- Program
- Normal Display
- Download the program in the information we provided, unzip it, and then enter the 2.23inch-OLED-HAT-Code\Without scrolling\Arduino\SPI\oled directory.
Double-click to open the oled.ino file. Select your development board, and the corresponding port.
Compile and download
After the download is successful, the screen will display normally.
- scroll
- Download the program in the information we provided, unzip it, and then enter the 2.23inch-OLED-HAT-Code\Scroll\Arduino\SPI\oled directory.
Double-click to open the oled.ino file.
Select your development board, and the corresponding port.
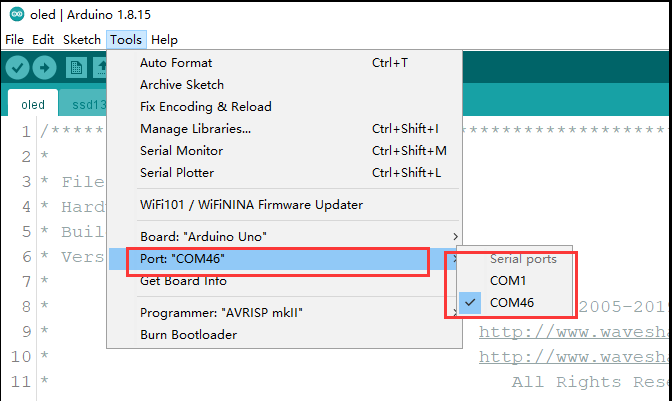
Compile and download
After the download is successful, the screen will scroll.
How to create image data
- Open Image2Lcd software
- Set Data type: *c
- Scanning type: Horizontal
- Grey Scale: Monochrome
- Max height and width: 128 32
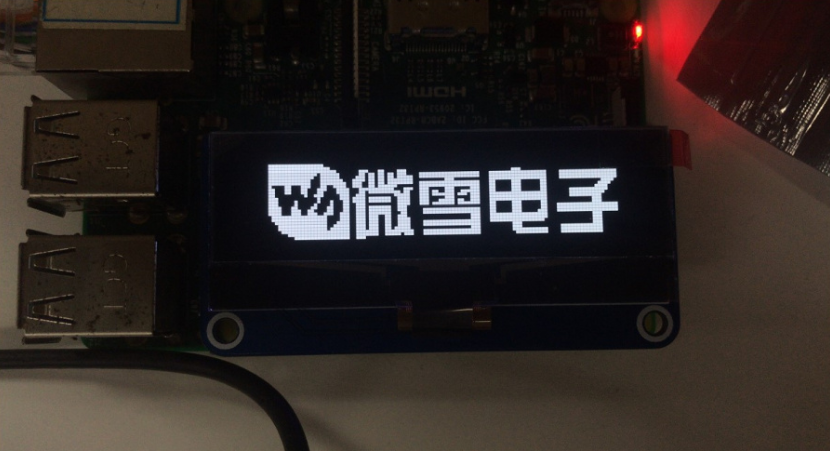
The expected result:
Resource
Documents
Demo codes
Software
FAQ
Support
Technical Support
If you need technical support or have any feedback/review, please click the Submit Now button to submit a ticket, Our support team will check and reply to you within 1 to 2 working days. Please be patient as we make every effort to help you to resolve the issue.
Working Time: 9 AM - 6 PM GMT+8 (Monday to Friday)


