1.3inch OLED HAT
| ||
Overview
Introduction
1.3inch LCD HAT, SPI/I2C interfaces.
Specification
- Driver: SH1106
- Interface: 4-wire SPI, 3-wire SPI, I2C
- Resolution: 128 x 64
- Display Size: 1.3inch
- Outline Dimension: 65mm x 30mm
- Display color: blue
- Visible Angle: >160°
- Operating TEMP. (℃): -20~70
- Storage TEMP. (℃): -30~80
Pin Function
| PIN Function | BCM | Description |
| KEY1 | P21 | Button 1/GPIO |
| KEY2 | P20 | Button 2/GPIO |
| KEY3 | P16 | Button 3/GPIO |
| Joystick Up | P6 | Go Up |
| Joystick Down | P19 | Go Down |
| Joystick Left | P5 | Go Left |
| Joystick Right | P26 | Go Right |
| Joystick Press | P13 | Press Down |
| SCLK | P11/SCLK | SPI Clock input |
| MOSI | P10/MOSI | SPI Data input |
| SCL | P3/SCL1 | I2C Clock Input |
| SDA | P2/SDA1 | I2C Data Input |
| DC | P24 | Data/Command |
| CS | P8/CE0 | Chip Selection |
| RST | P25 | Reset |
Hardware Configuration
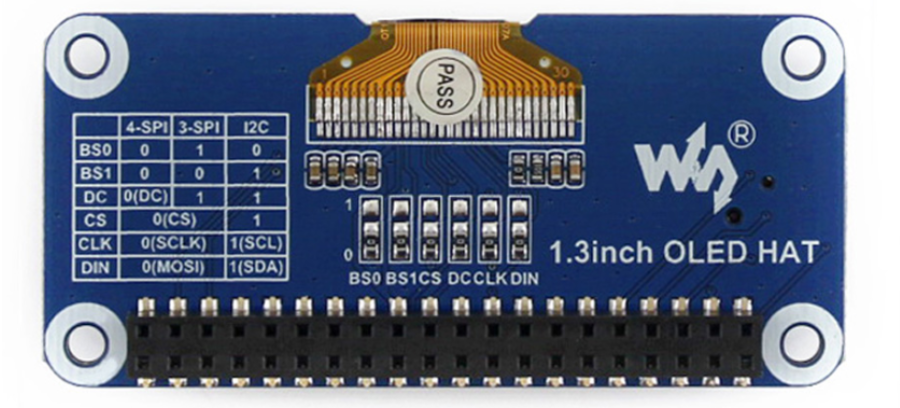
The OLED module provides three drive interfaces: 3-wire SPI, 4-wire SPI and I2C interface. There are six resistors that can be soldered on the back of the module. The corresponding communication method is selected by the electronic selection, as shown in the figure:

The module uses a 4-wire SPI communication mode by default, that is, BS0, BS1, DC, CS, CLK, and DIN are connected to 0 by default (1 and 0 do not represent the level, but the welding method of connecting or connecting the resistance, the specific hardware link is as follows surface):
Note: The above picture is the welding on the hardware, the following table is the actual hardware connection
| Communication Method | BS1/BS0 | CS | DC | DIN | CLK |
| 3-wire SPI | 0/1 | CS | 1 | MOSI | SCLK |
| 4-wire SPI | 0/0 | CS | DC | MOSI | SCLK |
| I2C | 1/0 | 0 | 1 | SDA | SCL |
The specific hardware configuration is as follows:
- Using 4-wire SPI:
That is, the factory program settings: BS0 and BS1 connect 0 to ground, CS connect 0 to CE0 (enable pin), D/C connect 0 to P24 (data/command pin) of Raspberry Pi, DIN to 0 is connected to Raspberry Pi MOSI, and CLK to 0 is connected to Raspberry Pi SCLK;
- Using 3-wire SPI:
Connect BS0 to 1 to VCC, BS1 to 0 to connect to GND, CS to 0 to connect to Raspberry Pi CE0, D/C to 1 to connect to GND, DIN to 0 to connect to Raspberry Pi MOSI, CLK to 0 to connect to the tree Raspberry Pi SCLK;
- Using I2C:
Connect BS0 to 0 to GND, BS1 to 1 to VCC (3.3V), CS to 1 to connect to GND, D/C to 1 to connect to GND, DIN to 1 to connect to Raspberry Pi SDA, CLK to 1 to connect to the tree Raspberry Pi SCL; when using I2C: the high and low states of DC can control the address of the slave device, here is connected to GND, then the 7-bit address of I2C is: 0x3C
The resistors after modification using I2C are as shown below

Raspberry Pi
Enable SPI interface
- Open the terminal, and use the command to enter the configuration page.
sudo raspi-config
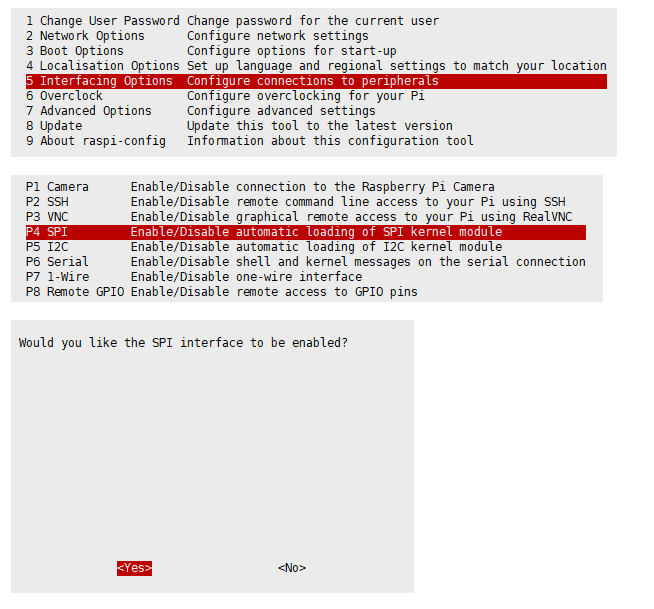
Choose Interfacing Options -> SPI -> Yes to enable the SPI interface.
sudo reboot
Please make sure that the SPI interface was not used by other devices, and you can check it in /boot/config.txt.
- Check /boot/config.txt, and you can see 'dtparam=spi=on' was written in.

To make sure SPI is not occupied, it is recommended to close other drivers' coverage. You can use ls /dev/spi to check whether SPI is occupied. If the terminal outputs /dev/spidev0.1 and /dev/spidev0.1, SPI is not occupied.
![]()
Enable I2C Interface
- Open the Raspberry Pi terminal and enter the following command to enter the configuration interface.
sudo raspi-config
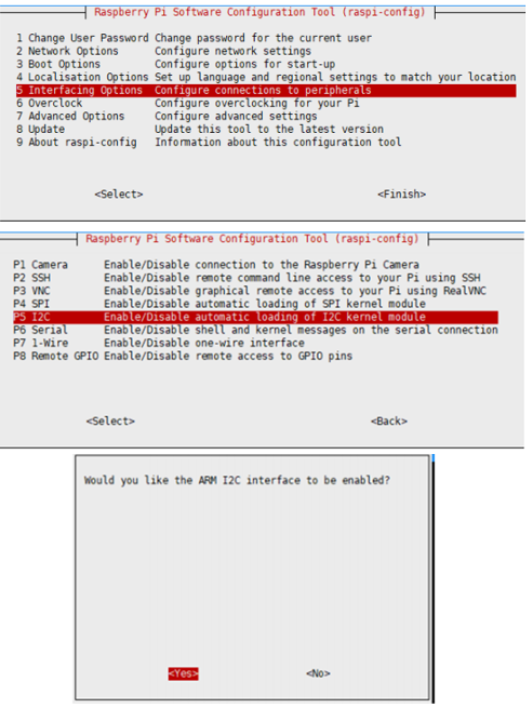
Select Interfacing Options -> I2C ->yes to start the i2C kernel driver
sudo reboot
Install Library
If you use bookworm system, only the lgpio library is available, bcm2835 and wiringPi libarary cannot be installed or used. Please note that the python library does not need to install, you can directly run the demo.
BCM2835
#Open the Raspberry Pi terminal and run the following command
wget http://www.airspayce.com/mikem/bcm2835/bcm2835-1.71.tar.gz
tar zxvf bcm2835-1.71.tar.gz
cd bcm2835-1.71/
sudo ./configure && sudo make && sudo make check && sudo make install
# For more, you can refer to the official website at: http://www.airspayce.com/mikem/bcm2835/
WiringPi
#Open the Raspberry Pi terminal and run the following command
cd
sudo apt-get install wiringpi
#For Raspberry Pi systems after May 2019 (earlier than that can be executed without), an upgrade may be required:
wget https://project-downloads.drogon.net/wiringpi-latest.deb
sudo dpkg -i wiringpi-latest.deb
gpio -v
# Run gpio -v and version 2.52 will appear, if it doesn't it means there was an installation error

# Bullseye branch system using the following command:
git clone https://github.com/WiringPi/WiringPi
cd WiringPi
. /build
gpio -v
# Run gpio -v and version 2.70 will appear, if it doesn't it means there was an installation error
lgpio
wget https://github.com/joan2937/lg/archive/master.zip
unzip master.zip
cd lg-master
sudo make install
#for more details, you can refer to https://github.com/gpiozero/lg
Python
sudo apt-get update
sudo apt-get install python3-pip
sudo apt-get install python3-pil
sudo apt-get install python3-numpy
sudo pip3 install spidev
Download Example
Run in the terminal of RPi:
sudo apt-get install p7zip-full
wget https://files.waveshare.com/upload/5/53/1.3inch-OLED-HAT-Code.7z
7zr x 1.3inch-OLED-HAT-Code.7z -r -o.
sudo chmod 777 -R  1.3inch-OLED-HAT-Code
cd 1.3inch-OLED-HAT-Code/RaspberryPi/
Test Program
- C
cd C
make clean
make
sudo ./main
- python
#python2
cd python2
sudo python main.py
sudo python key_demo.py
#python3
cd python3
sudo python3 main.py
sudo python3 key_demo.py
- For Raspberry Pi 4B and the system after raspbian_lite-2019-06-20, you need to set as follows, and the key can be input normally.
sudo nano /boot/config.txt
#add:
gpio=6,19,5,26,13,21,20,16=pu
I2C Control
- The 4-wire SPI is used by default, if the hardware is modified to I2C, the program needs to be modified.
C
Open C\obj\DEV_Config.h, change
#define USE_SPI 1
#define USE_IIC 0
To
#define USE_SPI 0
#define USE_IIC 1
and then execute again:
make clean
make
sudo ./main
python
Open python2/config.py, change:
Device_SPI = 1
Device_I2C = 0
To
Device_SPI = 0
Device_I2C = 1
and then execute again:
sudo python main.py
The same is true for python3.
Jetson Nano
Install Libraries
- Open the terminal and enter the following commands.
sudo apt-get update
sudo apt-get install python3-pip
sudo pip3 install Jetson.GPIO
sudo groupadd -f -r gpio
sudo usermod -a -G gpio your_user_name
sudo cp /opt/nvidia/jetson-gpio/etc/99-gpio.rules /etc/udev/rules.d/
sudo udevadm control --reload-rules && sudo udevadm trigger
【Note】your_user_name is the username you use, such as Waveshare.
- Install I2C.
sudo apt-get install python-smbus
- Install the image processing library:
sudo apt-get install python3-pil
sudo apt-get install python3-numpy
Download Program
sudo apt-get install p7zip
wget https://files.waveshare.com/upload/5/53/1.3inch-OLED-HAT-Code.7z
7z x 1.3inch-OLED-HAT-Code.7z
sudo chmod 777 -R  1.3inch-OLED-HAT-Code
cd 1.3inch-OLED-HAT-Code/JetsonNano/
Program Test
Due to the weak GPIO drive capability of Jetson Nano, it can only be controlled using SPI.
- C
cd C
make clean
make
sudo ./main
- python
#python2
cd python2
sudo python main.py
sudo python key_demo.py
#python3
cd python3
sudo python3 main.py
sudo python3 key_demo.py
Resources
Document
Datasheet
Relate Resources
Software
FAQ
{{{5}}}
{{{5}}}
At the operating voltage of 3.3V:
0.95inch RGB OLED: about 38mA for full white display, about 4mA for full black display.
0.96inch OLED: about 25mA when fully on, and 1.5mA when fully off.
1.3inch OLED: about 29mA when fully on, 1.0mA when fully off.
1.51inch OLED: about 171mA when fully on, 6.9mA when fully off.
2.42inch OLED: about 196mA when fully on, 7.3mA when fully off.
{{{5}}}
Program control is required to brighten the OLED.
{{{5}}}
2. The same picture cannot be displayed for a long time, otherwise it will produce afterimages and cause damage to the OLED.
{{{5}}}
Support
Technical Support
If you need technical support or have any feedback/review, please click the Submit Now button to submit a ticket, Our support team will check and reply to you within 1 to 2 working days. Please be patient as we make every effort to help you to resolve the issue.
Working Time: 9 AM - 6 PM GMT+8 (Monday to Friday)


