1.3inch LCD HAT
| ||
Introduction
Specification
- Operating voltage: 3.3V
- Interface: SPI
- LCD type: IPS
- Controller: ST7789VM
- Resolution: 240 (H) RGB x 240 (V)
- Display size: 23.4(H)x 23.4(V)mm
- Pixel size: 0.0975(H)x 0.0975(V)mm
- Dimension: 65 x 30.2(mm)
Pinout
| PIN | Raspberry Pi Interface (BCM) | Description |
| KEY1 | P21 | KEY1GPIO |
| KEY2 | P20 | KEY2GPIO |
| KEY3 | P16 | KEY3GPIO |
| Joystick UP | P6 | Upward direction of the Joystick |
| Joystick Down | P19 | Downward direction of the Joystick |
| Joystick Left | P5 | Left direction of the Joystick |
| Joystick Right | P26 | Right direction of the Joystick |
| Joystick Press | P13 | Press the Joystick |
| SCLK | P11/SCLK | SPI clock line |
| MOSI | P10/MOS | SPI data line |
| CS | P8/CE0 | Chip selection |
| DC | P25 | Data/Command control |
| RST | P27 | Reset |
| BL | P24 | Backlight |
LCD and the controller
The ST7789VW is a single-chip controller/driver for 262K-color, graphic type TFT-LCD. It consists of 240
source line and 320 gate line driving circuits. The resolution of this LCD is 240 (H) RGB x 240(V), it supports horizontal mode and vertical mode, and it doesn't use all the RAM of the controller.
This LCD accepts 8-bits/9-bits/16-bits/18-bits parallel interface, that are RGB444, RGB565, RGB666. The color format used in demo codes is RGB565.
This LCD use a 4-line SPI interface for reducing GPIO and fast speed.LCD
Working Protocol

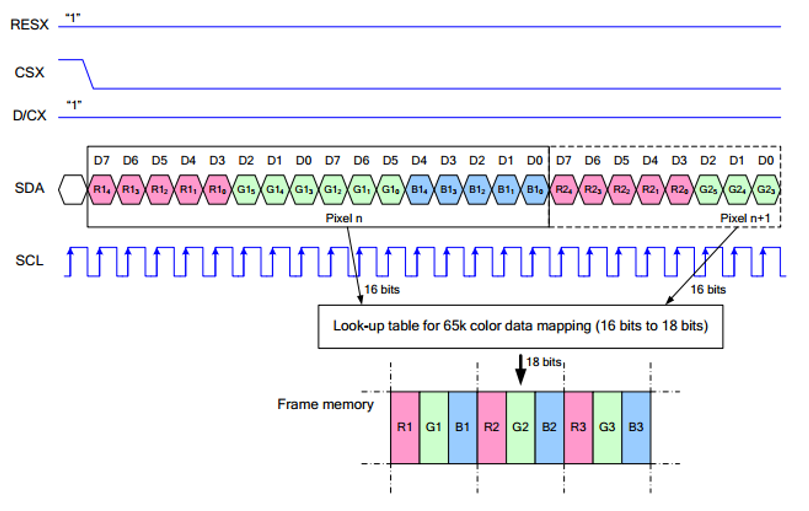
Note: Different from the traditional SPI protocol, the data line from the slave to the master is hidden since the device only has display requirement.
RESX Is the reset pin, it should be low when powering the module and be higher at other times;;
CSX is slave chip select, when CS is low, the chip is enabled.
D/CX is data/command control pin, when DC = 0, write command, when DC = 1, write data
SDA is the data pin for transmitting RGB data, it works as the MOSI pin of SPI interface;
SCL worka s the SCLK pins of SPI interface.
SPI communication has data transfer timing, which is combined by CPHA and CPOL.
CPOL determines the level of the serial synchronous clock at idle state. When CPOL = 0, the level is Low. However, CPOL has little effect to the transmission.
CPHA determines whether data is collected at the first clock edge or at the second clock edge of serial synchronous clock; when CPHL = 0, data is collected at the first clock edge.
There are 4 SPI communication modes. SPI0 is commonly used, in which CPHL = 0, CPOL = 0.
Working with Raspberry pi
We provide C and python examples
Enable SPI interface
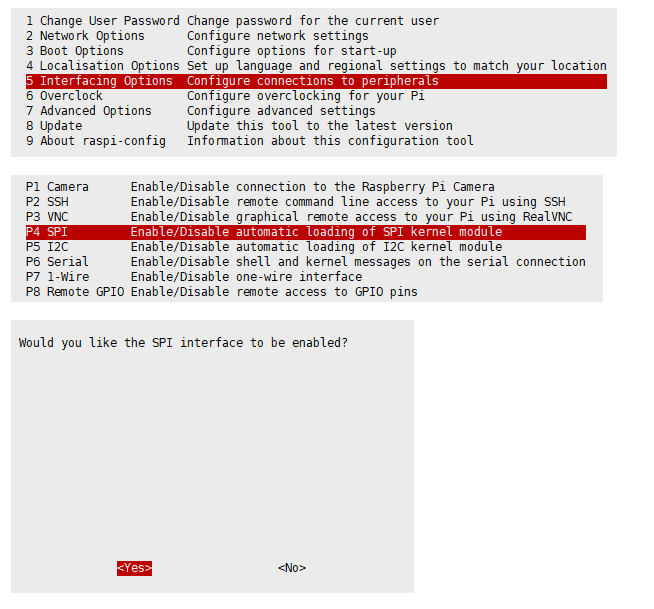
- Open terminal, use command to enter the configuration page
sudo raspi-config
Choose Interfacing Options -> SPI -> Yes  to enable SPI interface
sudo reboot
Please make sure that the SPI interface was not used by other devices, you can check in the /boot/config.txt
If you use bookworm system, only the lgpio library is available, bcm2835 and wiringPi libarary cannot be installed or used. Please note that the python library does not need to be installed, you can directly run the demo.
BCM2835
#Open the Raspberry Pi terminal and run the following commands:
wget http://www.airspayce.com/mikem/bcm2835/bcm2835-1.71.tar.gz
tar zxvf bcm2835-1.71.tar.gz
cd bcm2835-1.71/
sudo ./configure && sudo make && sudo make check && sudo make install
# For more information, please refer to the official website: http://www.airspayce.com/mikem/bcm2835/
wiringPi
#Open the Raspberry Pi terminal and run the following commands:
cd
sudo apt-get install wiringpi
#For Raspberry Pi systems after May 2019 (those earlier may not require execution), an upgrade may be necessary:
wget https://project-downloads.drogon.net/wiringpi-latest.deb
sudo dpkg -i wiringpi-latest.deb
gpio -v
# Run gpio -v and version 2.52 will appear. If it does not appear, there is an installation error

#Bullseye branch system uses the following command:
git clone https://github.com/WiringPi/WiringPi
cd WiringPi
./build
gpio -v
# Run gpio -v and version 2.70 will appear. If it does not appear, there is an installation error
lgpio
sudo su
wget https://github.com/joan2937/lg/archive/master.zip
unzip master.zip
cd lg-master
sudo make install
# For more information, please refer to the official website: https://github.com/gpiozero/lg
Python
sudo apt-get update
sudo apt-get install python3-pip
sudo apt-get install python3-pil
sudo apt-get install python3-numpy
sudo pip3 install spidev
Download Examples
Open the Raspberry Pi terminal and run the following command:
sudo apt-get install p7zip-full -y
wget https://files.waveshare.com/upload/b/bd/1.3inch_LCD_HAT_code.7z
7z x 1.3inch_LCD_HAT_code.7z -r -o./1.3inch_LCD_HAT_code
sudo chmod 777 -R 1.3inch_LCD_HAT_code
cd 1.3inch_LCD_HAT_code
Run the demo
- C
cd c
make clean
make
sudo ./main
- For Raspberry Pi 4B and system version after raspbian_lite-2019-06-20, please set as following for normal input:
sudo nano /boot/config.txt
And then add the following line at the end of the config.txt.
gpio=6,19,5,26,13,21,20,16=pu
- python
cd python
sudo python main.py
sudo python key_demo.py
FBCP Driver
The Framebuffer uses a memory area to store the display content, and changes the data in the memory to change the display content.
There is an open-source project on github: fbcp-ili9341. Compared with other fbcp projects, this project uses partial refresh and DMA to achieve a refresh rate of up to 60fps.
Environment Configuration
Raspberry Pi's vc4-kms-v3d will cause fbcp to fail, so we need to close vc4-kms-v3d before installing it in fbcp.
sudo nano /boot/config.txt
Just block the statement corresponding to the picture below.

A reboot is then required.
sudo reboot
Compile and Run
cd ~
sudo apt-get install cmake -y
sudo apt-get install p7zip-full -y
wget https://files.waveshare.com/upload/f/f9/Waveshare_fbcp.7z
7z x Waveshare_fbcp.7z -o./waveshare_fbcp
cd waveshare_fbcp
mkdir build
cd build
If you are using 1.44inch_LCD_HAT:
cmake -DSPI_BUS_CLOCK_DIVISOR=20 -DWAVESHARE_1INCH44_LCD_HAT=ON -DBACKLIGHT_CONTROL=ON -DSTATISTICS=0 ..
If you are using 1.3inch_LCD_HAT:
cmake -DSPI_BUS_CLOCK_DIVISOR=20 -DWAVESHARE_1INCH3_LCD_HAT=ON -DBACKLIGHT_CONTROL=ON -DSTATISTICS=0 ..
Then
make -j
sudo ./fbcp
Auto-start when Power on
sudo cp ~/waveshare_fbcp/build/fbcp /usr/local/bin/fbcp
sudo nano /etc/rc.local
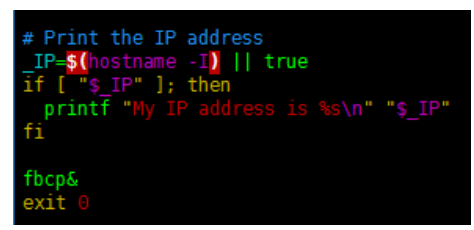
And then add fbcp& before exit 0, as the picture below.

Set the Display Resolution
Set the user interface display size in the /boot/config.txt file.
sudo nano /boot/config.txt
Then add the following lines at the end of the config.txt.
hdmi_force_hotplug=1
hdmi_cvt=300 300 60 1 0 0 0
hdmi_group=2
hdmi_mode=87
display_rotate=0
【Note】If you are using Raspberry Pi 4B, you need to comment out the following lines on the [pi4] part. The modification is as below:
[pi4]
# Enable DRM VC4 V3D driver on top of the dispmanx display stack
#dtoverlay=vc4-fkms-v3d
#max_framebuffers=2
And then reboot the system:
sudo reboot
The final display effect is scaled and displayed on the 1.3-inch LCD in proportion. The setting of the resolution here should be slightly larger than the LCD resolution, too high resolution will cause the font display to be blurred.
After rebooting the system, the Raspberry Pi OS user interface will be displayed.
Analog Mouse
There are a joystick and three buttons on the panel of the module, which we can use to control the mouse of the Raspberry Pi
- Install the library, then download and run the demo
#python2
sudo apt-get install python-xlib
sudo pip install PyMouse
wget https://files.waveshare.com/upload/d/d3/Mouse.7z
7z x Mouse.7z
sudo python mouse.py
#python3
sudo apt-get install python3-xlib
sudo pip3 install PyMouse
sudo pip3 install unix
sudo pip3 install PyUserInput
wget http://www.waveshare.net/w/upload/d/d3/Mouse.7z
7z x Mouse.7z
sudo python3 mouse.py
- 【Note】The mouse.py needs to run under the graphical interface, which will not run under the SSH login. You can skip this step directly, the Pi will run the demo automatically by booting up.
- If you are using the Raspberry PI 4B and the version of your image is after raspbian_lite-2019-06-20, you need to set as below:
sudo nano /boot/config.txt
And then add the following line at the end of the config.txt.
gpio=6,19,5,26,13,21,20,16=pu
Use the joystick to move up, down, left, and right, you can see that the mouse is moving.
- Set the auto-start when power on
cd .config/
mkdir autostart
cd autostart/
sudo nano local.desktop
And then add the following lines at the end of the local.desktop
#python2
[Desktop Entry]
Type=Application
Exec=python /home/pi/mouse.py
#python3
[Desktop Entry]
Type=Application
Exec=python3 /home/pi/mouse.py
Reboot the system, you can use the buttons to control the mouse.
sudo reboot
Others
For connecting to the game machine, you can refer to the following links:
https://www.sudomod.com/forum/viewtopic.php?f=11&t=5371&start=10
https://pi0cket.com/guides/tiny-software-for-tinypi/#more-99
Resource
Document
Demo
Relate Resources
Software
Datashee
FAQ
flexfb
fbtft_device
to
#flexfb
#fbtft_device
Then restart the raspberry pi
{{{5}}}
{{{5}}}
Wiring Connection LCD and EPS32 board: LCD -> ESP32 DIN -> 23 CLK -> 18 CS -> 5 DC -> 4 RST -> 0
{{{5}}}
Support
Technical Support
If you need technical support or have any feedback/review, please click the Submit Now button to submit a ticket, Our support team will check and reply to you within 1 to 2 working days. Please be patient as we make every effort to help you to resolve the issue.
Working Time: 9 AM - 6 PM GMT+8 (Monday to Friday)


