13.3inch PiPad C4
| ||
Overview
This is a 13.3-inch touch all-in-one computer with a built-in Raspberry Pi CM4, which can browse web pages, play small games, etc., with 1920 x 1080 HD resolution, with a toughened glass capacitive touch panel.
| more |
Features
- 13.3inch IPS screen,1920 x 1080 high resolution.
- Embed Raspberry Pi CM4 as controller, quad-core 64-bit Cortext-A72 [email protected], Dual-band WiFi, Bluetooth5.0.
- Toughened glass capacitive touch panel, up to 6H hardness, supports up to 10-point touch.
- Support displaying news, weather, and time.
- Embedded ferrite Hi-Fi speaker, high-quality MEMS silicon microphone, with 3.5mm audio jack.
- Embedded microphone and speaker.
- 75 x 75mm spacing mounting holes (M4 screw hole).
- Comes with 75° tilt angle stand.
Difference between Magic Mirror and Pipad
The only difference between the Magic Mirror and the Pipad is that the Magic Mirror uses a single-side mirror and the Pipad uses Toughened Glass.
Click here to see how to install the mirror system.
Write Raspberry Pi OS
- Download the lasted Raspberry Pi OS image from the Rasberry Pi website and write it to an empty micro SD card.
- Create a new Txt file under the BOOT directory of the micro SD card and name it SSH.
- Modify the config.txt file which is located in the BOOT directory, and add the following lines to the config.txt file.
hdmi_group=2
hdmi_mode=82
hdmi_cvt 1920 1080 60 6 0 0 0
- Save and insert the micro SD card into Raspberry Pi.
- Connect the Magic mirror to the network and power on Raspberry Pi.
- After booting, you can access Raspberry Pi via SSH/VNC, or directly connect the keyboard and mouse.
Check the USB Audio Card
- Test the sound output device:
aplay -l
- Test the sound input device:
arecord -l
USB2.0
To reduce consumption, USB interfaces are disabled in CM4 by default. If you need to use USB ports, please add the following line to the config.txt file.
dtoverlay=dwc2,dr_mode=host
Then reboot the CM4. If you use the newest Bullseye image, the USB2.0 is set to OTG mode by default, and occurs the error in CM4:
config failed, hub doesn't have any ports! (err -19)
To remove the errors, you can remove the line otg_mode=1 from the config.txt file and add the line:
dtoverlay=dwc2,dr_mode=host
Kepp Display Always On
- Modify lightdm.conf.
sudo vi /etc/lightdm/lightdm.conf
- Find the line "Xserver-command" below the [SeatDefaults] section and change it from:
#xserver-command=X
to
xserver-command=X -s 0 -dpms
- -s # – set screen saver not enabled.
- dpms turn off power saving management.
- Then save and reboot:
sudo reboot
RS232
In /boot/config.txt, add dtoverlay=uart3.
sudo nano  /boot/config.txt
dtoverlay=uart3
#device name /dev/ttyAMA1
RS485
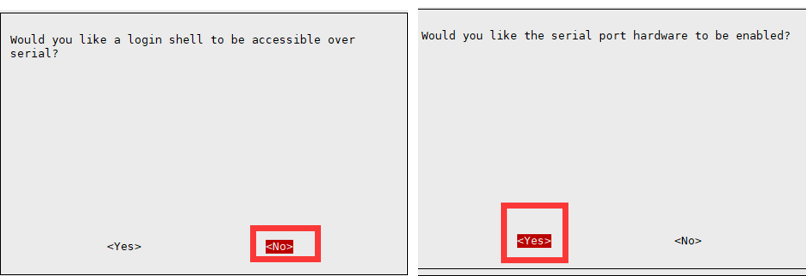
Open the Raspberry Pi terminal and enter the following command to access the configuration screen.
sudo raspi-config
#Select Interfacing Options -> Serial, disable shell visit, and enable hardware UART port.
#Device name: /dev/ttyS0
Keys Description
- 1: Turn on or off the LCD. If you don't need the LCD for a long time, you can use this button to reduce consumption.
- 2: Direction button.
- 3: "OK" function.
- 4: Open the menu and the "Return" function.
Resources
3D Drawings
Software
FAQ
12V 1A outer diameter 3.5 and inner diameter 1.35. If you want to use other power supplies, you need to ensure that the power supply ripple is within ±5%.
Support
Technical Support
If you need technical support or have any feedback/review, please click the Submit Now button to submit a ticket, Our support team will check and reply to you within 1 to 2 working days. Please be patient as we make every effort to help you to resolve the issue.
Working Time: 9 AM - 6 PM GMT+8 (Monday to Friday)


