UART GPS NEO-6M
| ||
Introduction
UART GPS Module, u-blox NEO-6M onboard, curved/horizontal pinheader
| More |
Parameters
| Receiver type: | 50 channels, GPS L1(1575.42Mhz) C/A code, SBAS:WAAS/EGNOS/MSAS |
| Horizontal position accuracy: | 2.5mCEP (SBAS:2.0mCEP) |
| Navigation update rate: | 5Hz maximum (1HZ default) |
| Capture time: | Cool start: 27s (fastest);Hot start: 1s |
| Tracking & Navigation sensitivity: | -161dBm |
| Communication protocol: | NMEA(default)/UBX Binary |
| Serial baud rate: | 4800, 9600(default), 19200, 38400, 57600, 115200, 230400 |
| Operating temperature: | -40℃ ~ 85℃ |
| Operating voltage: | 2.7V~5.0V(power supply input via VCC) |
| Operating current: | 45mA |
| TXD/RXD impedance: | 510Ohms |
Applications
Thismodule can be applied to navigator, aircraft positioning, etc.
Hardware
- A computer with Windows XP/Win7/Win8 OS;
- An USB to TTL serial module, such as FT232, PL2303, CP2102, etc. If there is a native serial port in the computer, a DB9 to TTL serial module may be used;
- A UART GPS NEO-6M module.
How to use
- Connect the UART GPS NEO-6M module to a serial module. FT232 is applied as the serial module in this document.
The connection between the GPS module and the serial module is listed as the table below.
| UART GPS NEO-6M module pins | Serial module pins |
| VCC | 3.3V/5V |
| GND | GND |
| TXD | RX |
| RXD | TX |
| PSS* |
- PPS should be connected to the clock pulse output (CPOUT) of a MCU. However, this pin is unconnected, in the case that the GPS module is connected to a computer.
- Connect the serial module to the computer.
- Start the serial debugging assistant, and set the serial port as below:
- Select the corresponding serial port in the Port No option. In this example, COM8 is selected.
- Baud rate: 9600(default).
- 8 data bits, 1 stop bit, no parity and no flow control.
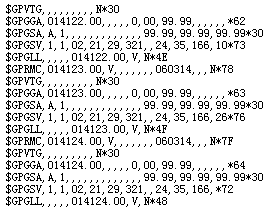
- After finishing the settings, you can see the serial debugging assistant will showman data in its window, as the figure shows below.
The data shown in the figure above means that the connection is established successfully, but it is unable to perform positioning.
In this case, please place the GPS module to the balcony or near the window, or outdoors for testing, because GPS is less stable in searching signal indoors.
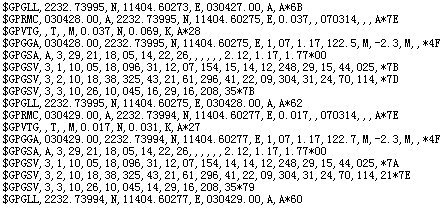
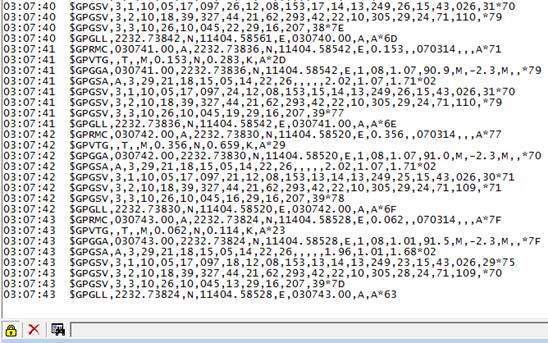
- After waiting for a while, if the serial debugging assistant lists similar data inits window as the figure shows below, it means GPS has performed positioning.And you can see that the LED on the module, which remains on when GPS is unable to perform the positioning, is flickering now.
Notice: For its first positioning after cold starts, GPS module normally takes 1-3 minutes to finishing this positioning successfully in the open air with a good weather. So, please be patient. Moreover, if there is a bad weather, it may take more time for positioning, or even unable to perform positioning sometimes.
- Installsoftware\u-centersetup-7.0.2.1\u-centerSetup-7.0.2.1.exe (please ensure you computer is connected to Internet).
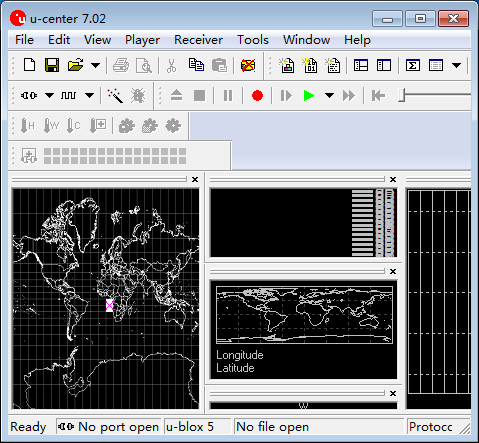
Start the software, u-center, and you can see the interface as the figure shows below.
- Click Receiver menu, and select Port option to configure the actual serial port number and Baud rate: 9600(default).
Click the button
to connect to the NEO-6M GPS module.
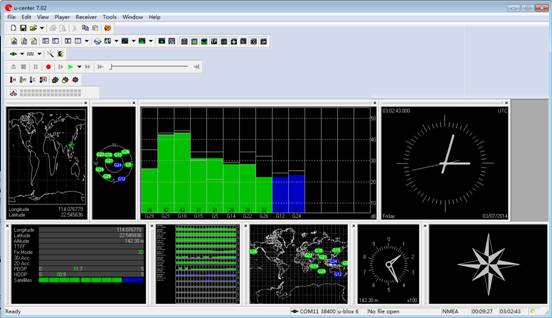
u-center will show the information as below:
- Install aplug-in, GoogleEarthPluginSetup.exe, for a better view. After finishing the installation, select Google Earth under the View menu in the u-center.
Notes: There may be some differences between the reality and the result shown by Google Earth, because of GPS static drift.
Appendix
How tomodify the baud rate via u-center?
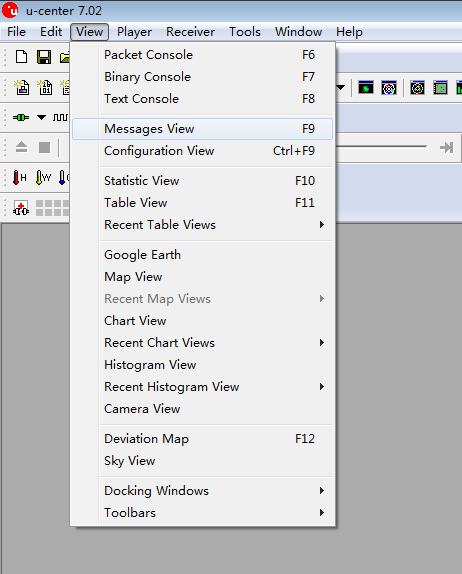
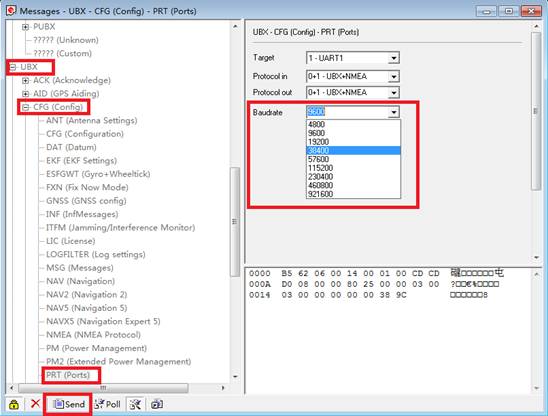
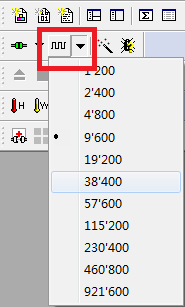
- Select View->Messages View, and unfold UBX->CFG(Config)->PRT(Ports). Then choose the baud rate you want to use in the Baud rate option, and click the button Send tocomplete the modification. The figures below show the steps in details.
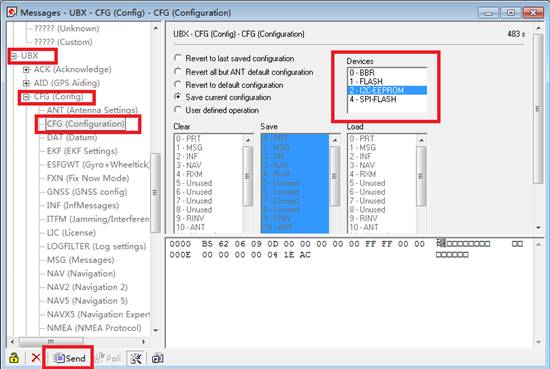
- Rightnow, if the module is powered off, the setting of the baud rate will be restored to 9600. To remain the settings, you should save the configuration information into the memory, following the steps listed below.
a) Configurethe baud rate, as the figure below shows.
b) UnfoldUBX->CFG(Config)->CFG(Configuration), and then select 2-I2CEEPROM in the Devices option. Click the button Send to save the configuration. The figure below shows the steps in details.
 After a successful positioning, you will receive a lot of information, as the figure shows below.
What are the meanings of the information?
We will illustrate these information with an example of $GPRMC,030742.00,A,2232.73830,N,11404.58520,E,0.356,,070314,,,A*77
- Firstly, open the document chip PDF\NMEA0183.pdf
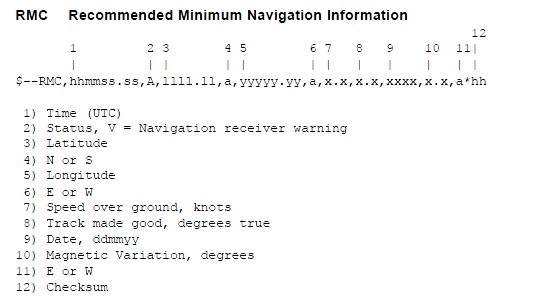
Secondly, find the relative explanations of GPRMC, as the figure shows.
- The meaning of each field in
$GPRMC,030742.00,A,2232.73830,N,11404.58520,E,0.356,,070314,,,A*77 is listed as below.
| 030742.00 | UTC time; since the test location is Eastern eight zones, the actual time should be 03+8=11(hour):07(minute):42(second) |
| A | Position state; it indicates valid |
| 2232.73830 | Latitude value |
| N | The Northern Hemisphere |
| 11404.58520 | Longitude value |
| E | The Eastern Hemisphere |
| 0.356 | Ground speed; 0.356knot (1knot =1 nautical mile per hour,which is equivalent to 0.5m per second) |
| 070314 | UTC date; it indicates 7th March, 2014 |
| A | Mode indication; it is in Assist Now Autonomous mode |
| 77 | Checksum; it is the result of XOR operation on the ASCII code of all the characters between $ and * |
- For more detail instructions about u-center, please refer to GPS Datasheets.
Resources
GPS Application notes
GPS-6M Application notes
- NEO-6 DataSheet
- NEO-6 ProductSummary
- LEA-6 NEO-6 MAX-6 HardwareIntegrationManual
- U-Blox-6 Receiver Description Including Protocol Specification
Software
FAQ
- Start the u-center to configure the settings of Port and Baud rate
- Select View->Messages View, and then a window will pop out. Select UBX->CFG(Config)->RATE(Rates)
- Enter “200” in the option Measurement Period
- Click the button Send to transmit the command to the GPS module. Now, the update rate is modified to 5Hz.
- For data save on power down, select UBX->CFG(Config)->CFG(Configuration)
- Select the option Save current configuration, and then choose the option 2-I2C-EEPROM in the Devices box.
- Click the button Send to save the current configuration to EEPROM.
{{{5}}}
- Select View->Messages View, and then a window will pop out. Select UBX->CFG(Config)->PRT(Ports)
- Set a new Baud rate in the option Baudrate
- Click the button Send to transmit the command to the GPS module. Now, the Baud rate is modified to the new setting.
{{{5}}}
- Select View->Messages View, and then a window will pop out. Select UBX->CFG(Config)->MSG(Messages)
- Select the outputted information in the option Messages View, such as F0-01 NMEA GxGLL
- If the option UART1 is deselected, this information will be masked.Click the button Send to transmit the command to the GPS module. Now, this information is masked.
{{{5}}}
- Select View->Messages View, and then a window will pop out. Select UBX->CFG(Config)->TP(Timepulse)
- Configure the setting in the option Pulse Lenth
- Click the button Send to transmit the command to the GPS module. Now, the outputted clock pulse is modified to the new setting.
{{{5}}}
Support
If you require technical support, please go to the Support page and open a ticket.

