L76X GPS HAT
| ||
Introduction
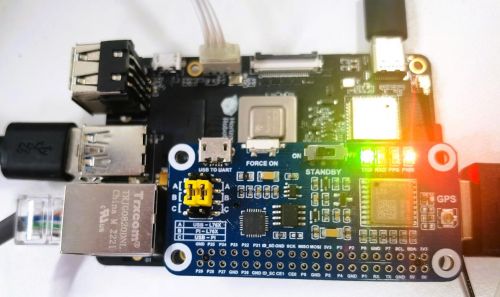
L76X GPS HAT is a HAT with GNSS (Global Navigation Satellite System) function for Raspberry Pi, Jetson Nano, and Sunburst® X3 PI, supports GPS, BD2, and QZSS positioning systems, with the advantages of small size, low power consumption, fast positioning. With this HAT, your board will be able to easily achieve a global positioning program that provides support for the calibration algorithm of the Baidu map with high accuracy.
Specifications
- Receiving Channel: 33 tracking channels, 99 capture channels, and 210 PRN channels
- Receiving Signal: GPS, BD2, and QZSS
- SBAS Support: WAAS, EGNOS, MSAS, GAGAN
- Signal Frequency: GPS L1(1575.42Mhz) BD2 B1 (1561.098MHz) C/A Code
- Capturing Time: Cold start: 10s (Max.); Hot start: 1s
- Capturing Frequency: -148dBm
- Tracking Frequency: -163dBm
- Re-capturing Frequency: -160dBm
- Positioning Accuracy: <2.5mCEP
- Maximum Altitude: 18000(M)
- Maximum Velocity: 515m/s
- Logic Level: 3.3/5V
- Communication Interface: UART
- UART Baudrate: 4800~115200 (default 9600)
- Refreshing Rate: Max. 10Hz (default 1HZ)
- Communication Protocol: NMEA 0183 /PMTK
- Operating Voltage: 2.7V~5V (Power input from 5V pin)
- Operating Current: 13mA
- Operating Temperature: -40℃ ~ 85℃
- Dimensions: 65 x 30.5(mm)
| More |
Hardware Introduction
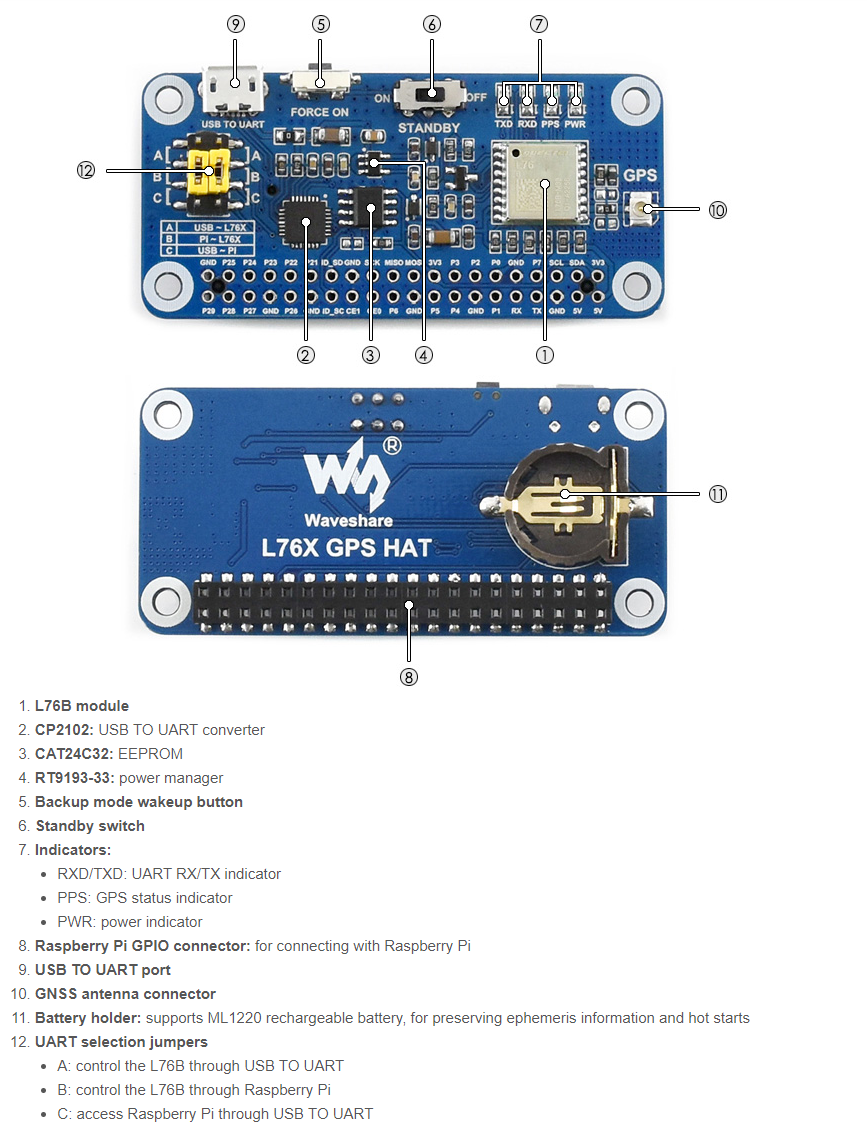
Standby mode: The module can be put into standby mode using the STANDBY switch, which is a low-power mode. In standby mode, the module stops satellite search and navigation and no positioning information (NMEA messages) is output, but it can be accessed via PMTK commands or any other data.
Backup mode: Pressing the key FORCE ON allows the module to exit the backup mode. Compared to standby mode, backup mode consumes less power. In backup mode, the module stops acquiring and tracking satellites. UART1 is not accessible. However, the backup memory in the RTC domain (including all GPS information needed for fast startup and a few user configuration variables) is acquired. The EASYTM self-generated orbit prediction function is supported for fast positioning. In this mode, the module current is about 7uA. The only way to wake up in backup mode is to pull the FORCE_ON pin high.
CAT24C32: The purpose of this chip is to provide an ID EEPROM for the Raspberry Pi (including vendor information, GPIO mapping, and valid device tree information). This was added because of the micro-HAT (uHAT) specification introduced by the Raspberry Pi (see specific reference). To ensure consistency and compatibility with future Raspberry Pi add-on boards, and to provide a better user experience.
Note: We are not using it here, so ignore it!
Windows UART Debug
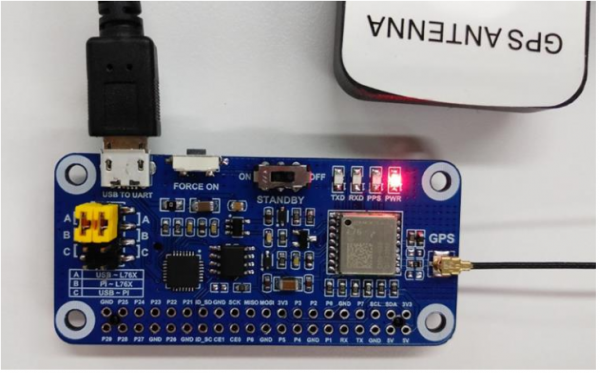
- Install CP2102 driver, switch the serial port of the module to A (yellow cap), and then communicate through USB and L76B.
- As shown below, connect the antenna, USB cable, and PC. After connecting, you can see the PWR indicator is always on.
- Place the other end of the antenna where you can see the sky.
- Wait for 1s, the TXD indicator starts to flash meaning the data transmission.
- Open the PC serial debugging assistant, set the corresponding serial port number (COM5 in my case), baud rate 9600, 8 bits of data, 1 bit of stop bit, no parity bit, and no flow control.
- Click SSCOM Serial Assistant to download.
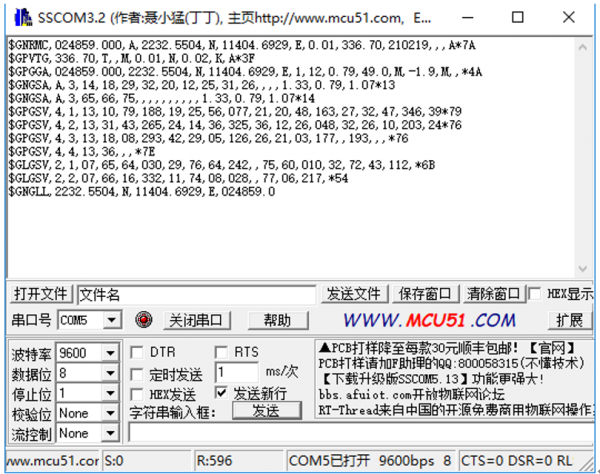
Note: 1. Since GPS indoor star search is not stable, please put the module or antenna next to the balcony or window, or experiment directly outdoors.
2. The first time the module is positioned (cold start), under normal conditions (outdoor, good weather, no large buildings blocking), it takes 35 seconds to position successfully, please wait patiently. If the weather conditions are not good, it may take a longer time for positioning, or even impossible to position.
Note: Due to the static drift of GPS, there will be errors between the results seen on Google Earth and the actual ones. The error of the Baidu coordinates calculated by using the demo is particularly small.
Working with Raspberry Pi
Provide C and Python demos for Raspberry Pi.
Enable UART Port
Enable the Raspberry Pi terminal and input the following commands to the config interface:
sudo raspi-config
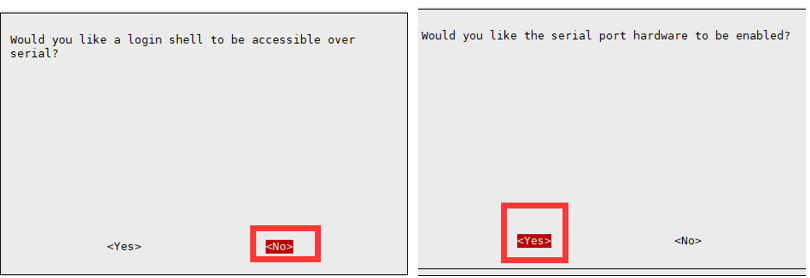
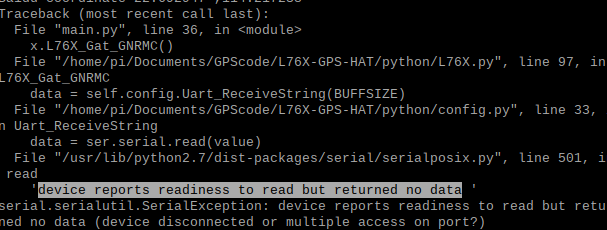
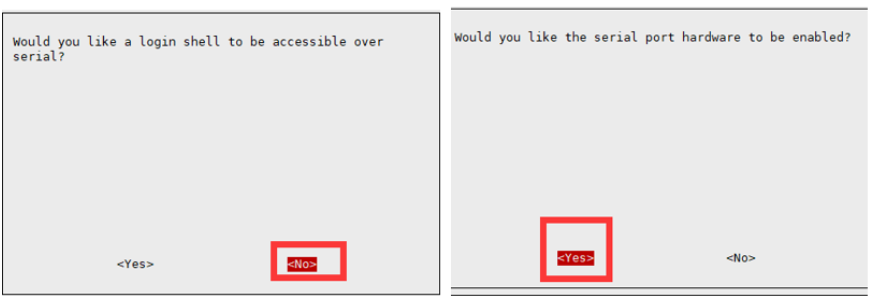
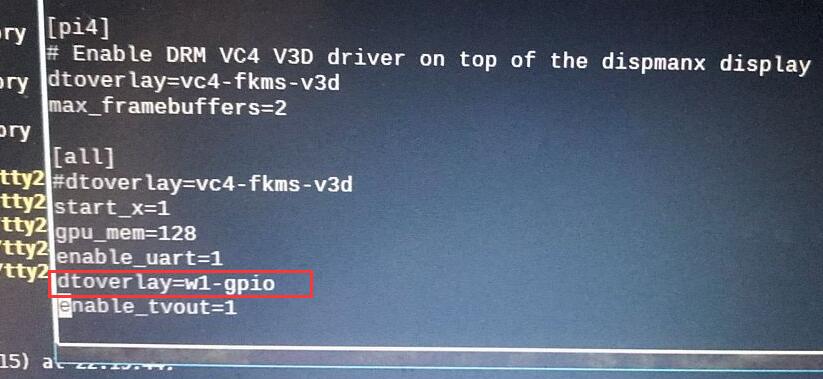
Choose Interfacing Options -> Serial, close shell visit, open the hardware serial port
Install Library
If you use bookworm system, only the lgpio library is available, bcm2835 and wiringPi libarary cannot be installed or used. Please note that the python library does not need to install, you can directly run the demo.
BCM2835
#Open the Raspberry Pi terminal and run the following command
wget http://www.airspayce.com/mikem/bcm2835/bcm2835-1.71.tar.gz
tar zxvf bcm2835-1.71.tar.gz
cd bcm2835-1.71/
sudo ./configure && sudo make && sudo make check && sudo make install
# For more, you can refer to the official website at: http://www.airspayce.com/mikem/bcm2835/
WiringPi
#Open the Raspberry Pi terminal and run the following command
cd
sudo apt-get install wiringpi
#For Raspberry Pi systems after May 2019 (earlier than that can be executed without), an upgrade may be required:
wget https://project-downloads.drogon.net/wiringpi-latest.deb
sudo dpkg -i wiringpi-latest.deb
gpio -v
# Run gpio -v and version 2.52 will appear, if it doesn't it means there was an installation error

# Bullseye branch system using the following command:
git clone https://github.com/WiringPi/WiringPi
cd WiringPi
. /build
gpio -v
# Run gpio -v and version 2.70 will appear, if it doesn't it means there was an installation error
lgpio
wget https://github.com/joan2937/lg/archive/master.zip
unzip master.zip
cd lg-master
sudo make install
#for more details, you can refer to https://github.com/gpiozero/lg
Python
sudo apt-get update
sudo pip install RPi.GPIO
sudo apt-get install python-serial
sudo apt-get install gpsd gpsd-clients python-gps
Hardware Connection
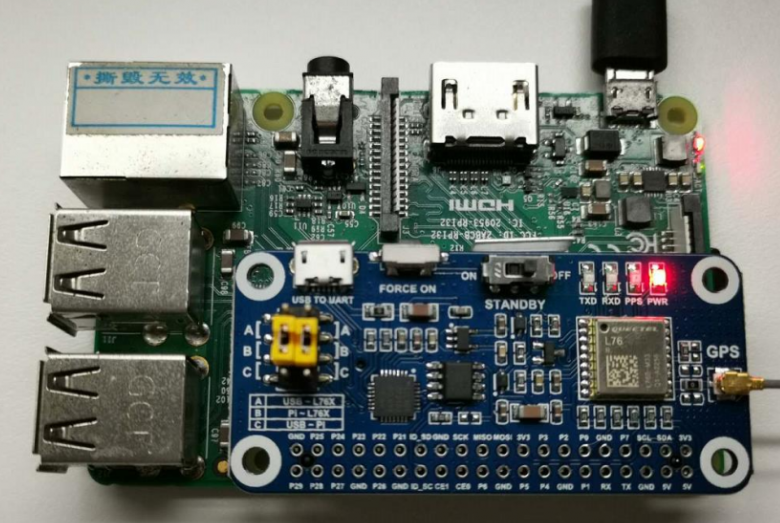
- Directly insert the module into the Raspberry Pi, and connect the yellow jumper cap to the B position.
Minicom Debug
- Install minicom debug assistant:
sudo apt-get install minicom
# For Raspberry Pi 3B\3B+\4B
sudo minicom -D /dev/ttyS0 -b 9600
# For Raspberry Pi ZERO\2B
sudo minicom -D /dev/ttyAMA0 -b 9600
The default baud rate is 115200, and if the setting baud rate is 9600 plus -b 9600, -D represents the port, /dev/ ttySO is similar to the COM1 of the windows. If it is not Raspberry Pi 3, it should be minicom -D /dev/ttyAMA0, and then connect the module to the Raspberry Pi.
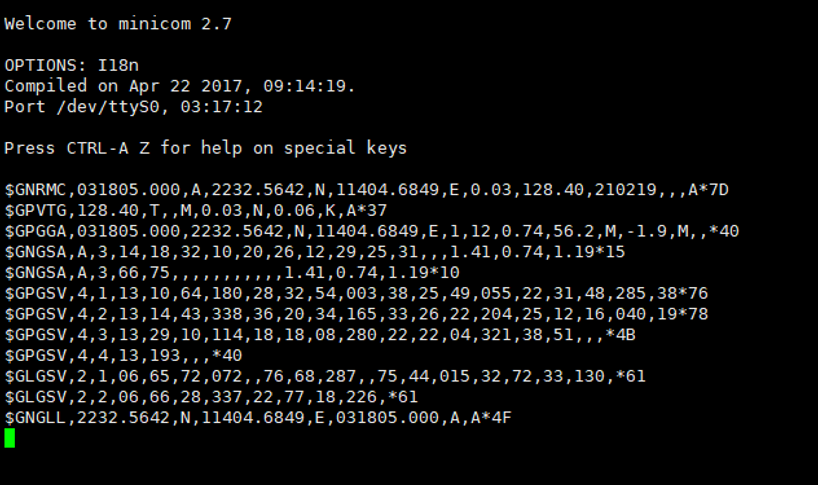
Exit: Ctrl + A and then independently press X, YES and Enter.
Example Demo
- Download the demo:
wget  https://files.waveshare.com/upload/f/f4/L76X_GPS_HAT_Code.zip
unzip L76X_GPS_HAT_Code.zip
sudo chmod 777 -R L76X_GPS_HAT_Code
cd L76X_GPS_HAT_Code/RaspberryPi
- C demo:
cd wiringPi
make clean
make
sudo ./main
- Python demo
cd python
sudo pip3 install pynmeagps
sudo pip3 install gps3
sudo python3 main.py
- Expected Result
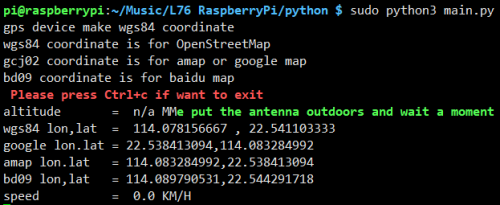
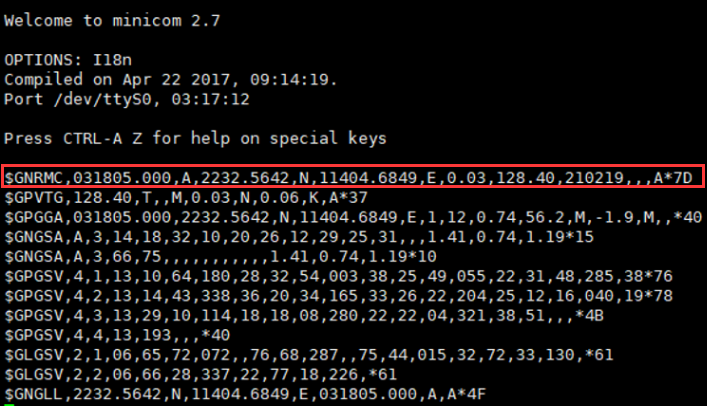
It takes 35 seconds for the module to be positioned for the first time. The front is the raw data output by the module. Time is the time output by the L76X GPS Module. Latitude and longitude are the output latitude and longitude and the directions of latitude and longitude. You can go to Baidu Coordinates System for the latitude and longitude position of the program that needs to be replaced, for example, 116.307629, 40.058359 should be changed to: 40.058359, 116.307629 (Baidu Coordinates System puts the longitude first).
Working with Sunrise X3 PI
Hardware Connection
- Insert the jumper cap in the B area.
- Plug the L76x GPS HAT directly on the 40PIN of the X3 PI.
Install Library
- Using the terminal, install the library with the following command:
sudo pip3 install pynmeagps
sudo pip3 install gps3
sudo apt-get install python3-serial
sudo apt-get install gpsd gpsd-clients python3-gps
Test with Minicom
- Install minicom.
sudo apt-get install minicom
sudo minicom -D /dev/ttyS3 -b 9600

Exit: Ctrl+A and then press X, Yes and Enter.
Example Demo
- Download the demo:
wget  https://files.waveshare.com/upload/f/f4/L76X_GPS_HAT_Code.zip
unzip L76X_GPS_HAT_Code.zip
sudo chmod 777 -R L76X_GPS_HAT_Code
cd L76X_GPS_HAT_Code/Sunrise
- Test the program:
sudo python3 main.py
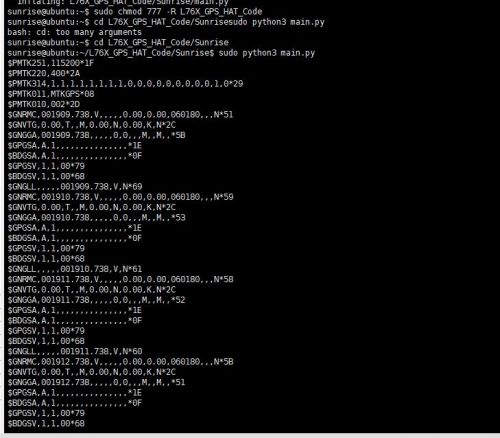
- Expecting result:
It takes 35 seconds to wait for the module to be positioned for the first time.
The front is the raw data output by the module.
Time is the time output by the L76X.
You can go to Baidu Coordinates System for the latitude and longitude position of the program that needs to be replaced, for example, 116.307629, 40.058359 should be changed to: 40.058359, 116.307629 (Baidu picks the coordinate system is the longitude first).
Working with Jetson Nano
Hardware Connection
- Insert the jumper cap in the B area.
- Plug the L76x GPS HAT directly into the 40PIN of the Jetson Nano.
Install Library
Using the terminal, install the library with the following command:
sudo pip3 install pynmeagps
sudo pip3 install gps3
sudo apt-get install python3-serial
sudo apt-get install gpsd gpsd-clients python3-gps
Test with Minicom
- Install minicom.
sudo apt-get install minicom
sudo minicom -D /dev/ttyTHS1 -b 9600

Exit: Ctrl+A and then press X, Yes, and Enter.
Example Demo
- Download the demo.
wget  https://files.waveshare.com/upload/f/f4/L76X_GPS_HAT_Code.zip
unzip L76X_GPS_HAT_Code.zip
sudo chmod 777 -R L76X_GPS_HAT_Code
cd L76X_GPS_HAT_Code/Jetson\ nano/
- Test the demo.
sudo python3 main.py
- Expecting result:
It takes 35 seconds to wait for the module to be positioned for the first time.
The front is the raw data output by the module.
Time is the time output by the L76X.
You can go to Baidu Coordinates System for the latitude and longitude position of the program that needs to be replaced, for example, 116.307629, 40.058359 should be changed to: 40.058359, 116.307629 (Baidu Coordinates System puts the longitude first).
Resources
Documentation
Demo Code
Datasheet
- CAT24C23
- RT9193
- CP2102
- Quectel GNSS Flash EPO Application Note V1.0
- Quectel GNSS FOTA User Guide V1.0
- Quectel GNSS Low Power Mode Application Note V2.0
- Quectel GNSS SDK Commands Manual V1.4
- Quectel L76 GNSS Presentation V1.3
- Quectel L76 Series GNSS Protocol Specification V3.3
Software
FAQ
{{{5}}}
Send the following commands to chafe the baud rate as 115200:
$PMTK251,115200*1F<CR><LF>
Send the following commands to restore the baud rate as 9600:
$PMTK251,9600*17<CR><LF>
{{{5}}}
{{{5}}}
{{{5}}}
{{{5}}}
{{{5}}}
{{{5}}}
{{{5}}}
{{{5}}}
{{{5}}}
{{{5}}}
{{{5}}}
{{{5}}}
{{{5}}}
Support
Technical Support
If you need technical support or have any feedback/review, please click the Submit Now button to submit a ticket, Our support team will check and reply to you within 1 to 2 working days. Please be patient as we make every effort to help you to resolve the issue.
Working Time: 9 AM - 6 PM GMT+8 (Monday to Friday)

