Jetson Xavier NX
| ||
| ||
Overview
Note
If you purchased the kit with a module provided by Waveshare, the system has been pre-burned on the matching EMMC when it leaves the factory. Once you get it you can just power on it to complete the boot configuration.
The pre-burned image does not have an SDK installed, and users need to download and install SDK plug-ins such as Cuda by themselves.
Introduction
NVIDIA Jetson Xavier NX brings supercomputer performance to the edge in a small form factor system-on-module (SOM). Up to 21 TOPS of accelerated computing deliver the horsepower to run modern neural networks in parallel and process data from multiple high-resolution sensors—a requirement for full AI systems. Jetson Xavier NX is production-ready and supports all popular AI frameworks.
Jetson TX2 NX Specification
| GPU | NVIDIA Maxwell™ architecture with 384 NVIDIA CUDA® cores 48 TFLOPS Cores |
|---|---|
| CPU | 6-core NVIDIA Carmel ARM® v8.2 64-bit CPU 6 MB L2 + 4 MB L3 |
| Memory | 8GB/16GB 128-bit LPDDR4x 59.7GB/s |
| Storage | 16 GB eMMC 5.1 Flash / M.2 M KEY NVME SSD Interface |
| Video Encoding | 2x 4K @ 60 4x 4K @ 30 (HEVC) |
| Video Decoding | 2x 8K @ 30 6x 4K @ 60 (HEVC) |
| Camera |
Up to 6 cameras (support up to 24 via virtual channels) |
| Networking |
Wi-Fi requires an external chip |
| Display |
2 x Multimode DP 1.4/eDP 1.4/HDMI 2.0 |
| UPHY | 1 x 1 (PCIe Gen3) + 1 x 4 (PCIe Gen4), 1 x USB 3.0, 2 x USB 2.0 |
| IO | 3 x UART, 2 x SPI, 2 x I2S, 4 x I2C, multiple GPIO headers |
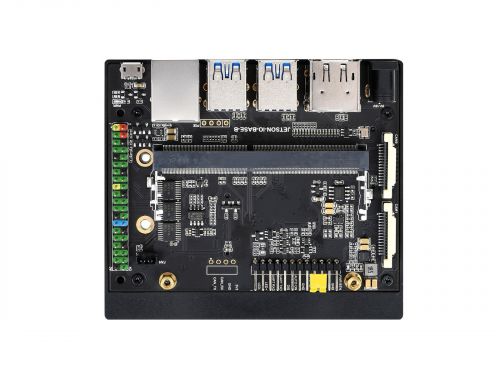
JETSON TX2 NX DEV KIT Onboard Resources
- Jetson Xavier NX Module
- 40PIN GPIO Headers
- Micro USB Interface: For USB data transmission
- Gigabit Ethernet Port: 10/100/1000Base-T self-adaptive Ethernet port
- 4-Ch USB 3.0 port
- HDMI Interface
- DisplayPort Interface
- DC Power Port: For 12~21V power input
- 2-Ch MIPI CSI Camera Port
- Fan Header
System Programming
Note that JETSON Xavier NX DEV KIT and JETSON TX2 NX DEV KIT are paired with the official 16eMMC version of Jetson Xavier NX 16GB/8GB core board without SD card slot. Therefore, the programming system needs to use the Ubuntu 18.04 host and use the SDK Manager tool to program.
Host Environment Configuration
- Programming environment: Ubuntu18.04 host (or virtual device).
In order to download resources, the ubuntu18.04 host used for programming needs to reserve about 100G of memory.
- In order to download resources and program the system normally in the future, please click JOIN in the upper right corner of the NVIDIA DEVELOPER website to register an account first.
- Download the deb file to the Ubuntu computer, then copy the deb file to the user's home directory.
- Open a terminal and run the following program to install sdk manager.
sudo apt install ./sdkmanager_[version]-[build#]_amd64.deb
Note: the [version]-[build#] in the instruction is changed to the actual downloaded file name.
Hardware Configuration (enter recovery mode)
- Use jumper caps or Dupont wires to short-circuit the FC REC and GND pins, as shown in the figure above, at the bottom of the module.
- Connect the DC power supply to the circular power port and wait for a while.
- Use a USB cable (note that it is a data cable) to connect the Micro USB port of the Jetson board to the Ubuntu host.
System Programming
- Open the terminal of the Ubuntu computer and run SDK manager to open the software.
- Log in.
- If Jetson Nano is identified normally, the SDK manager will detect and prompt for options.
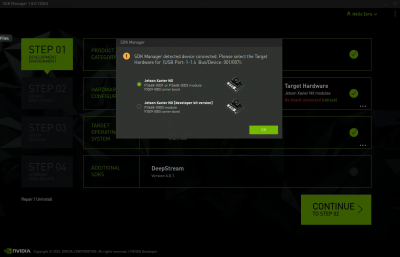
- Select "Jetson Xavier NX" for the development board type. (If you use the official kie, you should select another one.)
- In the JetPack option, select the supported latest system. Do not check other SDKs, and then click "Continue".
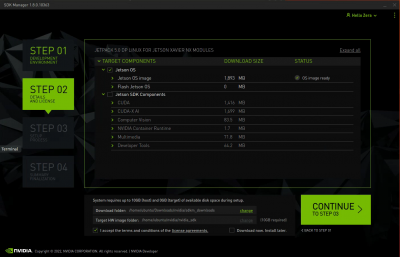
- Select Jetson OS, and remove the option of Jetson SDK Components. Check the first agreement at the bottom.
- Finally, click "Continue" and wait for the programming to finish.
- Starting from JetPack 4.6.1, the "preconfig" window will pop up when using SDK Manager to program the system.
- Here, the development board type is selected by default. Be careful not to make a mistake when selecting the type of development board earlier.
- Here select Manual Setup-Jetson... (Different motherboard suffix prompts are different.)
- Here you can choose runtime or preconfig. If you choose runtime, you need to manually configure the system (username, password, language, etc.) later. If you choose preconfig, you can fill in the username and password (you can define it yourself), and nano will be automatically configured during the startup process.
- After the programming is finished, remove the jumper cap of the carrier board, connect to the monitor, power on again, and follow the prompts to configure the boot (if it is pre-config set, it will directly enter the system after power on).
Set The System To Boot From SSD
- Connect SSD to Jetson Xavier NX, check the device number of SSD, open Jetson Xavier NX terminal and input:
ls /dev/nvme*
For example, you will see nvme0, nvme0n1.
- Format the SSD.
sudo mkfs.ext4 /dev/nvme0n1
- Modify the startup path.
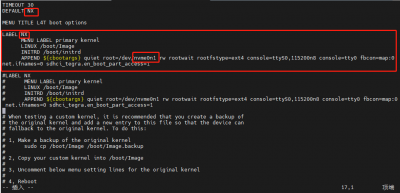
sudo vi /boot/extlinux/extlinux.conf
- Copy the above content and place it under the red box of the file and comment it out with # to prevent modification errors.
- Change the LABEL primary in the uncommented copied content to LABLE NX.
- Find the statement APPEND ${cbootargs} quiet root=/dev/mmcblk0p1 rw rootwait rootfstype=ext4 console=ttyS0,115200n8 console=tty0, change mmcblk0p1 to nvme0n1 and save.
- Then the primary on the second line is changed to NX.
- Mount SSD.
sudo mount /dev/nvme0n1 /mnt
- Copy the system to SSD (please wait patiently for no information to be printed during this process).
sudo cp -ax / /mnt
- Unmount the SSD after the copy is complete (do not remove the SSD).
sudo umount /mnt/
- Restart the system.
sudo reboot
- Enter:
df -h
SDK installation
Jetpack mainly includes system images, libraries, APIs, developer tools, examples, and some documentation. In the SDK Manager software, we first install the OS, which is the system image, and the uninstalled part is the SDK, as shown below:

The SDK includes TensorRT, cuDNN, CUDA, Multimedia API, Computer Vision, and Developer Tools.
- TensorRT: High-performance deep learning inference runtime for image classification, segmentation, and object detection neural networks, which speeds up deep learning inference and reduces convolutional and deconvolutional neural network operations time memory usage.
- cuDNN: The CUDA deep neural network library provides high-performance primitives for deep learning frameworks, including support for convolutions, activation functions, and tensor transformations.
- CUDA: The CUDA toolkit provides a comprehensive development environment for C and C++ developers building GPU-accelerated applications. The toolkit includes compilers for NVIDIA GPUs, math libraries, and tools for debugging and optimizing application performance.
- multimedia API: Jetson Multimedia API provides a low-level API for flexible application development.
- Computer Vision: VPI (Vision Programming Interface) is a software library that provides computer vision/image processing algorithms implemented on PVA1 (Programmable Vision Accelerator), GPU, and CPU, of which OpenCV is used for computer The leading open source library for vision, image processing, and machine learning, now featuring GPU acceleration for real-time operations, with VisionWorks2, a software development kit for computer vision (CV) and image processing.
- Developer Tools: The Developer Tools CUDA toolkit provides a comprehensive development environment for C and C++ developers building GPU-accelerated applications. The toolkit includes compilers for NVIDIA GPUs, math libraries, and tools for debugging and optimizing application performance.
The above are some functions of the SDK. When the previous system is installed, only the basic system is installed. Other JetPack SDK components, such as CUDA, need to be further installed after the system starts normally. Here are the steps to install the SDK. If you want to install this part, please ensure that the TF card or USB flash drive is the main system, because the downloaded content may cause the EMMC disk capacity to run out.
Use SDK Manager to install
When using the SDK Manager to install the SDK, there is no need to set the nano to recovery mode, that is, there is no need to short-circuit the pins.
- Power on and start Nano normally.
- After Jetson Nano enters the system and starts normally, connect the Micro USB interface of Jetson Nano to the Ubuntu host with a USB data cable.
- Ubuntu host computer runs sdkmanager command to open SDK Manager (you need to install SDK Manager first).
- Similar to the previous operation of burning the system, the difference is that in the step, do not check the OS option, but check the SDK' option, and then continue to the installation.
- After downloading resources, a pop-up window will prompt you to fill in the username and password, just fill in the username and password of the nano system.
- Wait for the SDK to be installed successfully.
Use the command to install
Users who do not have Ubuntu or a virtual machine can choose to install directly on Jetson Nano by the following instructions.
sudo apt update
sudo apt install nvidia-jetpack
Linux Basic Operation
Common Command Introduction
File System
sudo
- The sudo command executes commands as a system administrator.
- To use the root user, log in as the waveshare user and execute the following command:
sudo su #Switch to super user
su waveshare #Switch common users
ls
- The "ls" command is used to display the contents of the specified working directory (list the files and subdirectories contained in the current working directory).
- Common commands:
ls
ls -a #Show all files and directories (hidden files starting with . are also listed)
ls -l #In addition to the file name, it also lists the file type, permissions, owner, file size and other information in detail
ls -lh #file sizes are listed in an easy-to-understand format, e.g. 4K
- To learn about more parameters of the command, we can use the "help" command to view:
ls --help
chmod
- The chmod command is for users to control permissions on files.
- The file calling permissions of Linux/Unix is divided into three levels: file owner (Owner), user group (Group), and other users (Other Users).
- In the figure below, the detailed file information under the Linux root directory is displayed. Among these file information, the most important is the first column, which describes in detail the permissions of files and directories, while the third and fourth columns show which user or group the file and directory belong to.
- There are three file attributes in Linux: read-only (r), write (w), and executable (x). However, the above file attributes are divided into 10 small cells, because in addition to the first cell displaying the directory, the other three groups of three cells respectively represent the file owner permissions, permissions within the same group, and other user permissions.
- If d is displayed in the first column, it means that this is a directory; if it is a link file, l is displayed here; if it is a device file, c is displayed.
- The first rwx field: -rwx------ indicates the permissions of the file owner.
- The second rwx field: ---rwx--- indicates user rights within the same workgroup.
- The third rwx field: ------rwx indicates other user rights.
- E.g:
- -rwx rwx rwx means that no matter which user can read, write and execute this file.
- -rw- --- --- Indicates that only the file owner has read and write permissions, but no execute permissions.
- -rw -rw -rw means that all users have read and write rights.
- Symbolic mode
- who (user type)
| who | User Type | Description |
| u | user | file owner |
| g | group | The file owner's group |
| o | others | All other users |
| a | all | User used, equivalent to ugo |
- operator (symbol pattern table)
| Operator | Description | |
| + | Increase permissions for the specified user type | |
| - | Remove the permission of the specified user type | |
| = | Set the settings of the specified user permissions, that is to reset all permissions of the user type |
- permission (symbol pattern table)
| Mode | Name | Description |
| r | read | set to read permission |
| w | write | set to writable permission |
| x | Execute permission | Set as executable permission |
| X | Special execution permission | Set the file permission to be executable only when the file is a directory file, or other types of users have executable permission |
| s | setuid/gid | When the file is executed, set the file's setuid or setgid permissions according to the user type specified by the who parameter |
| t | paste bit | Set the paste bit, only superuser can set this bit, and only file owner u can use this bit |
- Symbolic Pattern Examples
- 1. Add read permissions to all users of the file:
chmod a+r file
- 2. Remove execute permission for all users of the file:
chmod a-x file
- 3. Add read and write permissions to all users of the file:
chmod a+rw file
- 4. Add read, write, and execute permissions to all users of the file:
chmod +rwx file
- 5. Set read and write permissions to the owner of the file, clear all permissions of the user group and other users to the file (space means no permission):
chmod u=rw,go= file
- 6. Add read permission to the user for all files in the directory waveshare and its subdirectory hierarchy, and remove read permission for the user group and other users:
chmod -R u+r,go-r waveshare
- Octal literals.
- The chmod command can use octal numbers to specify permissions. The permission bits of a file or directory is controlled by 9 permission bits, each of which is a group of three, which are read, write, and execute for the file owner (User), read, write, and execute for the user group (Group). Other users (Other) read, write, and execute.
| # | Permissions | rwx | Binary |
| 7 | Read + Write + Execute | rwx | 111 |
| 6 | Read + Write | rw- | 110 |
| 5 | read + execute | rwx | 101 |
| 4 | Read only | r-- | 100 |
| 3 | Write + Execute | -wx | 011 |
| 2 | Write only | -w- | 010 |
| 1 | Only execute | --x | 001 |
| 0 | None | --- | 000 |
- For example, 765 is interpreted as follows:
- The owner's permission is expressed in numbers: the sum of the numbers of the owner's three permission bits. For example, rwx, which is 4+2+1, should be 7.
- The permissions of a user group are expressed in numbers: the sum of the numbers of the permission bits that belong to the group. For example, rw-, which is 4+2+0, should be 6.
- The permission of other users expressed in numbers: the sum of the numbers of other users' permission bits. For example, r-x, which is 4+0+1, should be 5.
- Commonly used digital permission:
- 400 -r------- The owner can read, no one else can operate;
- 644 -rw-r–r-- all owners can read, but only the owner can edit;
- 660 -rw-rw---- Both owner and group users can read and write, others cannot operate;
- 664 -rw-rw-r-- readable by everyone, but editable only by owner and group users;
- 700 -rwx------ The owner can read, write and execute, other users cannot do anything;
- 744 -rwxr–r-- everyone can read, but only the owner can edit and execute;
- 755 -rwxr-xr-x everyone can read and execute, but only the owner can edit;
- 777 -rwxrwxrwx Everyone can read, write and execute (this setting is not recommended).
- For example:
- Add read permissions to all users of the file, and the owner and group users can edit:
sudo chmod 664 file
- Add read permissions to all users of the file, and the owner and group users can edit:
touch
- The touch command is used to modify the time attributes of a file or directory, including access time and change time. If the file does not exist, the system will create a new file.
- For example, in the current directory, use this command to create a blank file "file.txt" and enter the following command:
touch file.txt
mkdir
- The "mkdir" command is used to create directories.
- In the working directory, create a subdirectory named waveshare:
sudo mkdir waveshare
- Create a directory named waveshare/test in the working directory.
sudo mkdir -p waveshare/test
- If the waveshare directory does not already exist, create one. (Note: If the -p parameter is not added in this example, and the original waveshare directory does not exist, an error will occur.)
cd
- Change the current working directory:
cd ..     #Return to the previous directory
cd /home/waveshare #Enter /home/waveshare directory
cd        #return to user directory
cp
- The cp command is mainly used to copy files or directories.
- parameter:
- -a: This option is usually used when copying directories, it preserves links, and file attributes, and copies everything under the directory. Its effect is equal to the combination of dpR parameters.
- -d: keep links when copying. The links mentioned here are equivalent to shortcuts in Windows systems.
- -f: Overwrite existing object files without prompting.
- -i: Contrary to the -f option, give a prompt before overwriting the target file, asking the user to confirm whether to overwrite and answer "y" the target file will be overwritten.
- -p: In addition to copying the contents of the file, also copy the modification time and access rights to the new file.
- -r: If the given source file is a directory file, all subdirectories and files in the directory will be copied.
- -l: Do not copy files, just generate link files.
- Use the command cp to copy all the files in the current directory test/ to the new directory "newtest", and enter the following command:
sudo cp –r test/ newtest
mv
- The mv command is used to rename a file or directory or move a file or directory to another location.
- Parameter:
- -b: When the target file or directory exists, create a backup of it before performing the overwrite.
- -i: If the specified moving source directory or the file has the same name as the target directory or file, it will first ask whether to overwrite the old file. Enter "y" to directly overwrite, and "n" to cancel the operation.
- -f: If the source directory or file specified to be moved has the same name as the target directory or file, it will not be asked, and the old file will be overwritten directly.
- -n: Do not overwrite any existing files or directories.
- -u: The move operation is performed only when the source file is newer than the target file or the target file does not exist.
- Use the command mv to copy the file1 file in the current directory test/ to the new directory /home/waveshare, and enter the following command:
sudo mv file1 /home/waveshare
rm
- The rm command is used to delete a file or directory.
- parameter:
- -i: ask for confirmation one by one before deleting.
- -f: even if the original file attribute is set to read-only, it will be deleted directly without confirming one by one.
- -r: delete the files in the directory and below one by one.
- To delete a file, you can use the "rm" command directly. If you delete a directory, you must use the option "-r", for example:
sudo rm test.txt
- rm: delete the general file "test.txt"? y
sudo rm homework
- rm: cannot delete directory "homework": is a directory.
sudo rm -r homework
- rm: delete the directory "homework"? y
reboot
- The reboot command is used to restart the computer. Changing the configuration of Tinker Board 2 often requires restarting.
- Parameter:
- -n: do not write the memory data back to the hard disk before rebooting.
- -w: don't actually reboot, just write the log to the /var/log/wtmp file.
- -d: do not write logs to the /var/log/wtmp file (-d is included with the -n parameter).
- -f: force reboot, do not call shutdown command.
- -i: stop all network-related devices before rebooting.
- Reboot:
sudo reboot
shutdown
- When the Jetson Nano is turned off, you cannot directly unplug the power cord, because the Tinker Board 2 will use the memory as a temporary storage area. If you directly unplug the power cord, some data in the memory will not have time to be written to the SD card, resulting in data loss. The data on the SD card is lost or damaged, causing the system to fail to boot.
- Parameter:
- -t seconds: set the shutdown procedure after a few seconds.
- -k: don't actually shut down, just send a warning message to all users.
- -r: reboot after shutdown.
- -h: shutdown after shutdown.
- -n: do not use the normal program to shut down, use the forced method to kill all the programs in execution and then shut down by itself.
- -c: cancel the shutdown action that is currently in progress.
- -f: do not do fsck when shutting down (check the Linux file system).
- -F: force fsck action on shutdown.
- time: Set the shutdown time.
- message: The warning message is sent to all users.
- Example:
- Shut down now.
sudo shutdown -h now
- Shutdown after specified 10 minutes.
sudo shutdown -h 10
- restart the computer.
sudo shutdown -r now
- Shut down now.
- No matter which command is used to shut down the system, root user authority is required. If the user uses a common user such as linaro, the sudo command can be used to temporarily obtain root authority.
pwd
- The pwd command displays the name of the current working directory: on Jetson nano, typing "pwd" will output something like "/home/waveshare".
head
- The "head" command displays the beginning of the file, which can be used with "-n" to specify the number of lines to display (default is 10), or with "-c" to specify the number of bytes.
head test.py -n 5
tail
- The tail shows the end of the file. -c bytes or -n lines specify the starting point in the file.
df
- Displays available and used disk space on mounted filesystems. Use df -h to see the output in a readable format, use M for MB instead of bytes.
df -h
tar
- The "tar" command is a tool program used to create and restore backup files. It can add and unpack files in backup files.
- Compressed file:
tar -cvzf waveshare.tar.gz *
- unzip files:
tar -xvzf waveshare.tar.gz
apt
- "apt" (Advanced Packaging Tool) is a shell front-end package manager in Debian and Ubuntu.
- The "apt" command provides commands for finding, installing, upgrading, and removing a package, a group of packages, or even all packages, and the commands are concise and easy to remember.
- "apt" command execution requires super administrator privileges (root).
- "apt" common commands:
- List all updatable software inventory commands: sudo apt update.
- Upgrade packages: sudo apt upgrade.
- List updatable packages and version information: apt list --upgradeable.
- Upgrade packages, delete the packages that need to be updated before upgrading: sudo apt full-upgrade.
- Install the specified software command: sudo apt install <package_name>.
- Install multiple packages: sudo apt install <package_1> <package_2> <package_3>.
- Update the specified software command: sudo apt update <package_name>.
- Display package specific information, such as version number, installation size, dependencies, etc.: sudo apt show <package_name>.
- Remove package command: sudo apt remove <package_name>.
- Clean up unused dependencies and libraries: sudo apt autoremove.
- Remove packages and configuration files: sudo apt purge <package_name>.
- Find packages command: sudo apt search <keyword>.
- List all installed packages: apt list --installed.
- List version information of all installed packages: apt list --all-versions.
- For example, we install nano editor.
sudo apt install nano
Network
ifconfig
- Used to display the network configuration details of an interface on the current system when run with no arguments (ie) ifconfig.
- When connecting with SSH, you can find the IP address through ifconfig, and enter the terminal:
ifconfig
- Check the IP address of the wired network, input the terminal:
ifconfig eth0
- Check the IP address of the wireless network and enter the terminal:
ifconfig wlan0
hostname
- The hostname command displays the current hostname of the system. When we use Jetson Nano, we often need to use remote tools, and the default network configuration IP address adopts dynamic allocation, which will cause the problem of IP address uncertainty.
- When the IP address of our Jetson Nano changes, it is possible to log in using the hostname.
1. Log in to Jetson Nano, and modify the host file, the command is as follows:
sudo vim /etc/hosts
- Replace jp46 with the name to be modified, such as Waveshare, and press the keyboard ZZ to save and exit:

2. Modify the hostname file, and replace the jp46 here with the name to be modified, such as waveshare, and press the keyboard ZZ:
sudo vim /etc/hostname

3. After the modification is completed, restart the Jetson Nano:
sudo reboot
4. We can also check the IP address with the following command:
hostname -I
Vim Editor User Guide
- The Vim editor is a standard editor under all Unix and Linux systems. Its power is not inferior to any of the latest text editors. Here is just a brief introduction to its usage and common commands.
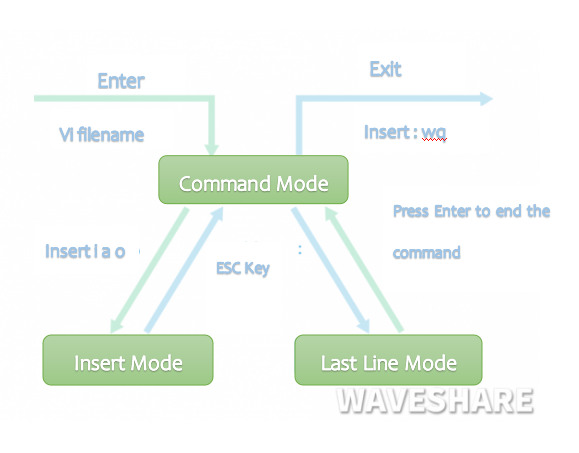
- Basically vim is divided into three modes, namely Command mode, Insert mode, and Last line mode.
- Command mode: control the movement of the screen cursor, delete characters, words, or lines, move and copy a section.
- Input Mode: Input characters and edit files in this mode.
- Last line mode: save the file or exit vim, you can also set the editing environment, such as finding strings, **listing line numbers, etc.
- We can think of these three modes as the icons at the bottom:
1. First remove the default Vi editor:
sudo apt-get remove vim-common
2. Then reinstall Vim:
sudo apt-get install vim
3. For convenience, you have to add the following three sentences after the /etc/vim/vimrc file:
set nu #display line number
syntax on # syntax highlighting
set tabstop=4 #tab back four spaces
Common Command
- Open file, save, close file (use in vi command mode):
vim filename //Open the filename file
        :w // save the file
        :q //Quit the editor, if the file has been modified please use the following command
        :q! //Quit the editor without saving
        :wq //Exit the editor and save the file
        :wq! //Force quit the editor and save the file
        ZZ //Exit the editor and save the file
        ZQ //Exit the editor without saving
- Insert text or line (used in vi command mode, after executing the following command, it will enter insert mode, press ESC key to exit insert mode:
a //Add text to the right of the current cursor position
i //Add text to the left of the current cursor position
A //Add text at the end of the current line
I //Add text at the beginning of the current line (the beginning of the line with a non-empty character)
O //Create a new line above the current line
o //Create a new line below the current line
R //Replace (overwrite) the current cursor position and some text behind it
J //Merge the line where the cursor is located and the next line (still in command mode)
- Delete and restore characters or lines (used in vi command mode):
x //Delete the current character
nx //Delete n characters from the cursor
dd //Delete the current line
ndd //Delete n lines including the current line down
u //Undo the previous operation
U //Undo all operations on the current row
- Copy and paste (used in vi command mode):
yy //Copy the current line to the buffer
nyy //Copy the current line down n lines to the buffer
yw //Copy the characters from the cursor to the end of the word
nyw //Copy n words starting from the cursor
y^ //Copy the content from the cursor to the beginning of the line
y$ //Copy from the cursor to end of line
p //Paste the contents of the clipboard after the cursor
P //Paste the contents of the clipboard before the cursor
Configuration
File transmission
This tutorial takes a Windows system to remotely connect to a Linux server as an example. There are multiple ways to upload local files to the server.
MobaXterm File Transmission
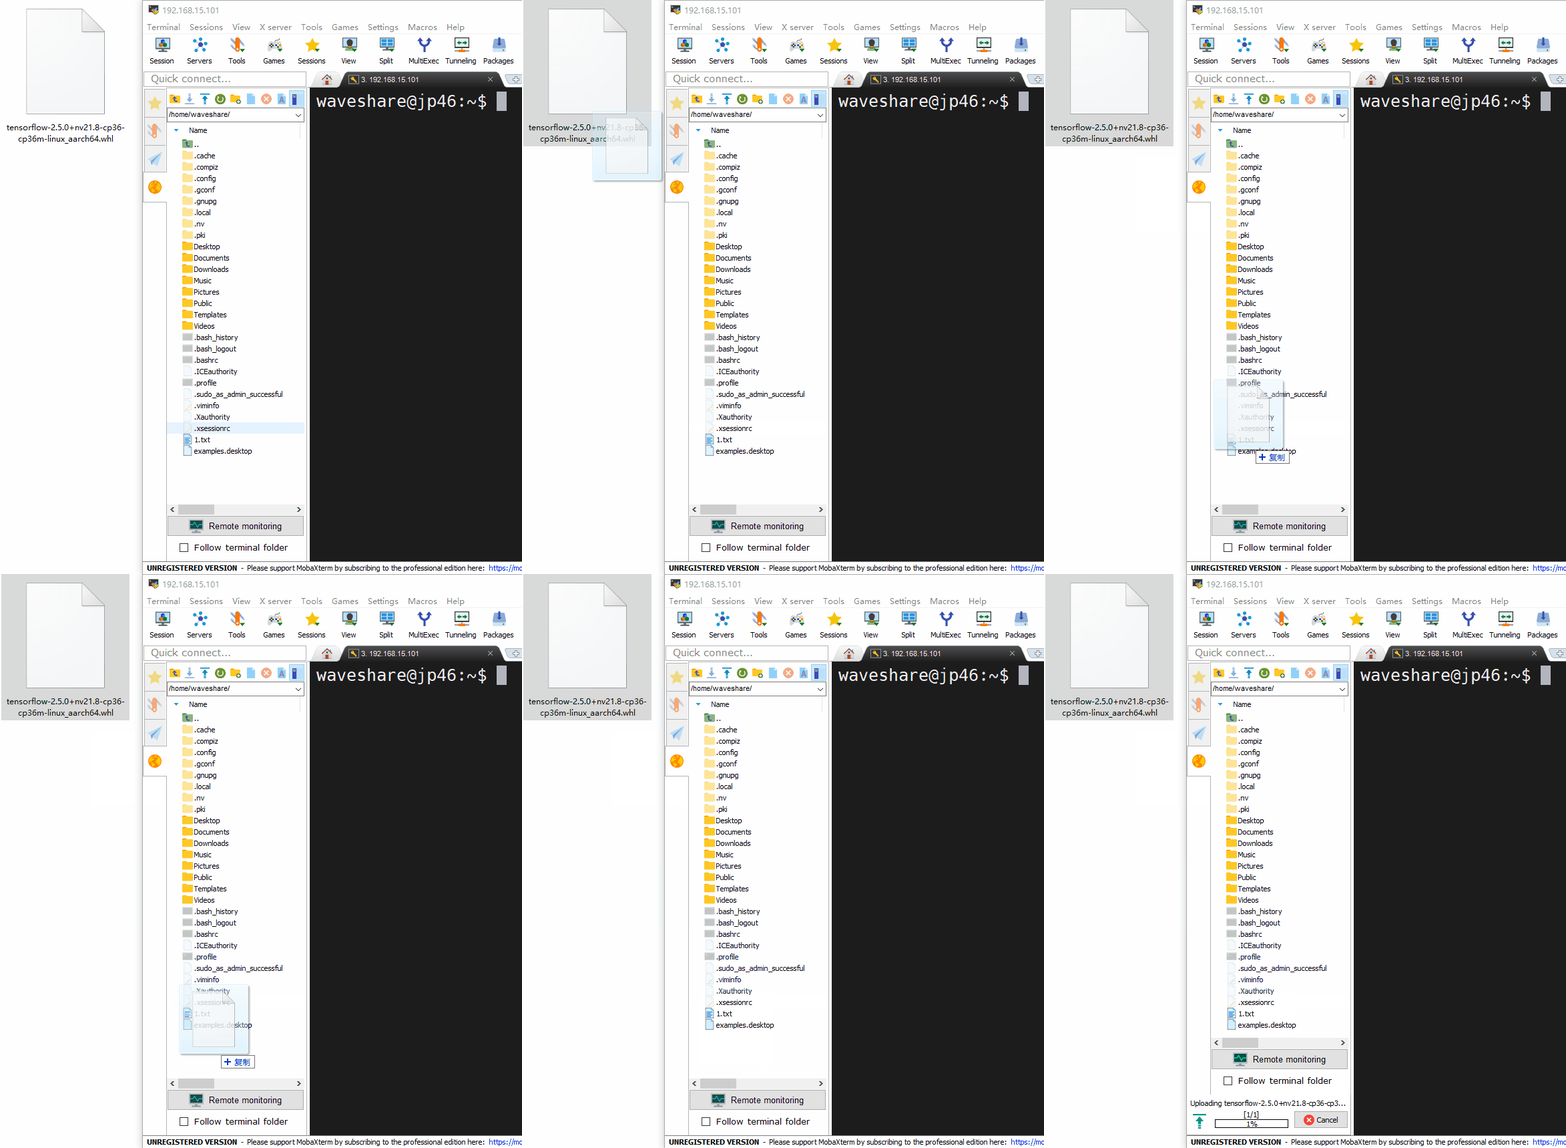
- Transferring files with the MobaXterm tool is very simple and convenient.
- To transfer files from Windows to Raspberry Pi simply drag the files to the left directory of MobaXterm.
- Similarly, to transfer Raspberry Pi files to Windows, just drag the files in the left directory of MobaXterm to Windows.
NoMachine File Transmission
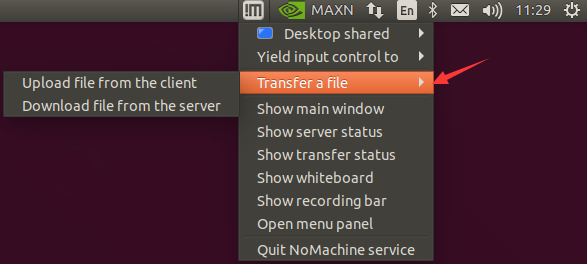
- When the NoMachine remote connection is successful, the NoMachine icon will appear in the upper right corner of the Jetson Nano desktop. We click the icon and select Transfer a file.
- Upload file from the client is to transfer files from a Windows computer to the Jetson Nano.
- Download the file from the server to transfer files from Jetson Nano to a Windows computer.
SCP File Transmission
- The SCP command can be used to securely copy or encrypt transfer files and directories across Linux systems.
- Format:
scp +parameter +username/login name+@+hostname/IP address+ : + target file path+local storage path
- First enter the directory where you want to store the file, hold down the keyboard Shift and right-click the blank space to open Windows PowerShell.
- Copy the file from the Jetson Nano to the local Windows and enter it in the terminal:
scp [email protected]:file .
Where "." represents the current path.
- Copy the file from the local Windows to the Jetson Nano and enter it in the terminal:
scp file [email protected]:
- Copy the file folder from the Jetson Nano to the local Windows. Since the file is a directory, you need to add the parameter r and enter it in the terminal.
scp -r [email protected]:/home/pi/file.
- Copy the file folder from the local Windows to the Jetson Nano and type in the terminal:
scp -r file [email protected]:
Note: The above waveshare needs to be changed to the username of your system, and the IP address to the actual IP address of Jetson Nano.
File sharing (Samba)
File sharing is possible using the Samba service. The Jetson Nano file system can be accessed in the Windows Network Neighborhood, which is very convenient.
1. First install Samba, enter into the terminal:
sudo apt-get update
sudo apt-get install samba -y
2. Create a shared folder sambashare in the /home/waveshare directory.
mkdir sambashare
3. After the installation is complete, modify the configuration file /etc/samba/smb.conf:
sudo nano /etc/samba/smb.conf
Pull to the end of the file and add the following statement to the end of the file.
[sambashare]
    comment = Samba on JetsonNano
    path = /home/waveshare/sambashare
    read only = no
    browsable = yes
Note: waveshare here needs to be changed to your system username. In other words, the path is the shared folder path you want to set.
4. Restart the Samba service.
sudo service smbd restart
5. Set shared folder password:
sudo smbpasswd -a waveshare
Note: The username here needs to be changed to the username of your system. If it is not the username, it will fail.
You will be asked to set a Samba password here. It is recommended to use your system password directly, which is more convenient to remember.
6. After the setup is complete, on your computer, open the file manager.
\\192.168.15.100\sambashare
7. Enter the login name and password set in step 5 earlier.
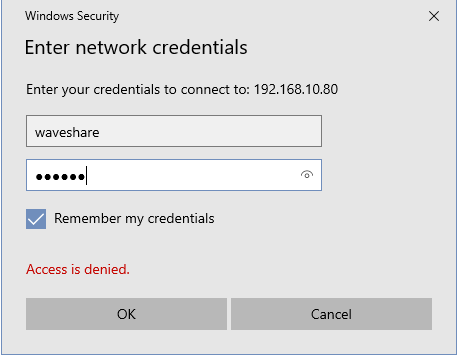
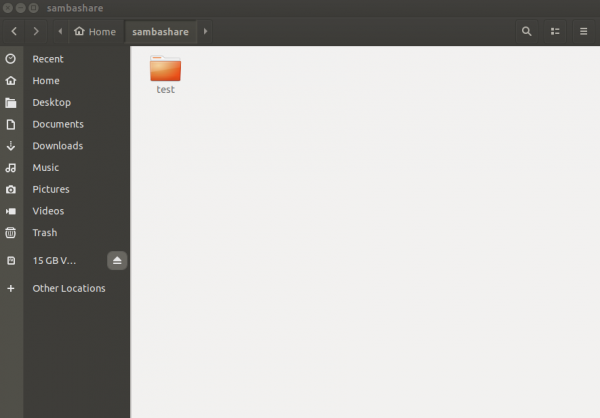
8. Let's verify, create a new test folder in Windows, and you can see the test folder in the Jetson Nano sambashare directory.

System Backup
- Create a new blank file with ".img" extension on the desktop of your Windows computer. Insert the SD card with the system image and select the disk drive letter of the corresponding SD card.
- Open Win32DiskImager file, click "Read" and the SD card file of Jetson Nano is converted to the image.
Camera
View the first connected camera screen:
nvgstcapture-1.0
View the picture of the second camera connected:
nvgstcapture-1.0 --sensor-id=1
Getting Started with AI
- This tutorial is based on the JetPack4.6 system image, the Python version is Python3.6, the TensorFlow version is 2.5.0, and the Pytorch version is 1.9.0 as an example.
- Note: The TensorFlow version and the Pytorch version must correspond to the JetPack version.
PIP Installation
1. Python3.6 version is installed by default in Jetson Nano, directly install PIP.
sudo apt update
sudo apt-get install python3-pip python3-dev
2. After the installation is complete, we check the PIP version.
pip3 -V
![]()
3. The default installed PIP is version 9.01, you need to upgrade it to the latest version.
python3 -m pip install --upgrade pip

4. After the upgrade is successful, check the pip version information and find some problems.
pip3 -V

5. We use the command to solve it as follows:
python3 -m pip install --upgrade --force-reinstall pip
sudo reboot
![]()
6. Install important installation packages in the field of machine learning.
Install important packages in the field of machine learning
sudo apt-get install python3-numpy
sudo apt-get install python3-scipy
sudo apt-get install python3-pandas
sudo apt-get install python3-matplotlib
sudo apt-get install python3-sklearn
Set Up The CUDA Environment
1. Check the CUDA version, if there appears "command not found", you need to configure the environment.
nvcc -V
cat /usr/local/cuda/version.txt

Note: If you use the "cat" command, you can not check the version here. Please enter the "/usr/local/" directory to see if there is a CUDA directory.
If you do not install CUDA by referring to the Uninstalled CUDA section below, configure the environment after the installation is complete.
2. Set environment variables:
sudo vim .bashrc
Add at the end of the file:
export PATH=/usr/local/cuda-10.2/bin:$PATH
export LD_LIBRARY_PATH=/usr/local/cuda/lib64:$LD_LIBRARY_PATH
export CUDA_HOME=$CUDA_HOME:/usr/local/cuda-10.2

3. Update environment variables.
source .bashrc
4. Check the CUDA version again.
nvcc -V
Tensorflow GPU Environment Construction
1. Install the needed package:
sudo apt-get install libhdf5-serial-dev hdf5-tools libhdf5-dev zlib1g-dev zip libjpeg8-dev liblapack-dev libblas-dev gfortran
sudo pip3 install -U pip testresources setuptools==49.6.0
2. Install Python independencies:
sudo pip3 install -U --no-deps numpy==1.19.4 future==0.18.2 mock==3.0.5 keras_preprocessing==1.1.2 keras_applications==1.0.8 gast==0.4.0 protobuf pybind11 cython pkgconfig packaging
sudo env H5PY_SETUP_REQUIRES=0 pip3 install -U h5py==3.1.0
3. Install Tensorflow (online installation often fails, you can refer to step 4 for offline installation).
sudo pip3 install --pre --extra-index-url https://developer.download.nvidia.com/compute/redist/jp/v46 tensorflow
4. Finally, it is recommended to install offline, first log in to NVIDIA's official website to download the TensorFlow installation package (take "jetpack4.6 TensorFlow2.5.0 nv21.08" as an example, it is recommended to use Firefox browser to download).

pip3 install tensorflow-2.5.0+nv21.8-cp36-cp36m-linux_aarch64.whl
5. After the installation is complete, check whether the installation is successful, and enter into the terminal:
python3
import tensorflow as tf

6. View the version information:
tf.__version__
Pytorch Environment Setting
Pytorch Installation
1. Login and download Pytorch. Here, we take Pytorch v1.9.0 as an example:

2. Download the independencies libraries.
sudo apt-get install libjpeg-dev zlib1g-dev libpython3-dev libavcodec-dev libavformat-dev libswscale-dev libopenblas-base libopenmpi-dev
3. Install Pytorch:
sudo pip3 install torch-1.9.0-cp36-cp36m-linux_aarch64.whl
4. Verify whether Pytorch has been installed successfully.
python3
import torch
x = torch.rand(5, 3)
print(x)

5. View the version information:
import torch
print(torch.__version__)
Torchvision Installation
1. The Torchvision version should match the Pytorch version. The Pytorch version we installed earlier is 1.9.0, and Torchvision installs the v0.10.0 version.

2. Download and install torchvision:
git clone --branch v0.10.0 https://github.com/pytorch/vision torchvision
cd torchvision
export BUILD_VERSION=0.10.0
sudo python3 setup.py install
3. Verify whether Torchvision is installed successfully.
python3
import torchvision

4. The error may be that the Pillow version is too high, uninstall and reinstall.
sudo pip3 uninstall pillow
sudo pip3 install pillow
![]()
5. View the version information.
import torchvision
print(torchvision.__version__)
Yolo V4 Environment Construction
1. First download darknet on GitHub:
git clone https://github.com/AlexeyAB/darknet.git
2. After downloading, you need to modify Makefile:
cd darknet
sudo vim Makefile
Change the first four lines of 0 to 1.
GPU=1
CUDNN=1
CUDNN_HALF=1
OPENCV=1
3. The cuda version and path should also be changed to our actual version and path, otherwise, the compilation will fail:
Change NVCC=nvcc to
NVCC=/usr/local/cuda-10.2/bin/nvcc
4. After the modification is completed, compile and enter into the terminal:
sudo make
Inference with YOLOv4
- There are three basic reasoning methods: picture, video, and camera (live image).
- Choose Yolo v4 and Yolo v4-tiny (more lightweight models, suitable to run on Jetson Nano) for testing. First, you need to download the trained model weight file.
Image Test
1. Test
./darknet detector test cfg/coco.data cfg/yolov4.cfg yolov4.weights data/dog.jpg

2. If you want to open the picture, you need to use the test mode, it will ask you to enter the location of the picture after execution:
./darknet detector test ./cfg/coco.data ./cfg/yolov4.cfg ./yolov4.weights
Video Test
1. Yolov4-tiny video detection (there is no video file in the data downloaded from GitHub, and the user needs to upload the video file to be detected to the data folder).
./darknet detector demo cfg/coco.data cfg/yolov4-tiny.cfg yolov4-tiny.weights data/xxx.mp4
Live image test
1. Check the device number of the USB camera:
ls /dev/video*
./darknet detector demo cfg/coco.data  cfg/yolov4-tiny.cfg  yolov4-tiny.weights /dev/video0 "nvarguscamerasrc ! video/x-raw(memory:NVMM), width=1280, height=720, format=NV12, framerate=30/1 ! nvvidconv  ! video/x-raw, width=1280, height=720, format=BGRx ! videoconvert ! video/x-raw, format=BGR ! appsink"
./darknet detector demo cfg/coco.data  cfg/yolov4.cfg  yolov4.weights /dev/video0 "nvarguscamerasrc ! video/x-raw(memory:NVMM), width=1280, height=720, format=NV12, framerate=30/1 ! nvvidconv  ! video/x-raw, width=1280, height=720, format=BGRx ! videoconvert ! video/x-raw, format=BGR ! appsink"
Hello AI World
- The Hello AI World project integrates the powerful TensroRT acceleration engine in NVIDIA, which improves performance by several times.
Environment Construction
1. Install cmake.
sudo apt-get update
sudo apt-get install git cmake libpython3-dev python3-numpy
2. Get the jetson-inference open-source project.
git clone https://github.com/dusty-nv/jetson-inference
cd jetson-inference
git submodule update --init
3. Create a new folder, and compile:
Note: The following example can only be run normally if the compilation does not report an error.
sudo mkdir build
cd build
sudo cmake ../
When the download model and Pytorch interface appear, we choose to skip (Quit and Skip).
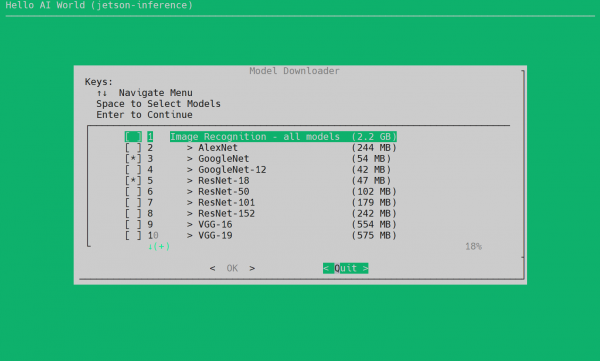
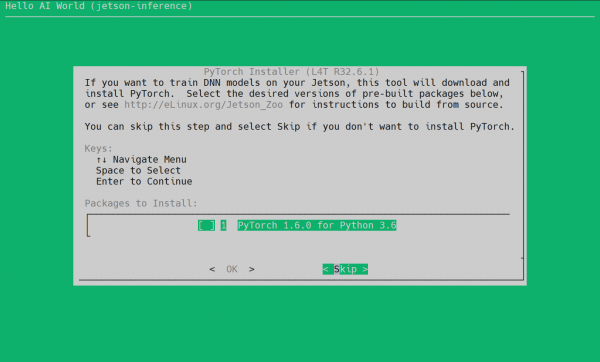
4. Download the model, then place it in the "jetson-inference/data/networks" directory, and unzip it. To help users, here we provide some model reference download instructions:
cd ~/jetson-inference/data/networks/
#If you need to download more algorithms, please refer to the method here, first obtain the download address of the model on github, and then use wget to add instructions to download. Download three models here for reference
wget https://github.com/dusty-nv/jetson-inference/releases/download/model-mirror-190618/facenet-120.tar.gz
wget https://github.com/dusty-nv/jetson-inference/releases/download/model-mirror-190618/GoogleNet.tar.gz
wget https://github.com/dusty-nv/jetson-inference/releases/download/model-mirror-190618/SSD-Mobilenet-v2.tar.gz
#The following command is to decompress the previously downloaded model, only after decompression can it be used
tar -zxvf facenet-120.tar.gz
tar -zxvf GoogleNet.tar.gz
tar -zxvf SSD-Mobilenet-v2.tar.gz
5. Copy files to Jetson Nano with a USB flash drive or #MobaXterm File Transmission.
cd jetson-inference/build
sudo make
sudo make install
6. Install the v4l camera driver, and input the following command in the terminal:
sudo apt-get install v4l-utils
v4l2-ctl --list-formats-ext
DetectNet Runs Real-time Camera Detection
- Use the camera to recognize objects in the environment.
cd ~/jetson-inference/build/aarch64/bin/
./detectnet-camera

Use TensorRT to accelerate the frame rate to 24 fps.
- The content below is a list of pre-trained object detection networks available for download, along with the "--network" parameter for loading the pre-trained model:
./detectnet-camera --network=facenet # Run the face recognition network
./detectnet-camera --network=multiped # run multi-level pedestrian/baggage detector
./detectnet-camera --network=pednet # Run the original single-stage pedestrian detector
./detectnet-camera --network=coco-bottle # Detect bottles/soda cans under camera
./detectnet-camera --network=coco-dog # detect dog under camera
- Let's use the "detectnet" program to locate objects in a static image. In addition to input/output paths, there are some additional command line options:
- Change the optional "--network" flag for the detection model in use (the default is SSD-Mobilenet-v2).
- "--overlay" flag can be comma-separated boxes, lines, labels, conf, or none.
- Default "--overlay=box",labels,conf show boxes, labels, and confidence coefficient.
- The box option draws filled bounding boxes, while lines only draw unfilled outlines.
- "--alpha" value, sets the alpha mixed value used during overlay (the default is 120).
- "--threshold" sets an optional value for the minimum threshold for detection (thedefault 0.5).
- "--camera" flag sets the camera device to use. (The default is to use MIPI CSI sensor 0 (--camera=0).)
- "--width" and "--height" flags set camera resolution (the default is 1280 x 720).
- The resolution should be set to a format supported by the camera, queried with "v4l2-ctl --list-formats-ext".
./detectnet-camera --network=facenet # Use FaceNet, default MIPI CSI camera (1280 × 720)
./detectnet-camera --camera=/dev/video1 --network=facenet # Use PedNet, V4L2 camera /dev/video1 (1280 x 720)
./detectnet-camera --width=640 --height=480 --network=facenet # Use PedNet, default MIPI CSI camera (640 x 480)
Hardware Control
The Jetson TX1, TX2, AGX Xavier, and Nano development boards include a 40-pin GPIO header, which is similar to the 40-pin header in the Raspberry Pi.
GPIO
- The digital inputs and outputs of these GPIOs can be controlled using the Python library provided in the Jetson GPIO library package.
- The Jetson GPIO library provides all the public APIs provided by the RPi.GPIO library. The use of each API is discussed below.
1. To import the Jetson.GPIO module, please use:
import Jetson.GPIO as GPIO
2. Pin number:
- The Jetson GPIO library provides four methods for numbering I/O pins.
- The first two correspond to the modes provided by the RPi.GPIO library, namely BOARD, and BCM, refer to the pin number of the 40-pin GPIO header and the Broadcom SoC GPIO number respectively.
- The remaining two modes, CVM and TEGRA_SOC use strings instead of numbers, corresponding to the CVM/CVB connector and signal names on the Tegra SoC respectively.
- To specify the mode you use (mandatory), use the following function to call:
GPIO.setmode(GPIO.BOARD)
GPIO.setmode(GPIO.BCM)
GPIO.setmode(GPIO.CVM)
GPIO.setmode(GPIO.TEGRA_SOC)
- To check which mode has been set, you can call:
mode = GPIO.getmode()
The model must be GPIO. BOARD, GPIO. BCM, GPIO. CVM, GPIO. TEGRA_SOC or None.
3. If GRIO detects that a pin has been set to a non-default value, you will see a warning message.
- You can disable warnings with the following code:
GPIO.setwarnings(False)
4. Set the channel:
- The GPIO channel must be set before it can be used as an input or output. To configure a channel as an input, please call:
#(where channel is based on the pin numbering mode discussed above)
GPIO.setup(channel, GPIO.IN)
- To set the channel as output, please call:
GPIO.setup(channel, GPIO.OUT)
- You can also specify an initial value for the output channel:
GPIO.setup(channel, GPIO. OUT, initial=GPIO. HIGH)
- When you set a channel to output, you can also set multiple channels at the same time:
#add as many channels as needed. You can also use tuples: (18,12,13)
channels = [18, 12, 13]
GPIO.setup(channels, GPIO.OUT)
5. Input:
- To read the value of a channel, please use:
GPIO.input(channel)
This will return the GPIO. LOW or GPIO. HIGH.
6. Output:
To set the value of a pin configured as an output, please use:
GPIO.output(channel, state)
where the state can be GPIO.LOW or GPIO.HIGH.
- You can also output to a list of channels or tuples:
channels = [18, 12, 13] # or use tuples
GPIO.output(channels, GPIO.HIGH) # or GPIO.LOW
#Set the first channel to LOW and the rest to HIGH.
GPIO.output(channel, (GPIO.LOW, GPIO.HIGH, GPIO.HIGH))
7. Clean up:
At the end of the demo, it's a good idea to clean up the channel so that all pins are set to their default state. To clean up all used channels, please call:
GPIO.cleanup()
- If you don't want to clean up all channels, you can also clean up a single channel or a list of channels or tuples:
GPIO.cleanup(chan1) # cleanup only chan1
GPIO.cleanup([chan1, chan2]) # cleanup only chan1 and chan2
GPIO.cleanup((chan1, chan2)) # does the same operation as previous statement
8. Jetson Board Information and Library Versions:
- To get information about Jetson modules use/read:
GPIO.JETSON_INFO
This provides a Python dictionary with the following keys: P1_REVISION, RAM, REVISION, TYPE, MANUFACTURER, and PROCESSOR. All values in the dictionary are strings, but P1_REVISION is an integer.
- To get information about library versions use/read:
GPIO.VERSION
This provides a string with the XYZ version format.
9. Interrupt:
In addition to polling, the library provides three additional methods to monitor input events:
- wait_for_edge() function
- This function blocks the calling thread until the provided edge is detected. The function can be called as follows:
GPIO.wait_for_edge(channel, GPIO.RISING)
- The second parameter specifies the edge to detect, which can be GPIO.RISING, GPIO.FALLING, or GPIO.BOTH. If you just want to limit the wait to a specified time, you can optionally set a timeout:
# Timeout is in milliseconds:
GPIO.wait_for_edge(channel, GPIO.RISING, timeout=500)
The function returns the channel on which the edge was detected, or None if a timeout occurred.
- event_detected() function
- This function can be used to periodically check if an event has occurred since the last call. The function can be set and called as follows:
# Set rising edge detection on the channel:
GPIO.add_event_detect(channel, GPIO.RISING)
run_other_code()
if GPIO.event_detected(channel):
    do_something()
As before, you can detect events for GPIO.RISING, GPIO.FALLING or GPIO.BOTH.
- Callback function to run when an edge is detected.
- This function can be used to run a second thread for the callback function. Therefore, the callback function can run concurrently with your main program in response to the edge. This feature can be used as follows:
# define callback function
def callback_fn(channel):
    print("Callback called from channel %s" % channel)

# Add rising edge detection:
GPIO.add_event_detect(channel, GPIO.RISING, callback=callback_fn)
- Multiple callbacks can also be added if desired, like this:
def callback_one(channel):
    print("First Callback")

def callback_two(channel):
    print("Second Callback")

GPIO.add_event_detect(channel, GPIO.RISING)
GPIO.add_event_callback(channel, callback_one)
GPIO.add_event_callback(channel, callback_two)
In this case, the two callbacks run sequentially, not simultaneously, because only the thread runs all the callback functions.
- To prevent multiple invocations of the callback function by merging multiple events into one, optionally set a debounce time:
# Bouncetime set in milliseconds:
GPIO.add_event_detect(channel, GPIO.RISING, callback=callback_fn,
bouncetime=200)
If edge detection is no longer needed, it can be removed as follows:
GPIO.remove_event_detect(channel)
10. Check GPIO channel function:
This function allows you to check the function of the provided GPIO channels:
GPIO.gpio_function(channel)
The function returns GPIO.IN or GPIO.OUT.
Turn on LED
- Sample demo:
import Jetson.GPIO as GPIO
import time as time

LED_Pin = 11

GPIO.setwarnings(False)
GPIO.setmode(GPIO.BOARD)
GPIO.setup(LED_Pin, GPIO.OUT)

while (True):
   GPIO.output(LED_Pin, GPIO.HIGH)
   time.sleep(0.5)
   GPIO.output(LED_Pin, GPIO.LOW)
   time.sleep(0.5)
Demo Use
- For the jetson.gpio library, the official also provides some simple demos.
- First download jetson-gpio:
git clone https://github.com/NVIDIA/jetson-gpio
- Move the downloaded file to /opt/nvidia:
sudo mv ~/jetson-gpio
- Go to the jetson-gpio library folder and install the library:
cd /opt/nvidia/jetson-gpio
sudo python3 setup.py install
- Before using it, you also need to create a gpio group, add your current account to this group, and give it permission to use.
sudo groupadd -f -r gpio
sudo usermod -a -G gpio user_name
Note: user_name is the username you use, say waveshare.
- Copy the 99-gpio.rules file to the rules.d directory:
sudo cp /opt/nvidia/jetson-gpio/lib/python/Jetson/GPIO/99-gpio.rules /etc/udev/rules.d/
- In order for the new rules to take effect, you need to reboot or reload the udev rules by running:
sudo udevadm control --reload-rules && sudo udevadm trigger
- After the configuration is complete, we can use the demo inside, such as "simple_input.py", which can read the status of the pins.
cd /opt/nvidia/jetson-gpio/samples/
sudo python3 simple_input.py
IIC
1. Install I2Ctool first and input in the terminal:
sudo apt-get update
sudo apt-get install -y i2c-tools
sudo apt-get install -y python3-smbus
2. Check the installation and input in the terminal:
apt-cache policy i2c-tools
If the output is as follows, the installation is successful:
i2c-tools:
Installed: 4.0-2
Candidate: 4.0-2
Version list:
***4.0-2500
500 http://ports.ubuntu.com/ubuntu-ports bionic/universe arm64 Packages
100 /var/lib/dpkg/status
i2cdetect
- Query i2c devices:
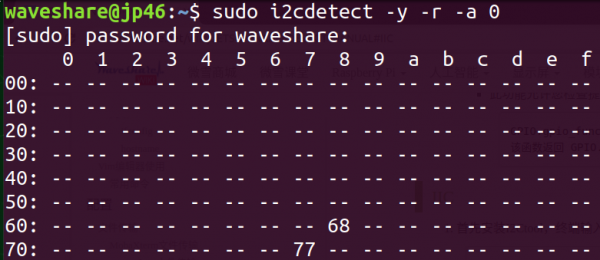
sudo i2cdetect -y -r -a 0
- Parameter: -y is to execute directly regardless of interaction problems, -r is the SMBus read byte command, -a is all addresses, and 0 refers to SMBus 0.
- Scan the register data:
sudo i2cdump -y 0 0x68
- Write in the register data:
sudo i2cset -y 0 0x68 0x90 0x55
- Parameter:
| parameters | meaning | |
| 0 | represents the I2C device number | |
| 0x68 | represents the address of the I2C device | |
| 0x90 | represents the register address | |
| 0x55 | represents the data written to the register |
- Register data read:
sudo i2cget -y 0 0x68 0x90.
- Parameter:
| parameters | meaning | |
| 0 | represents the I2C device number | |
| 0x68 | represents the address of the I2C device | |
| 0x90 | represents the register address |
Resources
Software
Jetson Official Resources
Cousces
FAQ
{{{5}}}
Yes, but you need use it after soldering pin headers.
{{{5}}}
Support
Technical Support
If you need technical support or have any feedback/review, please click the Submit Now button to submit a ticket, Our support team will check and reply to you within 1 to 2 working days. Please be patient as we make every effort to help you to resolve the issue.
Working Time: 9 AM - 6 PM GMT+8 (Monday to Friday)


