RS232/485 TO ETH
| ||
Internet login
Method 1: Access router or switch test
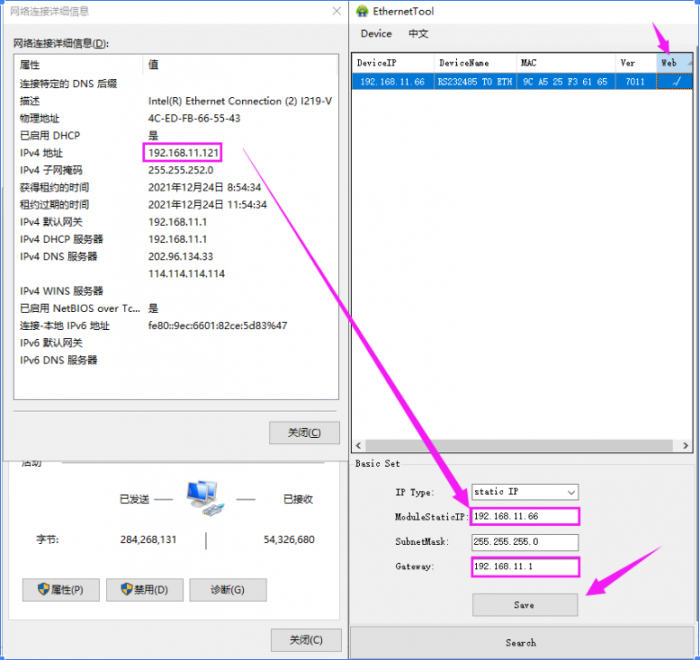
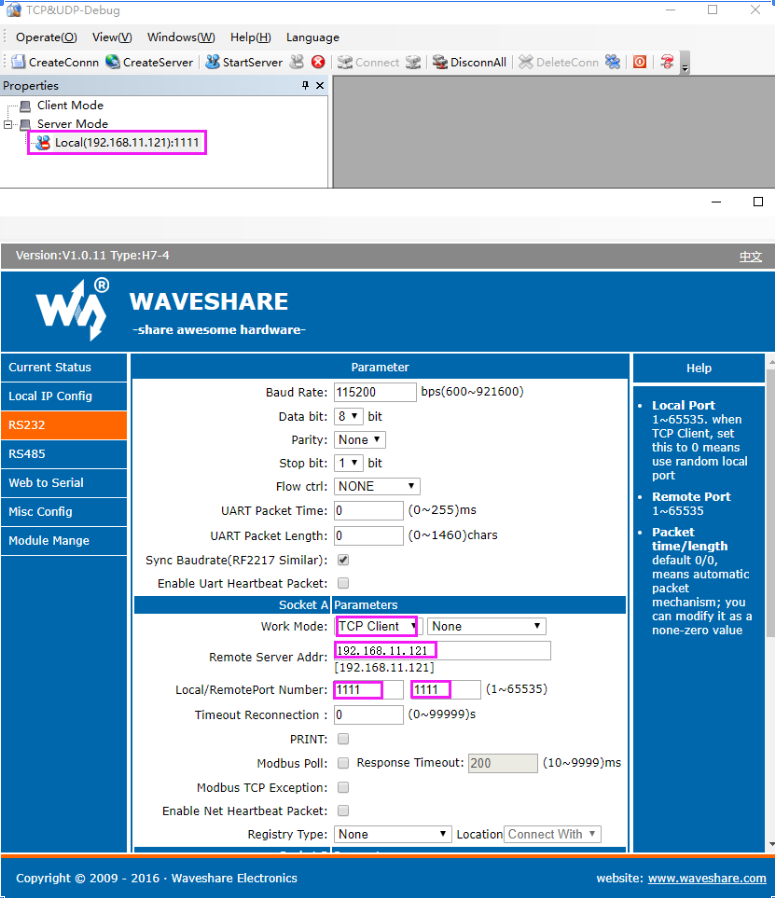
- Connect the RS232/485 TO ETH to the computer and the switch or router connected to the LAN respectively (in this way, firstly, the network cable of the computer does not need to be unplugged to avoid network disconnection; secondly, the RS232/485 TO ETH connected to the Internet can be connected to the public network TCP Server communication), fixed IP of RS232/485 TO ETH.
- Control Panel (File Explorer) -> Network Connections -> Double-click the network card -> Details -> See the computer IP (here is 192.168.11.121).
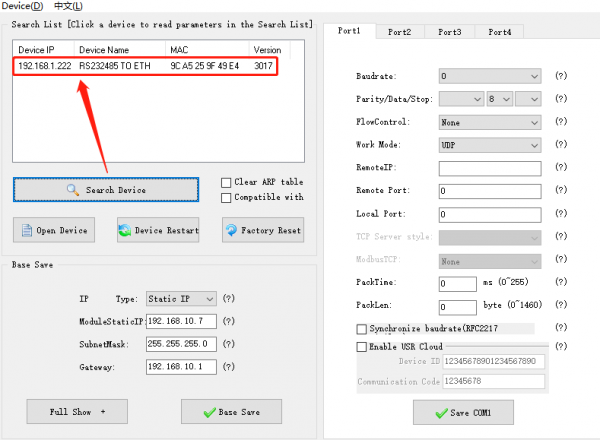
- Click the device factory IP: 192.168.0.7- > set the static IP to the same frequency band IP as the computer () -> subnet mask default -> set the corresponding gateway -> click set.
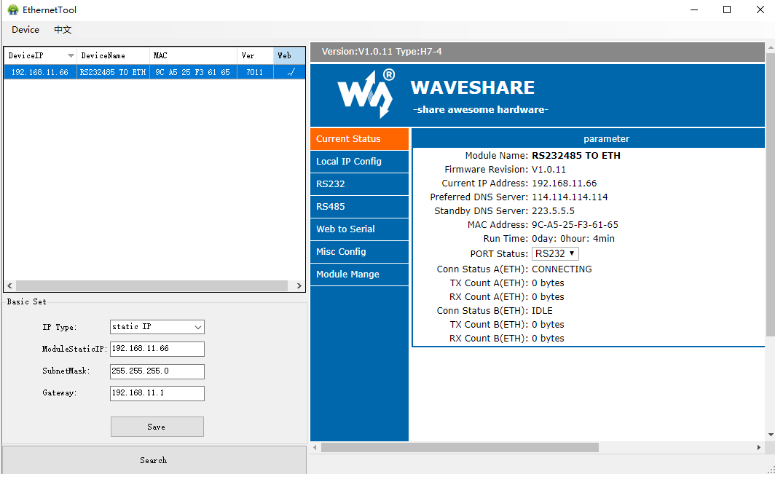
- Double-click the upper right corner of the webpage -> enter the account and password (the initial value is: admin).
Method 2: Test directly with the computer
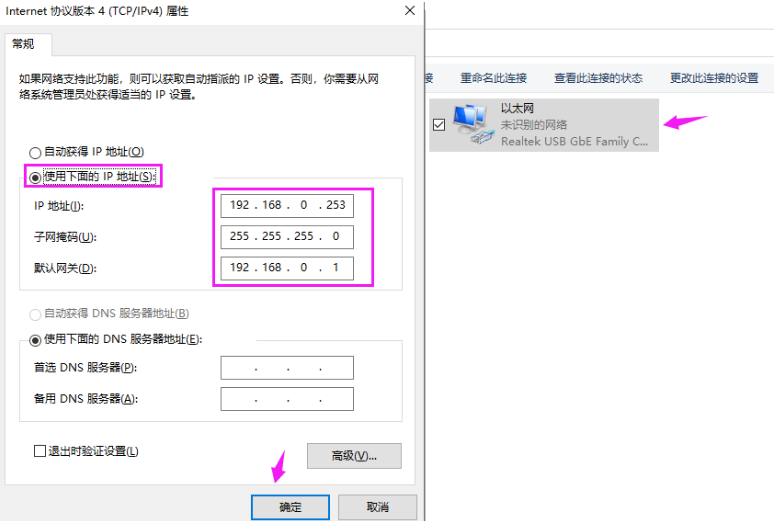
If you only have one network cable and no router or switch, you can connect the computer and RS232/485 TO ETH through a single network cable (similar to one-to-one communication between two computers through a network cable).
- Control Panel (File Explorer) -> Network Connections -> Double-click the network card -> Properties -> Internet Protocol Sakamoto 4 (TCP/IPV4) -> Use the following IP address -> Set the IP of the same frequency band as RS232/RS485 TO ETH -> OK.
RS232 TCP communication
Hardware connection
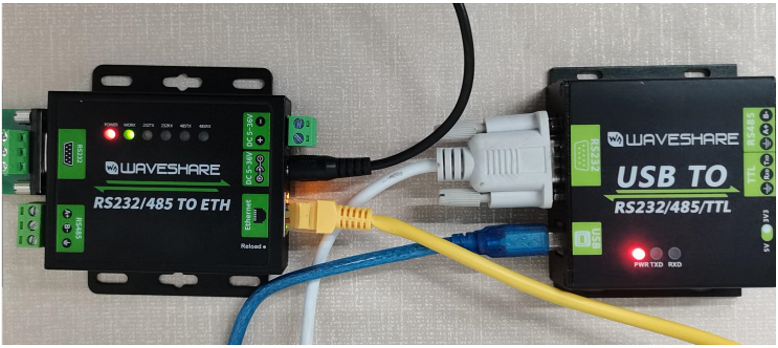
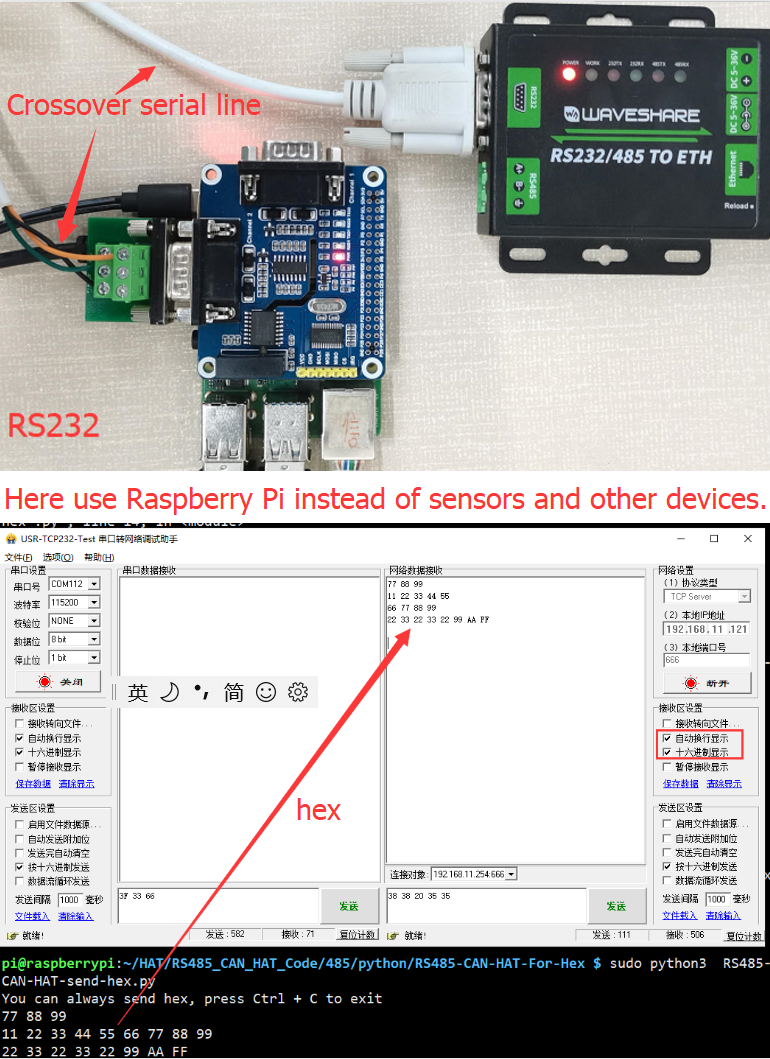
- Connect RS232/485 TO ETH and USB TO RS232/485/TTL via female to female crossover serial cable:
- Open the TCPIP/UDP debugging software, set the computer as the server, RS232/485 TO ETH as the client,
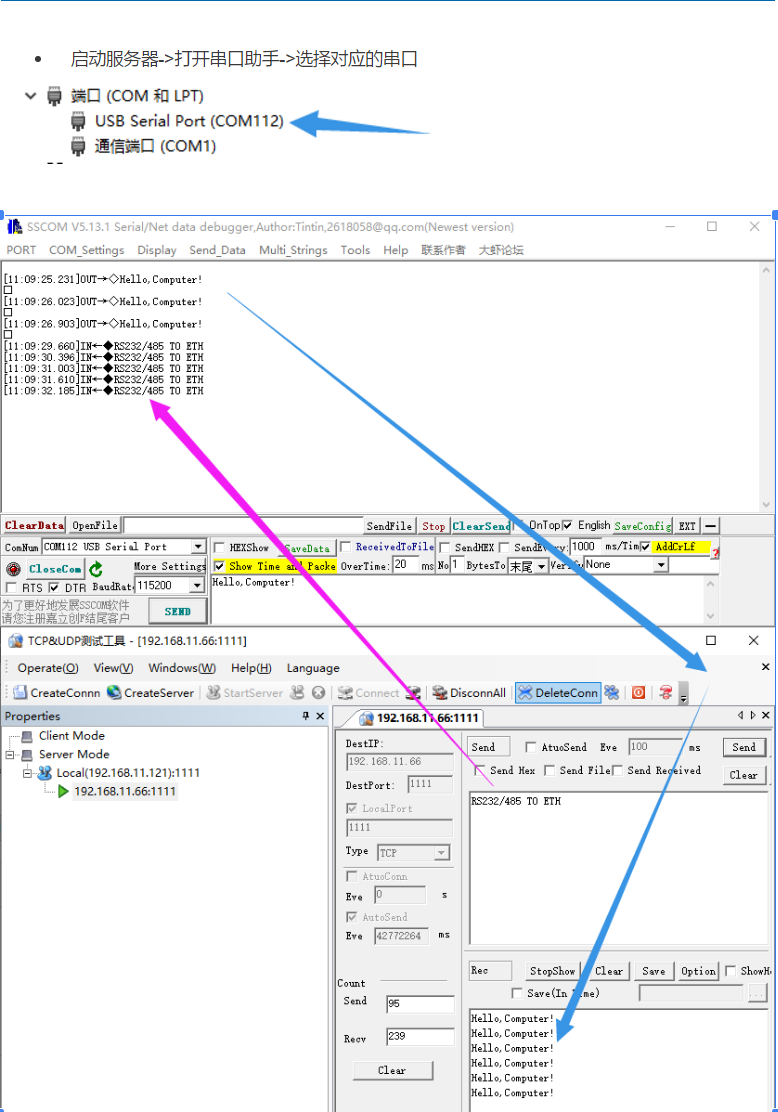
- Start the server -> open the serial port assistant -> select the corresponding serial port:
Resources
FAQ
Set the IP of RS232/485 TO ETH and computer to the same network address and different node address IP:
For example,If RS232/485 TO ETH IP is 192.168.0.7; computer IP is 192.168.0.8
- After confirming that the network communication is normal, you can observe whether the 232RX (485RX) light is flashing. If it does not flash, it means that there is no data in the RS232/485 TO ETH. Check whether the RS232/RS485 wiring is correct.
If the RXD and TXD of some RS232 lines are not cross-connected, they cannot communicate (check with a multimeter, if 2 and 2 are connected, 3 and 3 are directly connected to the serial line; if 2 and 3 are connected, 3 and 2 are connected. .), you can replace the crossover serial cable:
- If the indicator light is normal, please turn off the tool and then turn it on to test.
- The serial device sends "++++" continuously to the module, and when the module receives "++++", it sends 'a' to the device. No data can be sent during the packetization time before sending the '+++'.
- When the device receives 'a', it must send an 'a' to the module within 3 seconds.
- After receiving the 'a', the module sends "+OK" to the device and enters the "AT command mode".
- After receiving "+OK", the device knows that the module has entered "AT command mode" and can send AT command to it.
- The serial device sends the command "AT+ENTM" to the module, and after receiving the command, the module displays "+OK" and returns to the previous working mode.
{{{5}}}
Use Hex Data Transparent Transmission Mode (Recommended)
- 1. Connect the RS232/485 TO ETH and Modbus device.
- 2. Configure RS485 TO ETH's IP address and COM port, and ensure it is connected to the local network.
- 3. Use Modbus TCP protocol to connect the device through RS485 TO ETH, correctly configure the parameters such as the baud rate, and set the working mode as "None".
- 4. Send data to the Modbus device like USB to RS485, and return the corresponding data:
Transmit: 01 05 00 00 FF 00 8C 3A
Receive: 01 05 00 00 FF 00 8C 3A
Modbus RTU and Modbus TCP Bidirectional Convertion
- 1. Connect RS232/485 TO ETH to Modbus devices.
- 2. Configure the IP and COM port of RS485 TO ETH, and ensure it can be connected to the local network.
- 3. Use Modbus TCP protocol to connect RS485 TO ETH to the device, and correctly configure the parameters such as baudrate.
- 4. According to the Modbus device manual, you can use the corresponding commands (Address code, function code, etc.) to read the data in Modbus TCP protocol.
- 5. Convert the Modbus TCP data package to Modbus RTU, and use RS485 TO ETH to send the data pack to the device.
- 6. Receive the Modbus RTU response from the device, and convert it to Modbus TCP format.
The serial port sends 01 03 10 01 00 07 51 08
ETH receives 00 00 00 00 00 06 01 03 10 01 00 07
- 7. Deal with response data in the application.
- 8. Note that the Modbus TCP to Modbus RTU requires the specified gateway hardware or software. In addition, you need to understand more about Modbus TCP and Modbus RTU protocol so that you can correctly configure and use the gateway devices.
{{{5}}}
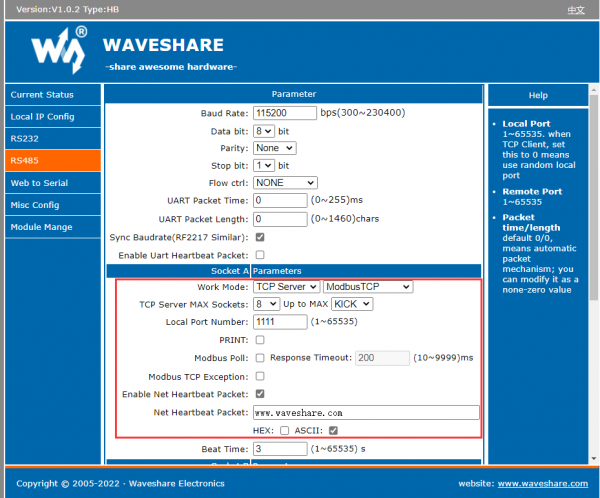
Up to 8 client devices.
{{{5}}}
- Check the network (ETH):
1. Can the device IP be pinged (by default)? If pingable, it indicates the device is not dead. The host software should attempt to connect to the device's IP and port to verify normal connectivity.
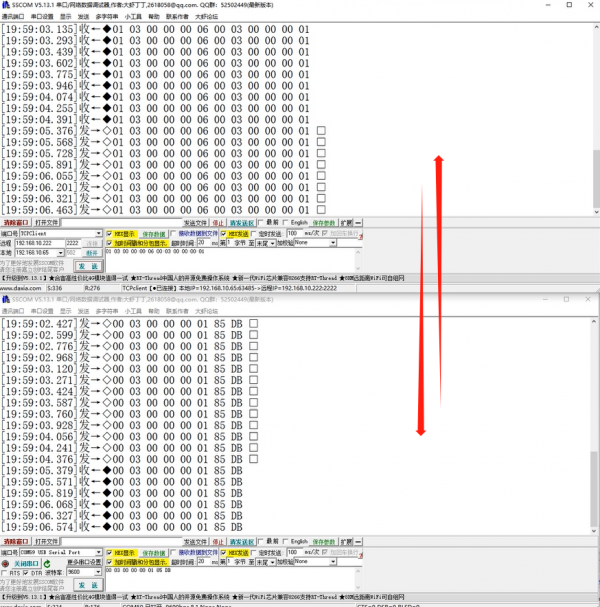
2. In the case where a TCP connection is established but no data is received, following the assessment in 1), if the TCP channel is established but no data is received, further investigation is necessary.
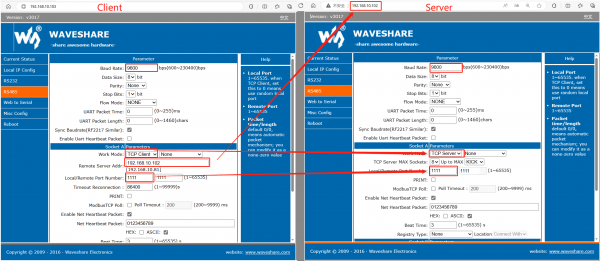
3. Set RS485 TO ETH to 192.168.0.7 with port number 1111; Set the computer to 192.168.0.8 with port number 1111.
4. If the network host machine fails to send data normally, consider configuring network heartbeat packet verification. If normal, data will be periodically transmitted.
5. Ensure SSCOM is added to the firewall, otherwise the firewall may block TCP connections, or test by temporarily disabling all firewalls on the computer.
- Detecting RS485 Serial Port Issues:
1. Confirm hardware connections including serial port devices, and check if your gateway and energy meter are correctly connected. Ensure power and data lines are connected properly and there are no loose connections.
2. If the serial port terminal device receives data but does not respond properly, monitor the data from the serial port device. Use a 485 to USB serial cable, connect it to the interface of the 485 device and the computer's USB port, assign a COM port on the computer, open serial debugging assistant software, set the serial port parameters consistently, input the corresponding COM port, and monitor the data from the 485 device. 485 Wiring: T+ --A T- --B; Check if the instructions sent to 485 are correct; Are there proper responses from 485 after sending correct instructions?
3. Confirm serial port parameters such as baud rate, data bits, and stop bits: Baud rate should be configured according to the connected RS485 device, commonly used rates are 9600 and 115200; Refer to the device manual or contact RS485 device technical support for configuration, especially if set to Modbus mode, confirm if the function code matches.
{{{5}}}
Yes, you can connect RS232 and RS485 simultaneously (same time) with Ethernet.
{{{5}}}
Support
Technical Support
If you need technical support or have any feedback/review, please click the Submit Now button to submit a ticket, Our support team will check and reply to you within 1 to 2 working days. Please be patient as we make every effort to help you to resolve the issue.
Working Time: 9 AM - 6 PM GMT+8 (Monday to Friday)


