MarsBoard AM335X Package B
| ||
Introduction
MarsBoard AM335X All-in-one mini PC Bundle, 7inch Touch LCD, 8G Micro SD Card
| More |
How to write firmware images
To use a AM335X LCD Board with an LCD, please download the firmware, of which name contains "LCD".
System Firmware downloads
You can get the related system firmware resource from:
How to write OS to a TF card
- Unzip the firmware.
- A file archiver software, such as 7-Zip, is required to unzip the corresponding image file.
- Format your TF card.
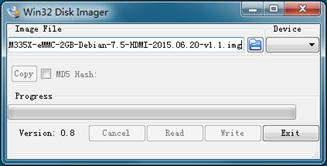
- Write the system firmware.
Boot up from the TF card system
Note: a 5V/2A adapter is used for power supply.
- Insert the TF card into the TF card socket;
- Set the boot up switch (hereafter BOOT) to “SD”;
- Power up to start the system.
Program the eMMC system from the TF card
- Insert the TF card, in which firmware should be eMMC , into the TF card socket;
- Set the BOOT to “SD”;
- Power up and then the LED1 and LED2 blink.
- The eMMC programming isn’t completed until both the LED1 and LED2 are lighten steady or extinguished (The programming process lasts about 30 min);
- Disconnect the power and remove the TF card.
- Set the BOOT to “NAND”.
- Power up to start the system.
LCD Connection
Note: There are two sockets for LCD connection(4.3inch LCD and 7inch LCD). If the board is connected to the LCD by a wrong interface, it may damage the LCD and the main board.
- When using 4.3inch LCD
- Disconnect the power then connect the board to a 4.3inch LCD via the LCD4.3 socket. Please first Make sure the image you programmed is for 4.3inch LCD and then plug a power adapter to the MarsBoard AM335X board.
- When using 7inch LCD
- Disconnect the power then connect the board to a 7inch LCD via the LCD7 socket. Please first Make sure the image you programmed is for 7inch LCD and then plug a power adapter to the MarsBoard AM335X board.
Touch Calibration
Since using a resistive touch LCD, you can execute the following commands for calibration:
Angstrom:
root@Angstrom:~# rm -rf /etc/pointercal*
root@Angstrom:~# ts_calibrate
After entering the calibration interface, there will be a prompt for five-point calibration shown in the screen. Click the points one by one and then execute:
root@Angstrom:~# sync
Restart your system to finish the touch calibration. Switch power supply or use
sudo reboot
to restart the system:
Note: if the calibration failed, reboot and retry again.
Debian:
root@debian:~# rm -rf /etc/pointercal*
root@debian:~# sync
Restart your system to enter touch calibration. Click the points one by one to finish the touch calibration.
Resources
Development tools for the AM335X
- CP2102 Driver
- Win32DiskImager, a Windows program for saving and restoring images from removable drives.
- 7-Zip, an open source file archiver
- Panasonic SD Formatter
- PuTTY, a free and open-source terminal emulator, serial console and network file transfer application.
Cross compiler tool chain
MarsBoard AM335X Image
- Click to download the Angstrom image and follow the section about Getting started
- Click to download the Debian image and follow the section about Getting started
MarsBoard AM335X Source Code
- Click to download the source code of the distribution Angstrom
- Click to download the source code of the distribution Debian
Development tools for the AM335X
- CP2102 Driver
- Win32DiskImager, a Windows program for saving and restoring images from removable drives.
- 7-Zip, an open source file archiver
- Panasonic SD Formatter
- PuTTY, a free and open-source terminal emulator, serial console and network file transfer application.
Cross compiler tool chain
Technical Support
If you need technical support or have any feedback/review, please click the Submit Now button to submit a ticket, Our support team will check and reply to you within 1 to 2 working days. Please be patient as we make every effort to help you to resolve the issue.
Working Time: 9 AM - 6 PM GMT+8 (Monday to Friday)


