USB TO TTL (D)
| ||
| ||
Overview
Introduction
USB TO TTL (D) is a USB to TTL converter, connecting the USB connector of the PC or other devices to the device with TTL logic level, such as microcontrollers, sensors for data communication.
Features
- Adopts original FT232RNL chip, with stable high-speed communication, reliability, and better compatibility.
- Built-in self-recovery fuse and ESD for over-current/over-voltage protection, counter-current proof, improving shock resistance.
- Onboard IO protection, anti-surge design, with stable communication and safety.
- Onboard TTL serial port 3.3V/5V level transilation circuit, for switching TTL communication level.
- Onboard 3 x LED indicator, for checking power and signal transmitting status.
- Plastic case, sandblasting process, nice-looking and compact.
Specification
Items Parameter Model USB to UART TTL Power Supply 5V UART (TTL level) 5V/3.3V Baud Rare 300bps ~ 3Mbps Operating Temperature -40℃~80℃ OS Support Win7/8/8.1/10/11, Mac, Linux, Android, WinCE, etc.
Interface Description
Pinout Function Input/Output VCC-Red Provide 5V/3.3V for external devices (configurable via switch) - GND-Black Ground - TXD-Green UART data sending pin, connecting to MCU.RX Output RXD-Blue UART data receiving pin, connecting to MCU.TX Input SH1.0-Yellow UART data receiving pin, connecting to MCU.TX Output SH1.0-White Ground - SH1.0-Orange UART data sending pin, connecting to MCU.RX Input
Dimensions
Working with Windows
Driver Installation
- Download the VCP Driver:
- Double-click CDM212364_Setup.exe to install by steps.
- Accept the agreement and keep clicking on "Next".
- Connect the computer and device, and you can see a new COM port in the device Manager.
Device Usage
SSCOM
- Connect TXD and RXD of the device (i.e., short the blue and green wires).
- Open SSCOM, input "waveshare" in the input box, check "Show Time and Packets".
- Select 100ms intervals, and then you can observe the device sends and receives data automatically.
Working with Linux
Device Query
- Raspbian, Ubuntu, CentOS, and other mainstream Linux systems generally with FT232 driver, no need to install the driver, connected to the ready-to-use!
- Take Raspberry Pi as an example, after connecting the device, you can use it by querying the serial device name with the following command.
- Similar to common USB device usage.
lsusb
ls /dev/ttyUSB*
Device Usage
- Download the example
cd
rm -rf USB_TO_TTL_\(D\)_Demo.zip
rm -rf USB_TO_TTL_\(D\)_Demo
wget https://files.waveshare.com/wiki/USB-TO-TTL-(D)/USB_TO_TTL_(D)_Demo.zip
unzip USB_TO_TTL_\(D\)_Demo.zip -d ./USB_TO_TTL_\(D\)_Demo
cd USB_TO_TTL_\(D\)_Demo/Linux/
- Short TXD (green wire) and RXD (blue wire).
- Execute the example.
sudo python3 UART.py
Use the UART Debug Interface of the Raspberry Pi 5
- Connect this device to the PC, and connect the SH1.0 interface to the UART Debug interface of the Raspberry Pi 5:
- Download the following example (skip this step if you have executed the above example to download):
cd
rm -rf USB_TO_TTL_\(D\)_Demo.zip
rm -rf USB_TO_TTL_\(D\)_Demo
wget https://files.waveshare.com/wiki/USB-TO-TTL-(D)/USB_TO_TTL_(D)_Demo.zip
unzip USB_TO_TTL_\(D\)_Demo.zip -d ./USB_TO_TTL_\(D\)_Demo
- Enter the sample demo:
cd USB_TO_TTL_\(D\)_Demo/SH1.0_Raspberry_Pi5/
- Open SSCOM, select 1000ms interval to send.
- Execute the example, and you can see the transceiving phenomenon:
sudo python3 UART.py
Android
Software Installation
- Download Android serial assistant, unzip it, and install it.
- The above software has integrated the FT232 driver, there is no need to install additional drivers.
Device Usage
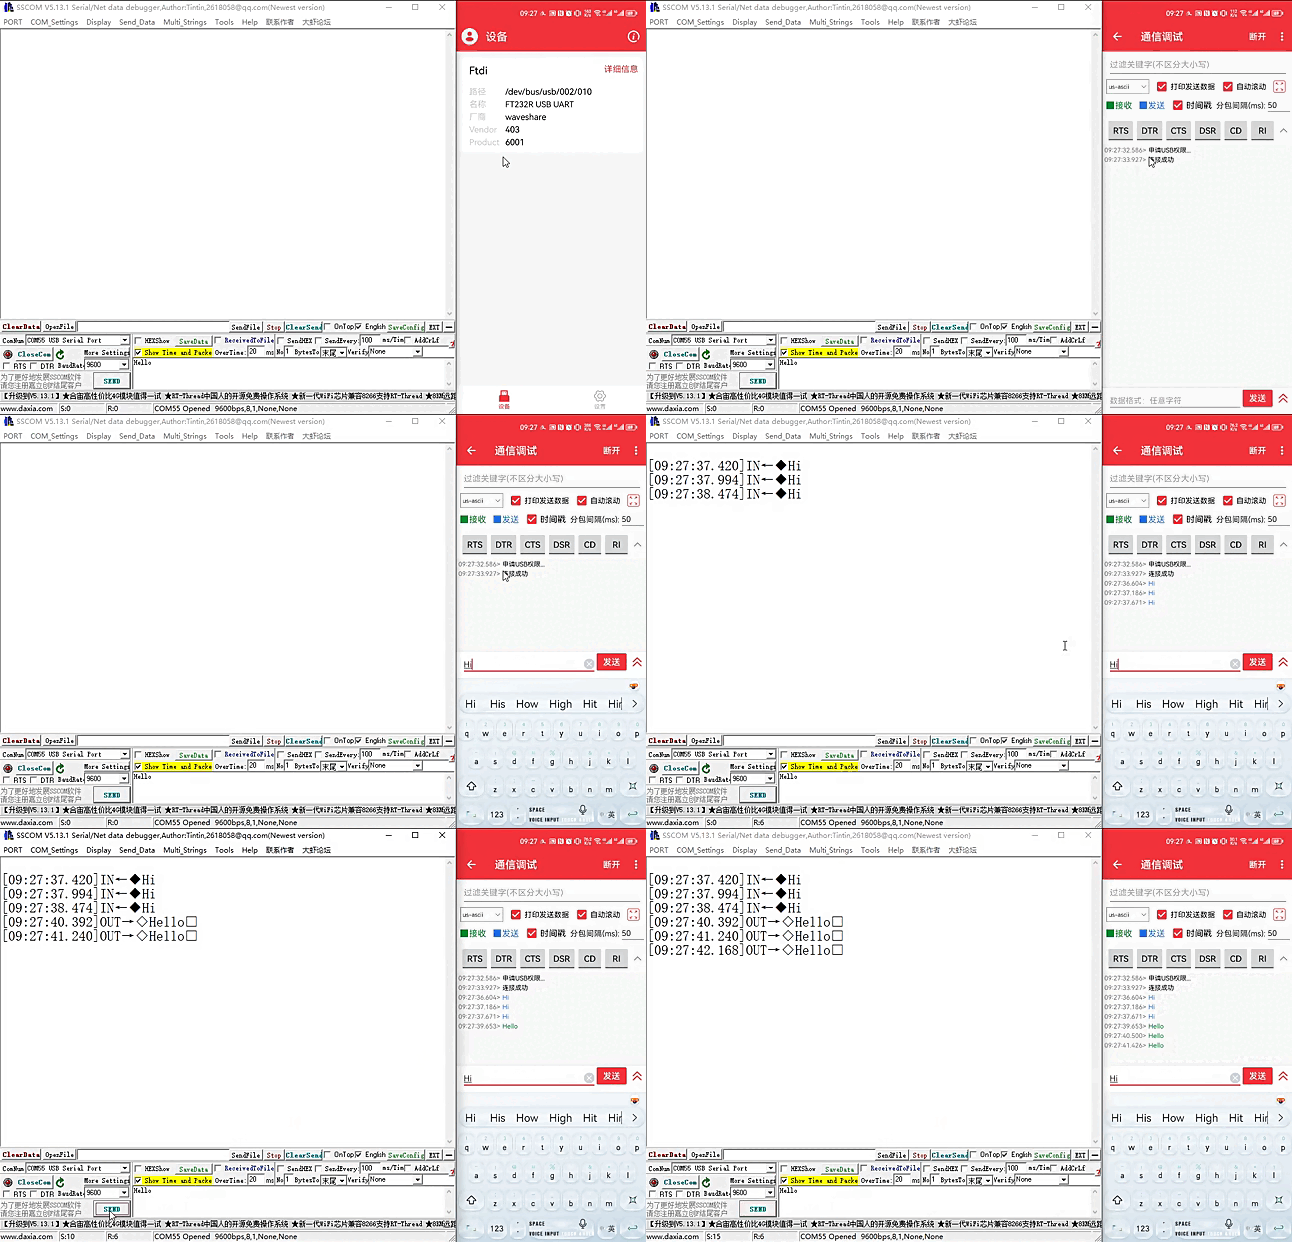
- Connect the USB of USB TO TTL (D) to the USB port of your Android phone through the OTG adapter cable, and at the same time, connect another USB TO TTL (D) to your computer through the USB port:
- A prompt appears to ask if the application is allowed to access the USB device, just OK.
- Enter the string to be sent into the cell phone's serial assistant, and the computer side receives the corresponding string in the serial assistant sscom, and vice versa.
- If you need to use the English version of the test assistant, you can search and install the appropriate debugging assistant software, which usually comes with a driver.
MacOS
- First click on here to download and install the driver.
- Click here to see how to install it.
- After the installation is complete, open the serial port assistant (For MAC, directly download the serial port debugging assistant online).
Resource
Demo
Software
Driver
Install the following driver demo or download it from FTDI website, for other systems, you can download the corresponding VCP from the FTDI website.
- Windows — VCP Driver
- MacOS — VCP Driver
- Android—SerialTool
- Linux supports FTDI devices, no drivers are required.
Software
Datasheet
FAQ
You can short TXD, RXD, and then send data in the serial port debugging assistant to see if there is any corresponding data return, if there is, the function is normal. As shown in the #SSCOM.
{{{5}}}
Linux supports this FTDI device, no need to install the driver.
{{{5}}}
Support
Technical Support
If you need technical support or have any feedback/review, please click the Submit Now button to submit a ticket, Our support team will check and reply to you within 1 to 2 working days. Please be patient as we make every effort to help you to resolve the issue.
Working Time: 9 AM - 6 PM GMT+8 (Monday to Friday)


