UPS HAT
| ||
Introduction
UPS HAT For Raspberry Pi, 5V Uninterruptible Power Supply, Multi Battery Protection Circuits.
Features
- Standard Raspberry Pi 40PIN GPIO extension header, supports Raspberry Pi series boards.
- I2C bus communication, monitoring the batteries' voltage, current, power, and remaining capacity in real time.
- Multi battery protection circuits: overcharge/discharge protection, over current protection, short circuit protection, and reverse protection, along with the equalizing charge feature, are safer and more stable.
- Onboard 5V regulator, up to 2.5A continuous output current.
- 5V USB output, convenient for powering other boards.
- Batteries warning indicators, easy to check if the battery is connected correctly.
- Comes with online resources and manuals.
Specifications
- Output voltage: 5V
- Charger: 8.4V 2A
- Control bus: I2C
- Battery supported: 3.7V 18650 Li battery (NOT included)
- Battery capacity: 5200mAh in total for 2 batteries (NOT included)
- Dimensions: 56mm × 85mm
- Mounting hole: 3.0mm
Hardware

Note that the 8.4V interface is the charging port. You can plug the 8.4V/2A charger provided for charging the batteries.
The switch is the power switch, you can turn it into ON/OFF to turn on/off Jetson Nano Developer Kit.
WARNING LED are the indicators of batteries, they turn on if you reverse batteries.
Note 1: Please check the WARNING LED when you install batteries, make sure that you set all the batteries in the correct way. Don't charge batteries if you reverse them.
Note 2: The board may not work when you install the batteries for the first time, you need to charge the batteries for a while to activate them.
Note 3: Please use the charger provided, the module may be destroyed by other unsuitable power adapters/chargers.
SAFETY CAUTIONS
- Li-ion and Li-po batteries are quite unstable. They may cause fire, personal injury, or property damage, if they're not properly recharged or used.
- Do not reversely connect the polarities when recharging or discharging the battery. Do not use inferior charger/charging panel to recharge the battery.
- Do not mix use old batteries with new ones, avoid using batteries of different brands.
- When buying Lithium battery, make sure the battery specification is compatible with the expansion board. Choose batteries from formal manufacturer, and ensure the batteries will work stably and safely by aging test.
- Lithium batteries have limited cycle life, they will also deteriorate as time goes by. Should be replaced with new ones when the batteries reaching their max cycle life, or working over two years, whichever comes first.
- Should be placed carefully and properly, keep it away from inflammables and explosives articles, away from children, avoid any safety accident caused by careless storage.
Raspberry Pi Demo
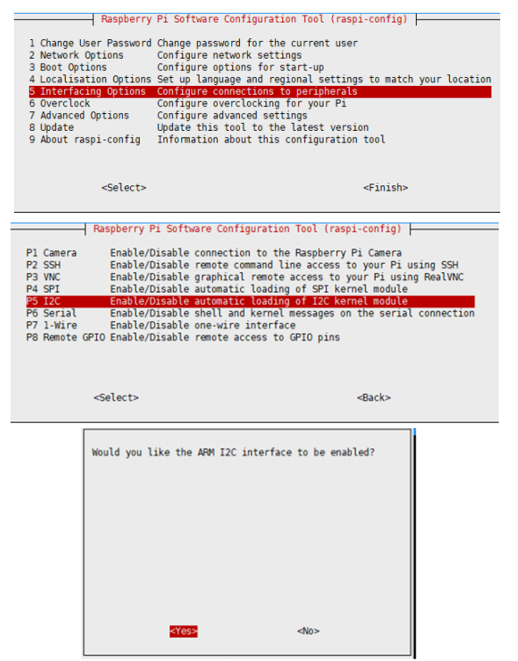
Enable I2C Interface
- Open the terminal of Raspberry Pi, and enter the following commands for the configuration interface:
sudo raspi-config
Select Interfacing Options -> I2C ->yes to start the i2C kernel driver
sudo reboot
You can just attach the UPS HAT on the 40PIN GPIO of Raspberry Pi or connect the i2c interface and to Raspberry Pi by wires. VCC should be connected to 3.3V
Open a terminal and run the following commands:
sudo apt-get install p7zip
wget https://files.waveshare.com/upload/d/d9/UPS_HAT.7z
7zr x UPS_HAT.7z -r -o./UPS_HAT
cd UPS_HAT
python3 INA219.py
The terminal will print the IP address, battery voltage, current and the percentage of battery quantity, as well as the CPU, GPU and memory information after starting the server.

Note: if the current value is negative, it means that the batteries are powering the Raspberry Pi. If the current value is positive, it means that the batteries are charging.
Resources
Demo codes
Document
FAQ
{{{5}}}
{{{5}}}
{{{5}}}
The negative current value means that the batteries are powering the Raspberry Pi.
{{{5}}}
{{{5}}}
{{{5}}}
{{{5}}}
You can use only one power supply 8.4V/2A for UPS hat is enough for raspberry pi board.
Do not connect direct power supply to raspberry pi board.
{{{5}}}
Support
Technical Support
If you need technical support or have any feedback/review, please click the Submit Now button to submit a ticket, Our support team will check and reply to you within 1 to 2 working days. Please be patient as we make every effort to help you to resolve the issue.
Working Time: 9 AM - 6 PM GMT+8 (Monday to Friday)


