
Template: Zero LCD HAT (A) Spec
Enable SPI interface
- Open the terminal, and use the command to enter the configuration page.
sudo raspi-config
Choose Interfacing Options -> SPI -> Yes  to enable the SPI interface

Reboot Raspberry Pi:
sudo reboot
Make sure that the SPI is not occupied by other devices, you can check in the middle of the /boot/config .txt.
Library Installtion
Python
#python2
sudo apt-get update
sudo apt-get install python-pip
sudo apt-get install python-pil
sudo apt-get install python-numpy
sudo pip install RPi.GPIO
sudo pip install spidev
#python3
sudo apt-get update
sudo apt-get install python3-pip
sudo apt-get install python3-pil
sudo apt-get install python3-numpy
sudo -H pip3 install --upgrade luma.oled
sudo pip3 install RPi.GPIO
sudo pip3 install spidev
Download Test Demo
Open the Raspberry Pi terminal and execute:
sudo apt-get install unzip -y
sudo wget https://files.waveshare.com/wiki/Zero-LCD-HAT-A/Zero_LCD_HAT_A_Demo.zip
sudo unzip ./Zero_LCD_HAT_A_Demo.zip
cd Zero_LCD_HAT_A_Demo
Python
- Enter the Python demo directory:
cd python/example
- Run the example demo:
# Run the 0inch96 screen 1:
sudo python 0inch96_spi0ce0.py

# Run 0inch96 screen 2:
sudo python 0inch96_spi0ce1.py

# Run 1inch3 screen
sudo python 1inch3_spi1ce0.py
(Add "dtoverlay=spi1-1cs" to the config.txt file to open the SPI device before running this command.)

# Synchronously run two 0.96inch screens:
sudo python double_0inch96_spi.py
Or
sudo python3 CPU.py

# Run the key demo:
sudo python3 key_double.py
FPCP Porting
Note: It is not recommended to run other demos (i.e python display demo) of 1.3inch screen after running FBCP porting as they may conflict.
Download Drives
Open the Raspberry Pi terminal and execute:
sudo apt-get install unzip -y
sudo apt-get install cmake -y
sudo wget https://files.waveshare.com/wiki/Zero-LCD-HAT-A/Zero_LCD_HAT_A_fbcp.zip
sudo unzip ./Zero_LCD_HAT_A_fbcp.zip
sudo cp Zero_LCD_HAT_A.dtbo /boot/overlays/
sudo wget https://files.waveshare.com/wiki/OLED-LCD-HAT-A/Rpi-fbcp.zip
sudo unzip ./Rpi-fbcp.zip
cd rpi-fbcp/
sudo mkdir build
cd build
sudo cmake ..
sudo make -j8
sudo install fbcp /usr/local/bin/fbcp
sudo ./fbcp
Edit the config.txt file:
sudo nano /boot/config.txt
Please block the following sentence:

Add the following code at the end of config.txt:
dtparam=spi=on
dtoverlay=Zero_LCD_HAT_A

hdmi_force_hotplug=1
max_usb_current=1
hdmi_group=2
hdmi_mode=1
hdmi_mode=87
hdmi_cvt 240 240 60 6 0 0 0
hdmi_drive=2
dtoverlay=spi1-1cs
display_rotate=0
Set up to Boot Automatically
sudo cp ~/rpi-fbcp/build/fbcp /usr/local/bin/fbcp
sudo nano /etc/rc.local
Add fbcp& in front of exit 0. Be sure to add the "&" and run it in the background, otherwise, the system may not boot.

A reboot is then required:
sudo reboot
After rebooting, it can normally display.
API
Raspberry Pi series can all share a common set of programs as they are embedded systems with better compatibility.
The demo is divided into the bottom hardware interface, the middle layer LCD driver, and the upper layer application.
Python (For Raspberry Pi)
It is for Python and Python3.
For Python, its invocation isn't as complex as C.
lcdconfig.py
- Module initialization and exit processing.
def module_init()
def module_exit()
Note:
1. Here is some GPIO processing before and after using the LCD screen.
2. The module_init() function is automatically called in the INIT () initializer on the LCD, but the module_exit() function needs to be called by itself
- GPIO read and write:
def  digital_write(pin, value)
def  digital_read(pin)
- SPI write data.
def spi_writebyte(data)
About Rotation Settings
If you need to set the screen rotation in the Python program, you can set it by the statement im_r= image1.rotate(270).
im_r= image1.rotate(270)
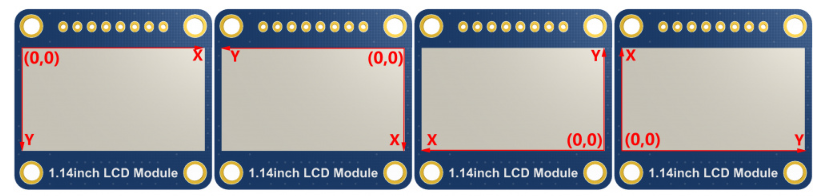
- Rotation effect, take 1.14 as an example, the order is 0°, 90°, 180°, 270°.

GUI Functions
Python has an image library PIL official library link, it does not need to write code from the logical layer like C and can directly call the image library for image processing. The following will take a 1.54-inch LCD as an example, we provide a brief description of the demo.
- It needs to use the image library and install the library.
sudo apt-get install python3-pil
And then import the library.
from PIL import Image,ImageDraw,ImageFont.
Among them, Image is the basic library, ImageDraw is the drawing function, and ImageFont is the text function.
- Define an image cache to facilitate drawing, writing, and other functions on the picture.
image1 = Image.new("RGB", (disp.width, disp.height), "WHITE")
The first parameter defines the color depth of the image and is defined as "RGB" which means RGB888 colorful image. The second parameter is a tuple that defines the width and height of the image. The third parameter defines the default color of the buffer, which is defined as "WHITE".
- Create a drawing object based on Image1 on which all drawing operations will be performed on here.
draw = ImageDraw.Draw(image1)
- Draw a line.
draw.line([(20, 10),(70, 60)], fill = "RED",width = 1)
The first parameter is a 4-element tuple, with (20, 10) as the starting point and (70, 60) as the ending point, to draw a straight line. fill="RED" indicates that the line is red in color, and width=1 specifies a line width of 1 pixel.
- Draw a rectangle.
draw.rectangle([(20,10),(70,60)],fill = "WHITE",outline="BLUE")
The first parameter is a 4-element tuple, with (20, 10) as the coordinates of the upper-left corner of the rectangle, and (70, 60) as the coordinates of the lower-right corner of the rectangle. fill="WHITE" specifies that the interior is filled with white color, and outline="BLUE" indicates that the outer border is blue.
- Draw a circle.
draw.arc((150,15,190,55),0, 360, fill =(0,255,0)
Draw an inscribed circle in the square, the first parameter is a tuple of 4 elements, with (150, 15) as the upper left corner vertex of the square, (190, 55) as the lower right corner vertex of the square, specifying the level median line of the rectangular frame is the angle of 0 degrees, the second parameter indicates the starting angle, the third parameter indicates the ending angle, and fill = (0,255,0) indicates that the color of the line is green. If the figure is not square according to the coordination, you will get an ellipse.
Besides the arc function, you can also use the chord function for drawing a solid circle.
draw.ellipse((150,65,190,105), fill = (0,255,0))
In essence, it's drawing an ellipse. The first parameter specifies the bounding rectangle of the chord, and fill = (0, 255, 0) indicates that the interior is filled with green color. If the bounding rectangle of the ellipse is a square, the ellipse becomes a circle.
- Character.
The ImageFont module needs to be imported and instantiated:
Font1 = ImageFont.truetype("../Font/Font01.ttf",25)
Font2 = ImageFont.truetype("../Font/Font01.ttf",35)
Font3 = ImageFont.truetype("../Font/Font02.ttf",32)
You can use the fonts of Windows or other fonts which is in ttc format..
Note: Each character library contains different characters; If some characters cannot be displayed, it is recommended that you refer to the encoding set to be used.
To draw English characters, you can directly use the fonts; for Chinese characters, you need to add a symbol u:
draw.text((40, 50), 'WaveShare', fill = (128,255,128),font=Font2)
text= u"微雪电子"
draw.text((74, 150),text, fill = "WHITE",font=Font3)
The first parameter is a 2-element tuple with (40, 50) as the left-top point. The font is set to Font2, and you can specify the font color with fill. You can directly use fill = "WHITE", as standard color values are already defined. Alternatively, you can use fill = (128, 255, 128), where the values in parentheses correspond to the RGB values for precise color control.
The second line displays "Waveshare" using Font3, with the font color set to white.
- Read local pictures.
image = Image.open('../pic/LCD_1inch28.jpg')
The parameter is the image path.
- Other functions.
Python's image library is very powerful, if you need to implement more, you can learn on the website http://effbot.org/imagingbook pil.