
Template: Hall Sensor Pico Guide
From Waveshare Wiki
Use with Pico
Configure Pico
MicroPython and C examples are provided for this sensor, to use it with Pico, you need to first flash firmware to the Pico according to the example.
Please refer to the guides of Raspberry Pi about how to flash the firmware. We recommend you use the firmware from the Demo codes archive.
Hardware connection

| Hall | Pico | Description |
|---|---|---|
| VCC | 3.3V | Power input |
| GND | GND | Ground |
| AOUT | GP26 | Analog data output |
| DOUT | GP22 | Digital data output |
Examples
Download the example
Open the terminal of Raspberry Pi and run the following command to download the example:
sudo apt-get install p7zip-full
cd ~
sudo wget  https://files.waveshare.com/upload/7/75/Hall-Sensor-code.7z
7z x Hall-Sensor-code.7z -o./Hall-Sensor-code
cd ~/Hall-Sensor-code
C
Here we use the Raspberry Pi board to flash the Pico.
- Compile the c examples.
- Go into the directory of C examples.
cd ~/Hall-Sensor-code/Pico/c/
- Go into the build folder and add the sdk; ../../pico-sdk is the path of the SDK, if may be different if you have saved the SDK in other paths.
cd build
export PICO_SDK_PATH=../../pico-sdk
- Generate Makefile by cmake command
cmake ..
- Compile the codes by command make
make -j9
- Note: If you use Pi zero, please run make only.
- After compiling, a uf2 file is generated.
- Hold the button of the Pico board, and connect the Pico board to Raspberry Pi by USB cable.
- After connecting, release the button, and a portable disk (RPI_RP2) is recognized.
- Copy the main.uf2 file generated which locates in the build folder to the portable disk (RPI-RP2).
cp main.uf2 /media/pi/RPI-RP2/
Python examples
- In Windows PC
- Hold the BOOTSET button of the PICO board, and connect the Pico board to Raspberry Pi by USB cable.
- After connecting, release the button, and a portable disk (RPI-RP2) is recognized.
- Copy the rp2-pico-20210418-v1.15.uf2 file to the portable disk (RPI-RP2).
- Open the Thonny IDE (Please install the newest version which supports the Pico board or update).
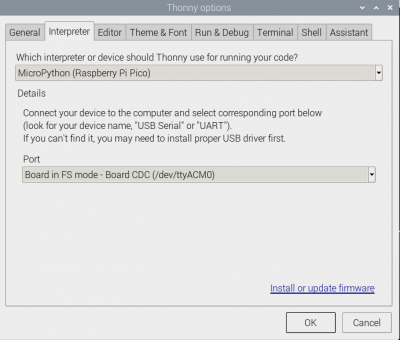
- Choose Tools -> Options ->Interpreter, and choose the Pico and the port.

- Download the demo codes, unzip, and find the MicroPython example.
- Choose File -> Open -> Hall Sensor.py and run it.

- In Raspberry Pi

- Flash the uf2 file to the Pico board just like in the Windows PC.
- Open the Thonny IDE of Pi, make sure that it is the newest version, or update it.
- Choose Tools -> Options... -> Interpreter.
- Choose Pico and the Port.
- If your Thonny IDE cannot support the Pico board, you can update it and try again.

sudo apt upgrade thonny
- Choose File -> Open... -> python/Hall Sensor.py and run it.
Expected result
- The indicator of the sensor lights up when the sensor is near the magnet and goes off when it is away from the magnet.
- As the sensor contacts and separates from the metal, the output data of the serial port will change accordingly.