Template: ESP32 e-Paper WiFi-Example
From Waveshare Wiki
WiFi Demo
Provide WiFi demos with an HTML host computer.
Note: The module only supports the 2.4G network band.
How to Use
- Go to the Loader_esp32wf directory, double click Loader_esp32wf.ino file to open the project.
- Choose Tools -> Boards -> ESP32 Dev Module in the IDE menu, and select the correct COM port: Tools -> Port.
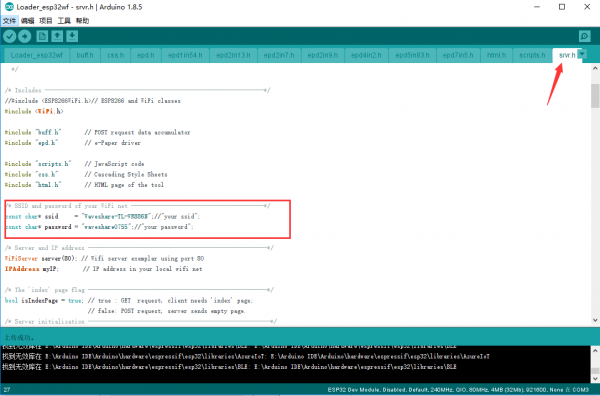
- Open the srvr.h file and change the ssid and password to the actual WiFi username and password used.
- Modify the WiFi username and password here to match the WiFi username and password of your router or mobile hotspot. In this program, the ESP32 acts as a slave, not a host, so it will not transmit the WiFi hotspot message outward.
- Press win + R and type CMD to open the command line and get the IP of your computer.
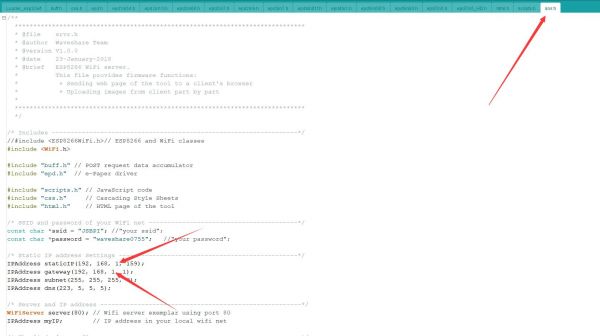
- Open the srvr.h file, modify the network segment in the location shown in the picture to the corresponding network segment.
- Note: the IP address of ESP32 (that is, the fourth bit) should not be the same as the address of the computer, and the rest should be the same as the IP address of the computer.
- Then click upload to compile and download the demo to the ESP8266 driver board.
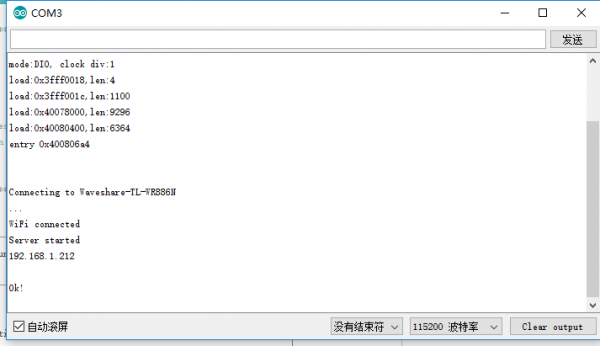
- Open the serial monitor and set the baud rate to 115200, you can see the serial port print out the IP address of the ESP32 driver board as follows:
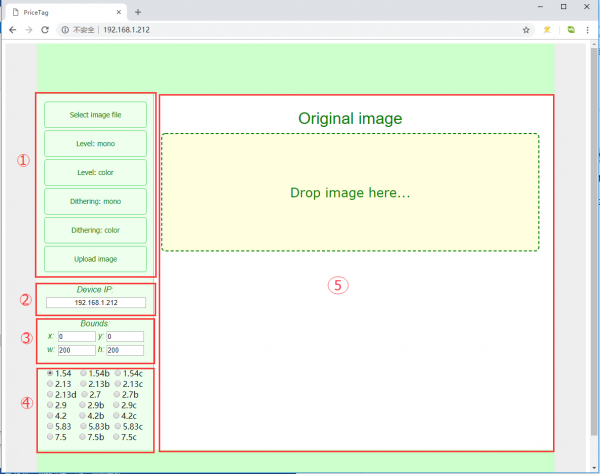
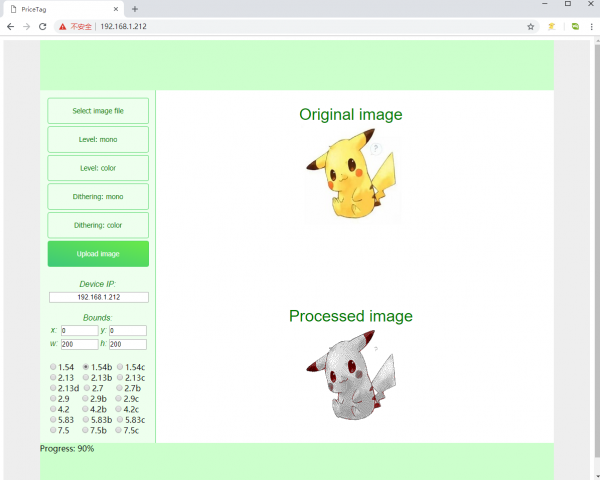
- Open the browser on your computer or cell phone (note that the network you are accessing needs to be on the same network segment as the wifi connected to the ESP8266), enter the IP address of the ESP8266 in the URL input field, and open it, you can see the operation interface as follows.
- The entire operation interface is divided into five areas:
- Image Operation Area:
Select Image file: Click to choose an image from your computer or phone
Level: mono: Black and white image processing algorithm
Level: color: Multi-color image processing algorithm (only effective for multi-color screens)
Dithering: mono: Black dithering image processing algorithm
Dithering: color: Multi-color dithering image processing algorithm (only effective for multi-color screens)
Update image: Upload image - IP information display area: This displays the IP address information of the module you are currently connected to
- Image size setting area: Here, x and y can be set to specify the starting position of the display, which is relative to the image file you have selected. For example, if you choose an 800x480 image but the e-Paper screen you are connected to is 2.9 inches, the screen will not be able to display the entire image. In this case, the processing algorithm will automatically crop the image from the upper left corner and send a portion of it to the e-ink screen for display. You can set x and y to customize the starting position of the cropping. W and h represent the resolution of the current e-ink screen. Note: If you modify the x and y coordinates, you need to click on the processing algorithm again to generate a new image.
- Model selection area: Here, you can choose the e-ink screen model you are connected to.
- Image display area: Here, the selected image and the processed image will be displayed.
- PS: During image upload, the upload progress will be displayed at the bottom.
- Image Operation Area:
- Area ①: Click "Select Image file" to choose an image, or drag and drop the image directly into the "Original image" area.
- Area ④: Choose the corresponding e-Paper model, for example, 1.54b.
- Area ①: Click on an image processing algorithm, for example, "Dithering: color".
- Area ①: Click "Upload image" to upload the image to the e-ink screen display.

