
Template: 1.28inch Touch LCD pico use
Raspberry Pi Pico
Hardware Connection
| Pin | Raspberry Pi Pico |
| VCC | 3.3V |
| GND | GND |
| MISO | GP12 |
| MOSI | GP11 |
| SCLK | GP10 |
| LCS_CS | GP9 |
| LCS_DC | GP14 |
| LCS_RST | GP8 |
| LCS_BL | GP15 |
| TP_SDA | GP6 |
| TP_SCL | GP7 |
| TP_INT | GP17 |
| TP_RST | GP16 |
C/C++ Development Environment Installation
- Before using the demos and tutorials, you need to set up a development environment and learn the basic methods.
- Pico-Get-Start-Windows
- Pico-Get-Start-RPI
Software Environment Debugging
- In order to facilitate the development of Pico boards using MicroPython on the computer, it is recommended to download Thonny IDE.
- Download Thonny IDE and install it by steps.
- After installing, please configure the language and the environment for the first time. Note that we should choose the Raspberry Pi option in the board environment.

- Configure the Micrpython environment and select the Pico port.
- First connect the Raspberry Pi Pico to the computer, left-click on the configuration environment option in the lower right corner of Thonny--> select configure an interpreter.
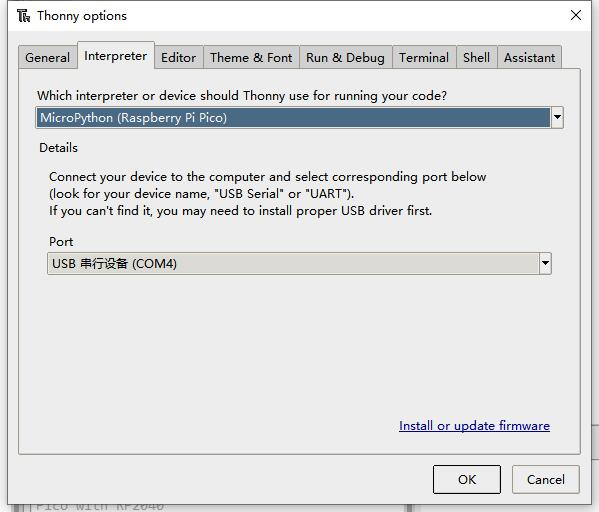
- In the pop-up window bar, select MicroPython (Raspberry Pi Pico), and select the corresponding port.


- Click OK to return to the main interface of Thonny, download the firmware library to Pico, and then click the stop button to display the currently used environment in the Shell window.
- Pico download firmware library method in windows: Press and hold the BOOT button and connect to the computer, release the BOOT button, and a removable disk will appear on the computer and copy the firmware library into it.
Raspberry Pi
- Open the Raspberry Pi and execute:
sudo apt-get install p7zip-full
cd ~
sudo wget https://files.waveshare.com/upload/3/3e/1.28inch_Touch_LCD_Pico.zip
unzip 1.28inch_Touch_LCD_Pico.zip
cd ~/1.28inch_Touch_LCD_Pico
cd c/build/
How to Use Demos
C
- The following tutorial is operated on Raspberry Pi. As cMake features multi-platforms and portability, it can be sucessufully compiled on the PC. The operation my be a little different, you need to judge it by yourselves.
Compile, please make sure it is in the c directory:
cd ~/1.28inch_Touch_LCD_Pico/c/
Create and enter build directory, add SDK: ../../pico-sdk is your SDK directory. In our example demo, there is "build", you can directly enter:
cd build
export PICO_SDK_PATH=../../pico-sdk
(Note: please correctly write your SDK path)
Execute cmake and automatically generate Makefile.
cmake ..
Execute make to generate the executable file, you may wait for a long time as it is the first time to be compiled.
make -j9
After compiling, uf2 file will generate. Press the button on the Pico board, Pico can connect to the USB port of the Raspberry Pi via a Micro USB cable, and then release the buttons. After connecting, Raspberry Pi will automatically identify a movable disk (RPI-RP2), and copy main.uf2 in the build file to the recognizable movable disk (RPI-RP2).
cp main.uf2 /media/pi/RPI-RP2/
Python
- 1. On the Raspberry Pi, copy ~/1.28inch_Touch_LCD_Pico/python/rp2-pico-20221125-v1.19.1.uf2 to Pico.
- 2. Open Thonny IDE on the Raspberry Pi (click Raspberry Pi logo -> Programming -> Thonny Python IDE), and you can check the version information in Help -> About Thonny.
To ensure your version that your version includes the package supported Pico, you can click Tools -> Options... -> Interpreter, choose MicroPython (Raspberry Pi Pico and ttyACM0 port).
As shown below:

If your current Thonny version has no package supporting Pico, you can enter the following commands to update Thonny IDE.
sudo apt upgrade thonny
3. Click File->Open...->~/1.28inch Touch LCD Pico/python/1.28inch_Touch_LCD.py, and then run the script.
Windows
- Click to download 1.28inch Touch LCD Pico.zip, decompress the package and go to the 1.28-inch Touch LCD Pico folder.
C
- After entering 1.28inch_Touch_LCD_Pico\c, you can open the project with vs code.

- Choose the Compiler.

- Start to compile.

- Finish.

- Copy the main.uf2 filr in build to Pico, and then it can automatically run the demo.

Python
- Press the BOOTSET button on the Pico and connect the pico to the USB port of the computer with a Micro USB cable. Release the button when the computer identifies a movable disk (RPI-RP2).
- Copy rp2-pico-20221125-v1.19.1.uf2 file in the python directory to the recognizable movable disk(RPI-RP2).
- Open Thonny IDE (Note: please use the latest version of Thonny, otherwise there is no Pico supporting package. Currently, the newest version in Windows is v3.3.3.)
- Click Tool -> Setting ->Explainer. select the Pico and the corresponding port as shown below:
- File -> Open -> 1.28inch_Touch_LCD.py, click to run, the effect is shown as below.


We provide a simple demo for you...
Demo Analysis
C
Bottom Hardware Interface
We package the bottom hardware layer for easily porting to the different hardware platforms.
DEV_Config.c(.h) in the directory:...\c\lib\Config
- Data type:
#define UBYTE   uint8_t
#define UWORD   uint16_t
#define UDOUBLE uint32_t
- Module initialize and exit:
void DEV_Module_Init(void);
void DEV_Module_Exit(void);
Note:
1. The functions above are used to initialize the display or exit handle.
- GPIO write/read:
void 	DEV_Digital_Write(UWORD Pin, UBYTE Value);
UBYTE 	DEV_Digital_Read(UWORD Pin);
- SPI transmits data.
void DEV_SPI_WriteByte(UBYTE Value);
- I2C writes and reads data.
void DEV_I2C_Write_Byte(uint8_t addr, uint8_t reg, uint8_t Value);
void DEV_I2C_Write_nByte(uint8_t addr, uint8_t *pData, uint32_t Len);
uint8_t DEV_I2C_Read_Byte(uint8_t addr, uint8_t reg);
void DEV_I2C_Read_nByte(uint8_t addr, uint8_t reg, uint8_t *pData, uint32_t Len);
Application functions
We provide basic GUI functions for testing, like draw point, line, string, and so on.
The GUI function can be found in directory:..\c\lib\GUI\GUI_Paint.c(.h).

The fonts used can be found in the directory: RaspberryPi\c\lib\Fonts.

- Create a new image, you can set the image name, width, height, rotate angle, and color.
void Paint_NewImage(UWORD *image, UWORD Width, UWORD Height, UWORD Rotate, UWORD Color, UWORD Depth)
Parameter:
 	image: Name of the image buffer, this is a pointer;
 	Width: Width of the image;
 	Height: Height of the image;
 	Rotate: Rotate the angle of the Image;
 	Color: The initial color of the image;
 	Depth: Depth of the color
- Select image buffer: You can create multiple image buffers at the same time and select the certain one and draw by this function.
void Paint_SelectImage(UBYTE *image)
Parameter:
 	image: The name of the image buffer, this is a pointer;
- Set point displays position and color in the cache: Here is the core function of the GUI, the processing point displays position and color in the cache.
void Paint_SetPixel(UWORD Xpoint, UWORD Ypoint, UWORD Color)
Parameter:
 	Xpoint: Point X position in the image cache
 	Ypoint: Point Y position in the image cache
 	Color: The color in which the dot is displayed
- Image cache fill color: fill the image cache to a certain color, generally as the role of screen whitening
void Paint_Clear(UWORD Color)
Parameter:
 	Color: The filling color
- Image cache part window fill color: fill a certain part of the image cache window with a certain color, generally as the role of window whitening, often used for the display of time, refreshing white for one second.
void Paint_ClearWindows(UWORD Xstart, UWORD Ystart, UWORD Xend, UWORD Yend, UWORD Color)
Parameter:
 	Xstart: The X start coordinate of the window
 	Ystart: The Y-start coordinate of the window
 	Xend: The X endpoint coordinates of the window
 	Yend: The Y-end coordinates of the window
 	Color: The color of the fill
- Draw point: Draw a point at the position (Xpoint, Ypoint) of the image buffer, you can configure the color, size, and style.
void Paint_DrawPoint(UWORD Xpoint, UWORD Ypoint, UWORD Color, DOT_PIXEL Dot_Pixel, DOT_STYLE Dot_Style)
Parameter:
 	Xpoint: X-axis position of the point.
 	Ypoint: Y-axis position of the point
 	Color: Color of the point
 	Dot_Pixel: Size of the point, 8 sizes are available.
 	 	 typedef enum {
 	 	 	 DOT_PIXEL_1X1  = 1,	// 1 x 1
 	 	 	 DOT_PIXEL_2X2  , 		// 2 X 2
 	 	 	 DOT_PIXEL_3X3  , 	 	// 3 X 3
 	 	 	 DOT_PIXEL_4X4  , 	 	// 4 X 4
 	 	 	 DOT_PIXEL_5X5  , 		// 5 X 5
 	 	 	 DOT_PIXEL_6X6  , 		// 6 X 6
 	 	 	 DOT_PIXEL_7X7  , 		// 7 X 7
 	 	 	 DOT_PIXEL_8X8  , 		// 8 X 8
 	 	} DOT_PIXEL;
 	Dot_Style: The style of the point, defines the extended mode of the point.
 	 	typedef enum {
 	 	   DOT_FILL_AROUND  = 1,
 	 	   DOT_FILL_RIGHTUP,
 	 	} DOT_STYLE;
- Draw the line: Draw a line from (Xstart, Ystart) to (Xend, Yend) in the image buffer, you can configure the color, width, and style.
void Paint_DrawLine(UWORD Xstart, UWORD Ystart, UWORD Xend, UWORD Yend, UWORD Color, LINE_STYLE Line_Style , LINE_STYLE Line_Style)
Parameter:
 	Xstart: Xstart of the line
 	Ystart: Ystart of the line
 	Xend: Xend of the line
 	Yend: Yend of the line
 	Color: Color of the line
 	Line_width: Width of the line, 8 sizes are available.
 	 	typedef enum {
 	 	 	 DOT_PIXEL_1X1  = 1,	// 1 x 1
 	 	 	 DOT_PIXEL_2X2  , 		// 2 X 2
 	 	 	 DOT_PIXEL_3X3  ,		// 3 X 3
 	 	 	 DOT_PIXEL_4X4  ,		// 4 X 4
 	 	 	 DOT_PIXEL_5X5  , 		// 5 X 5
 	 	 	 DOT_PIXEL_6X6  , 		// 6 X 6
 	 	 	 DOT_PIXEL_7X7  , 		// 7 X 7
 	 	 	 DOT_PIXEL_8X8  , 		// 8 X 8
 	 	} DOT_PIXEL;
 	 Line_Style: Style of the line, Solid or Dotted.
 	 	typedef enum {
 	 	 	 LINE_STYLE_SOLID = 0,
 	 	 	 LINE_STYLE_DOTTED,
 	 	} LINE_STYLE;
- Draw a rectangle: Draw a rectangle from (Xstart, Ystart) to (Xend, Yend), you can configure the color, width, and style.
void Paint_DrawRectangle(UWORD Xstart, UWORD Ystart, UWORD Xend, UWORD Yend, UWORD Color, DOT_PIXEL Line_width, DRAW_FILL Draw_Fill)
Parameter:
 	Xstart: Xstart of the rectangle.
 	Ystart: Ystart of the rectangle.
 	Xend: Xend of the rectangle.
 	Yend: Yend of the rectangle.
 	Color: Color of the rectangle
 	Line_width: The width of the edges. 8 sizes are available.
 	 	typedef enum {
 	 	 	 DOT_PIXEL_1X1  = 1,	// 1 x 1
 	 	 	 DOT_PIXEL_2X2  , 		// 2 X 2
 	 	 	 DOT_PIXEL_3X3  ,		// 3 X 3
 	 	 	 DOT_PIXEL_4X4  ,		// 4 X 4
 	 	 	 DOT_PIXEL_5X5  , 		// 5 X 5
 	 	 	 DOT_PIXEL_6X6  , 		// 6 X 6
 	 	 	 DOT_PIXEL_7X7  , 		// 7 X 7
 	 	 	 DOT_PIXEL_8X8  , 		// 8 X 8
 	 	} DOT_PIXEL;
 	Draw_Fill: Style of the rectangle, empty or filled.
 	 	typedef enum {
 	 	 	 DRAW_FILL_EMPTY = 0,
 	 	 	 DRAW_FILL_FULL,
 	 	} DRAW_FILL;
- Draw circle: Draw a circle in the image buffer, use (X_Center Y_Center) as the center and Radius as the radius. You can configure the color, width of the line and style of a circle.
void Paint_DrawCircle(UWORD X_Center, UWORD Y_Center, UWORD Radius, UWORD Color, DOT_PIXEL Line_width, DRAW_FILL Draw_Fill)
Parameter:
 	X_Center: X-axis of center
 	Y_Center: Y-axis of center
 	Radius: radius of the circle
 	Color: The color of the circle
 	Line_width: The width of the arc, 8 sizes are available.
 	 	typedef enum {
 	 	 	 DOT_PIXEL_1X1  = 1,	// 1 x 1
 	 	 	 DOT_PIXEL_2X2  , 		// 2 X 2
 	 	 	 DOT_PIXEL_3X3  ,		// 3 X 3
 	 	 	 DOT_PIXEL_4X4  ,		// 4 X 4
 	 	 	 DOT_PIXEL_5X5  , 		// 5 X 5
 	 	 	 DOT_PIXEL_6X6  , 		// 6 X 6
 	 	 	 DOT_PIXEL_7X7  , 		// 7 X 7
 	 	 	 DOT_PIXEL_8X8  , 		// 8 X 8
 	 	} DOT_PIXEL;
 	Draw_Fill: Style of the circle: empty or filled.
 	 	typedef enum {
 	 	 	 DRAW_FILL_EMPTY = 0,
 	 	 	 DRAW_FILL_FULL,
 	 	} DRAW_FILL;
- Show Ascii character: Show a character in (Xstart, Ystart) position, you can configure the font, foreground, and background.
void Paint_DrawChar(UWORD Xstart, UWORD Ystart, const char Ascii_Char, sFONT* Font, UWORD Color_Foreground, UWORD Color_Background)
Parameter:
 	Xstart: Xstart of the character
 	Ystart: Ystart of the character
 	Ascii_Char: Ascii char
 	Font: five fonts are available:
 	 	font8:5*8
 	 	font12:7*12
 	 	font16:11*16
 	 	font20:14*20
 	 	font24:17*24
 	Color_Foreground: foreground color
 	Color_Background: background color
- Draw English string: In (Xstart Ystart) as the left vertex, write a string of English characters, you can choose Ascii code visual character library, font foreground color, or font background color.
void Paint_DrawString_EN(UWORD Xstart, UWORD Ystart, const char * pString, sFONT* Font, UWORD Color_Foreground, UWORD Color_Background)
Parameter:
 	Xstart: Xstart of the string
 	Ystart: Ystart of the string
 	pString: String
 	Font: five fonts are available:
 	 	font8:5*8
 	 	font12:7*12
 	 	font16:11*16
 	 	font20:14*20
 	 	font24:17*24
 	Color_Foreground: foreground color
 	Color_Background: background color
- Draw Chinese string: Draw Chinese string at (Xstart Ystart) of the image buffer. You can configure fonts (GB2312), foreground, and background.
void Paint_DrawString_CN(UWORD Xstart, UWORD Ystart, const char * pString, cFONT* font, UWORD Color_Foreground, UWORD Color_Background)
Parameter:
 	Xstart: Xstart of string
 	Ystart: Ystart of string
 	pString: string
 	Font: GB2312 fonts, two fonts are available
 	 	font12CN:ascii 11*21,Chinese 16*21
 	 	font24CN:ascii 24*41,Chinese 32*41
 	Color_Foreground: Foreground color
 	Color_Background: Background color
- Draw number: In the image buffer, at (Xstart Ystart) as the left vertex, write a string of numbers, you can choose the Ascii font, font foreground color, or font background color.
void Paint_DrawNum(UWORD Xpoint, UWORD Ypoint, double Nummber, sFONT* Font, UWORD Digit,UWORD Color_Foreground, UWORD Color_Background);
Parameter:
 	Xstart: Left vertex X coordinate
 	Ystart: Left vertex Y coordinate
 	Nummber: The displayed number is stored in a 32-bit int type, which can be displayed up to 2147483647.
 	 	font8:5*8
 	 	font12:7*12
 	 	font16:11*16
 	 	font20:14*20
 	 	font24:17*24
        Digit: Display decimal places
 	Color_Foreground: Foreground color
 	Color_Background: Background color
- Display time: In (Xstart Ystart) as the left vertex, display for a period of time, you can choose Ascii code visual character library, font foreground color, and font background color.
void Paint_DrawTime(UWORD Xstart, UWORD Ystart, PAINT_TIME *pTime, sFONT* Font, UWORD Color_Background, UWORD Color_Foreground)
Parameter:
 	Xstart: The left vertex X coordinate of the character
 	Ystart: The left vertex Y coordinate of the character
 	pTime: The displayed time, here defines a time structure, just pass the number of hours, minutes, and seconds to the parameter
 	Font: Ascii font, five fonts are available
 	 	font8:5*8
 	 	font12:7*12
 	 	font16:11*16
 	 	font20:14*20
 	 	font24:17*24
 	Color_Foreground: Foreground
 	Color_Background: Background
MicroPython (Applicable for Raspberry Pi Pico)
- For basic library, you can refer to Pico python sdk.pdf, for more details, you can click here.
- See this link for graphic library usage.