Servo Driver HAT
| ||
| ||
Overview
Introduction
This product is a PWM/servo expansion board based on Raspberry Pi. It can expand 16-ch servo control or PWM output through the PCA9685 chip, and each channel has a 12-bit resolution. With the I2C interface for controlling, it does not require any other pins. The onboard 5V voltage regulator chip can be connected to the battery, and the maximum output current is 3A. It is suitable for controlling robotic arms and various servo robots.
Features
- Power supply: 6V-12V
- Servo voltage: 5V
- Logic voltage: 3.3V
- Driver: PCA9685
- Control interface: I2C
- Dimension: 65mm x 30mm
- Mounting hole size: 3.0mm
Hardware Description
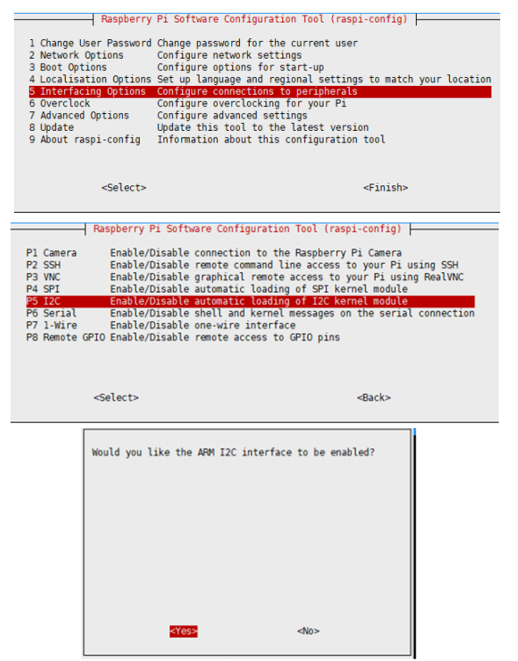
It does not need additional power as its power supply is from Raspberry Pi.
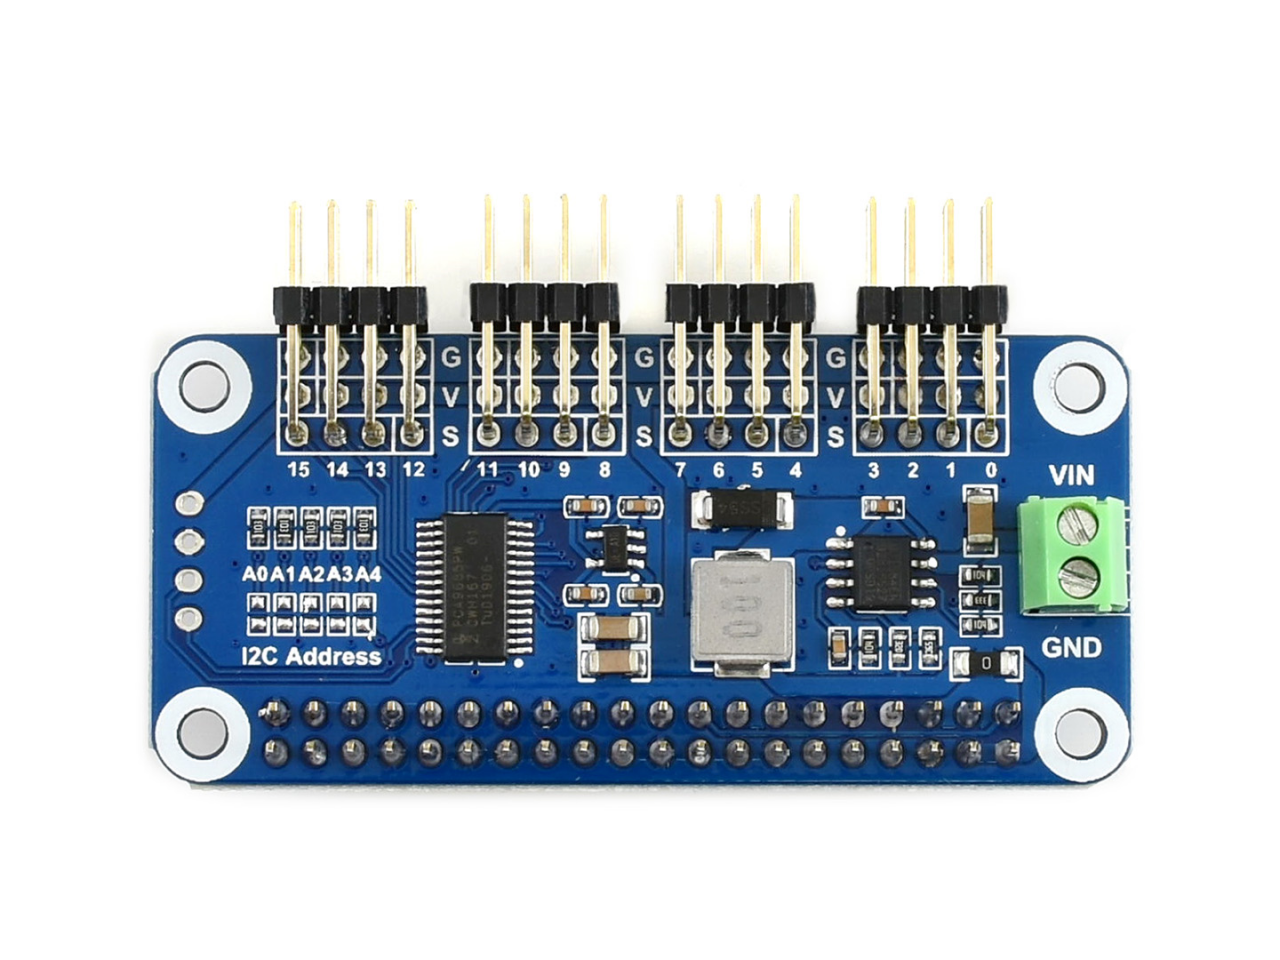
Also, you can power it by the green terminal VIN on the right side with a range of 6V-12V. When the servo and Raspberry Pi are provided by 5V from the onboard constant voltage chip, the maximum current output is 3A.
A0-A4 can be used to set the I2C device address of the PCA9685 chip and can be connected to multiple Servo Driver HAT at the same time.
The pin headers on the top are for connecting the servo. The black pin headers are for GND (mostly connected to the brown wire of the servo), the red ones are for the 5V power supply and the yellow ones are for the PWM signal cable. There are 0-15 channels and can connect to 16 servos at the same time. Please do not connect the servo cable reversely, or the servo will not rotate.
Note:
If a high-power servo is connected, the power supply may be insufficient as the whole board is powered by 5V. As both the RPI and the servo are powered by 5V, the RPI will reboot as a result of insufficient power when the power consumption is too high. In this case, we should remove the onboard 0R resistor and connect the external power by VIN (6-12V).
Using with Raspberry Pi
To use this module, we provide python examples for test PCA9685, WiFi remote control and bluetooth remote control.
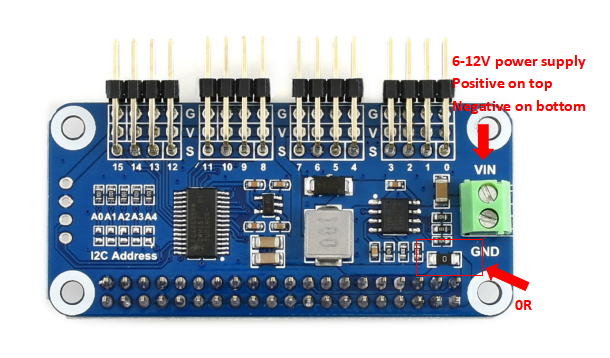
Enable I2C Interface
Open a terminal and run the following commands:
sudo raspi-config
Choose Interfacing Options -> I2C -> Yes.
Reboot Raspberry Pi:
sudo reboot
Install libraries
sudo apt-get update
sudo apt-get install python-pip
sudo pip install RPi.GPIO
sudo apt-get install python-smbus
Downalod the demo codes and unzip
You should start the Raspberry Pi, open a terminal and run the following commands:
sudo apt-get install p7zip-full
wget https://www.waveshare.com/w/upload/6/6c/Servo_Driver_HAT.7z
7zr x Servo_Driver_HAT.7z -r -o./Servo_Driver_HAT
sudo chmod 777 -R Servo_Driver_HAT
cd Servo_Driver_HAT/Raspberry\ Pi/
Python Examples
Open a terminal and runt the following comamnds:
#For python2
cd ~/Servo_Driver_HAT/Raspberry\ Pi/
cd python/
sudo python PCA9685.py
#For python3
cd ~/Servo_Driver_HAT/Raspberry\ Pi/
cd python3/
sudo python3 PCA9685.py
Expected result: Connect a servo to Channel 0, the servo will rotate.
WIFI Remote Control
Open a terminal and run the following commands:
cd Wifi-Control/
sudo python main.py
Please connect the Raspberry Pi and telephone to the same WLAN network. Data will be transmitted by TCP protocol. After running the program, the IP address will be displayed and the port number is 8000.
Open the APP and choose the WIFI control, input the IP address and the port then connect.
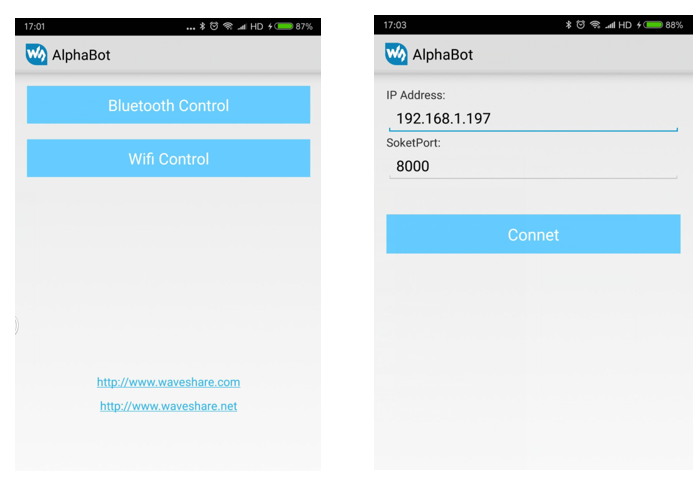
It enters the control page if connected successfully. You can click the button to control the four servos (Channel 0 to Channel 4).

You can also connect it with QT software on Windows PC.

Note: You can download the APP and the QT software from the Resources part.
Bluetooth Remote Program
Execute:
sudo apt-get update
sudo apt-get upgrade -y
sudo apt-get dist-upgrade -y
sudo apt-get install pi-bluetooth bluez bluez-firmware blueman
sudo usermod -G bluetooth -a pi
sudo vi /etc/systemd/system/dbus-org.bluez.service
sudo reboot
Start/add SPP, and turn on the Bluetooth device.
sudo vi /etc/systemd/system/dbus-org.bluez.service
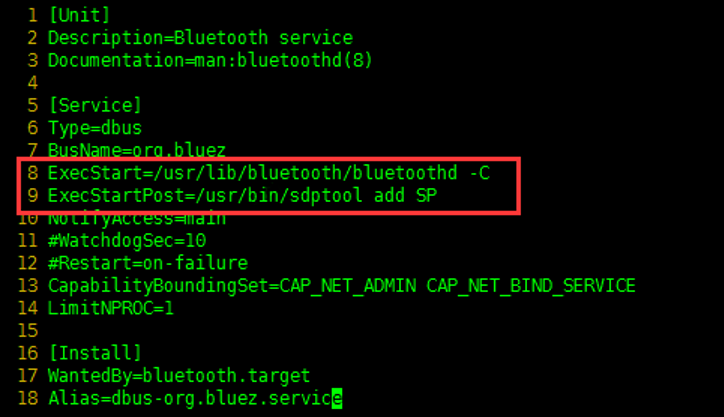
After restarting the Raspberry Pi, enter the hciconfig command (similar to the ifconfig command) to check the Bluetooth service.

If you see the hci0 device, the Bluetooth has been turned on. If not then no Bluetooth device is recognized.
Run the following command to start the program.
cd Servo_Driver_HAT/python/Bluetooth-Control
sudo ./Bluetooth.sh
After the program runs, you will be prompted to wait for the Bluetooth connection, choose the Bluetooth remote control on the mobile app, click scan, discovers the Raspberry Pi device, and connects.

After connecting the program, enter the control interface, and click the button to remotely control the forward and reverse rotation of the servos of channels 0~4.
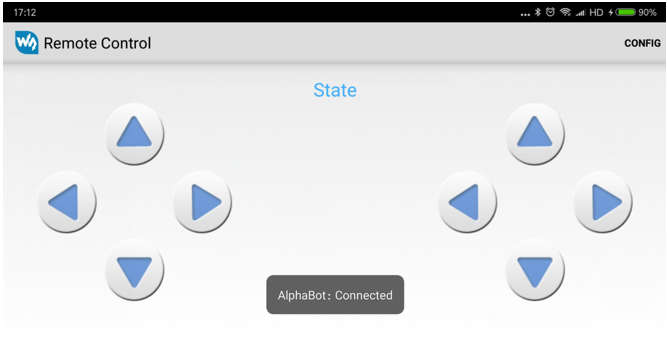
Note: If the received command is incorrect, you may need to configure the command sent when the corresponding button is pressed and released in the APP.
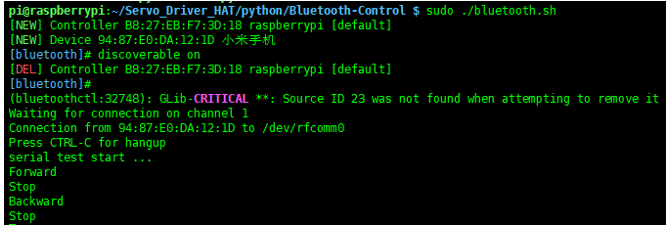
Note: The default discovery time of Raspberry Pi is only 180s. If you want to always discover and pair, you can configure it by modifying the following files.
sudo vi /etc/bluetooth/main.conf
Find the following two statements and uncomment them.

The program is compatible with python3, just replace python with python3 when running.
For more information on Raspberry Pi wifi and Bluetooth remote control, please refer to AlphaBot2:
http://www.waveshare.com/wiki/AlphaBot2
https://www.waveshare.com/wiki/AlphaBot2
Using with Jetson Nano
Install Library
- Enable the terminal interface and enter the following command to install the library.
sudo apt-get update
sudo apt-get install python3-pip
sudo pip3 install Jetson.GPIO
sudo groupadd -f -r gpio
sudo usermod -a -G gpio your_user_name
sudo cp /opt/nvidia/jetson-gpio/etc/99-gpio.rules /etc/udev/rules.d/
sudo udevadm control --reload-rules && sudo udevadm trigger
【Note】your_user_name is the name you used such as waveshare.
- Install I2C
sudo apt-get install python-smbus
- Install image processing library:
sudo apt-get install python3-pil
sudo apt-get install python3-numpy
Downlaod the example program & unzip to the specified directory
sudo apt-get install p7zip
wget https://www.waveshare.com/w/upload/6/6c/Servo_Driver_HAT.7z
7zr x Servo_Driver_HAT.7z -r -o./Servo_Driver_HAT
sudo chmod 777 -R Servo_Driver_HAT
cd Servo_Driver_HAT/Jetson\ Nano/
Run the test demo
- python 2
cd python2/
sudo python test.py
- python 3
cd python3/
sudo python3 test.py
Working with VisionFive2
Installing the Corresponding Library File
apt-get install pip
pip install VisionFive.gpio
apt-get install python3-smbus
Demo Download
apt-get install p7zip-full
wget https://files.waveshare.com/upload/6/6c/Servo_Driver_HAT.7z
7zr x Servo_Driver_HAT.7z -r -o./Servo_Driver_HAT
cd Servo_Driver_HAT/VisionFive2/python
Direct Use
python3 PCA9685.py
Expected effect: The servo of channel 0 turns from 0 degrees to 180 degrees, and then turns from 180 degrees to 0 degrees again, repeating the cycle continuously.
Wifi Remote Control
cd Wifi-Control/
python3 main.py
For details, you can refer to #WIFI Remote Control.
Note:
1. Control can only be done within the same LAN (Local Area Network).
2. There is a feature (a user-friendly bug) that allows the device to be used with only an Ethernet connection when there is no WiFi module connected. However, after connecting a WiFi module and running the demo once, if you unplug the WiFi module and run the demo again, an error may occur. Simply restarting the device should resolve this issue.
Resources
Document
Software
Datasheet
Third-Parties Porject
FAQ
{{{5}}}
{{{5}}}
{{{5}}}
{{{5}}}
{{{5}}}
{{{5}}}
Support
Technical Support
If you need technical support or have any feedback/review, please click the Submit Now button to submit a ticket, Our support team will check and reply to you within 1 to 2 working days. Please be patient as we make every effort to help you to resolve the issue.
Working Time: 9 AM - 6 PM GMT+8 (Monday to Friday)


