Compute Module PoE Board
Introduction
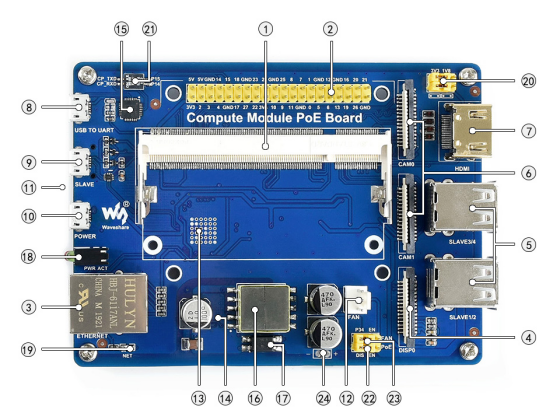
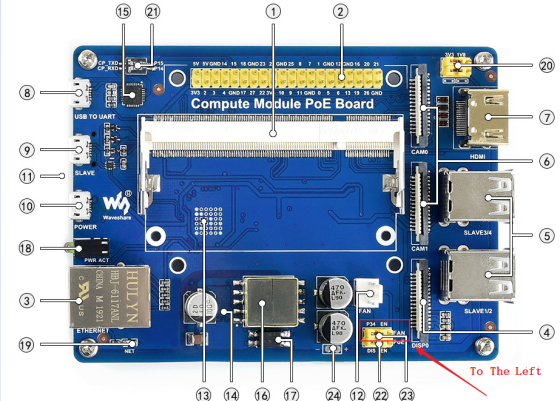
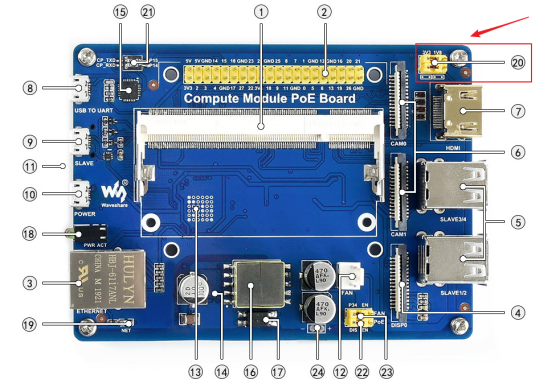
The Compute Module PoE Board is a development board that you can plug a Raspberry Pi Compute Module into, and make use of the resources of Pi more flexibly. With the PoE (Power over Ethernet) feature, and versatile onboard peripheral interfaces, it is suitable for evaluating the Raspberry Pi compute module, also is an ideal choice for end products.
Features
- Raspberry Pi GPIO header, for connecting sorts of Raspberry Pi HATs.
- 10/100M auto-negotiation Ethernet port, with PoE enabled.
- 4 x USB ports, which allow connecting more USB devices.
- 2 x CSI camera interfaces.
- Onboard HDMI/DSI interfaces for connecting displays.
- Onboard USB TO UART, for serial debugging.
- Cooling fan interface, autorun on power-up OR controlled by IO pins.
- Adopts isolated SMPS (Switching Mode Power Supply).
Specification
- Power supply: micro USB port/PoE Ethernet port
- PoE power input: 37V ~ 57V DC in
- PoE power output: 5V 2.5A DC out
- Operating Temperature: -25℃ ~ 80℃
- Network standard: 802.3af PoE standard
- Dimensions: 114mm × 84.4mm
- Mounting hole size: 3.2mm
What's on board
| Type | Label | Name | Description |
| Core Interface Introduction | |||
| 1 | Compute Module interface | can be connected to Compute Module 3/3 Lite/3+/3+ Lite | |
| 2 | Raspberry Pi GPIO interface | can be connected to various Raspberry Pi HATs | |
| 3 | Ethernet interface with PoE function | 10/100M self-adaptive, can be connected to a router or switch with PoE function | |
| 4 | DSI Display Interface | Can be connected to Raspberry Pi LCD | |
| 5 | USB interface | 4 x USB interface, can be connected to various USB devices | |
| 6 | CSI camera interface | 2 x CSI interface, can be connected to Raspberry Pi Camera | |
| 7 | HDMI Interface | Can be connected the HDMI devices | |
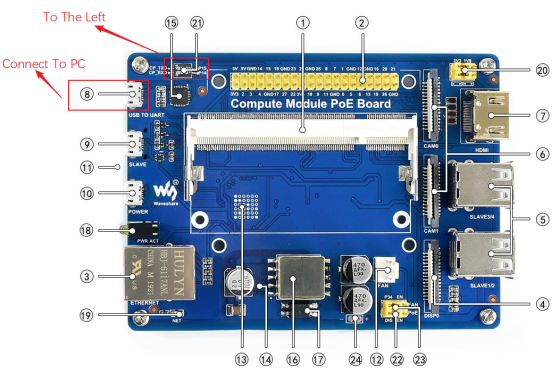
| 8 | USB TO UART interface | Easy for serial debugging | |
| 9 | USB SLAVE interface | Compute Module 3/3+ can burn the system image through this interface | |
| 10 | Power Connector | Generally connected to 5V 2.5A power supply | |
| 11 | TF card interface (rear) | Used to insert the Micro SD card with the system to start the Compute Module 3 Lite/3+ Lite | |
| 12 | Fan Interface | Easy to connect to the cooling fan | |
| On Board Introduction | |||
| 13 | LAN9514 (back) | Integrated 10/100M Ethernet and USB hub function chip | |
| 14 | Si3404 PoE power management chip (back) | - | |
| 15 | CP2102 USB to serial port chip | - | |
| 16 | EP13 PoE Power Transformer | - | |
| 17 | Optocoupler Isolator | - | |
| 18 | Double hole LED lamp holder | Red light: Raspberry Pi power indicator Green light: Raspberry Pi working status indicator | |
| 19 | NET Network Indicator | - | |
| Jumper Switch Description | |||
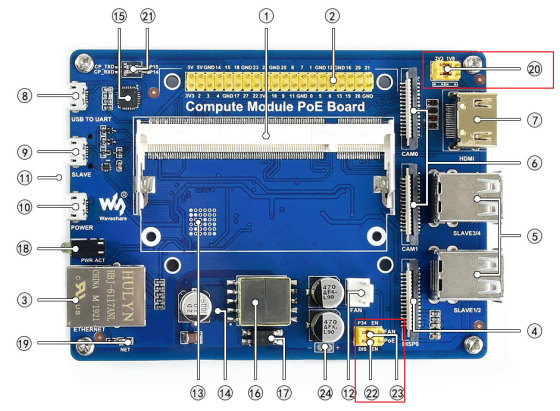
| 20 | VGx Power Select Jumper | Select I/O Level | |
| 21 | Serial port output selection | Dial to the left: CP2102 serial port is connected to the Raspberry Pi serial port Dial to the right: CP2102 serial port is disconnected from the Raspberry Pi serial port | |
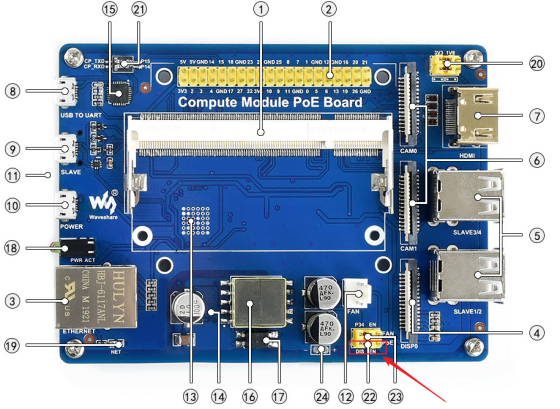
| 22 | Fan selection jumper | P34: Programmatically control the fan through the P34 pin EN: Direct 5V power supply to run the fan | |
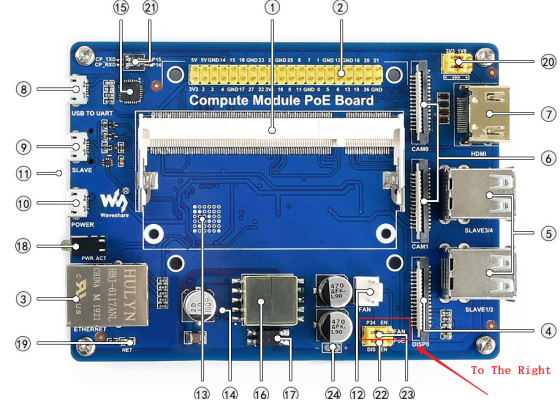
| 23 | PoE enable pin | DIS: Disable PoE power supply EN: Enable PoE power supply | |
| 24 | PoE power supply voltage measurement solder ports | - | |
User guide
Power
- 1. PoE power
- To enable the POE function, you should set the PoE jumpers to the EN side.
If you need to turn on the PoE power supply, please turn the jumper cap to the right EN position. If you turn it to the left, it means that the PoE power supply is disabled.
- When using PoE function, this module supports DC 27V ~ 57V input, and voltage output is 5V and 2.5V.
- To check PoE, you can test pad 24.
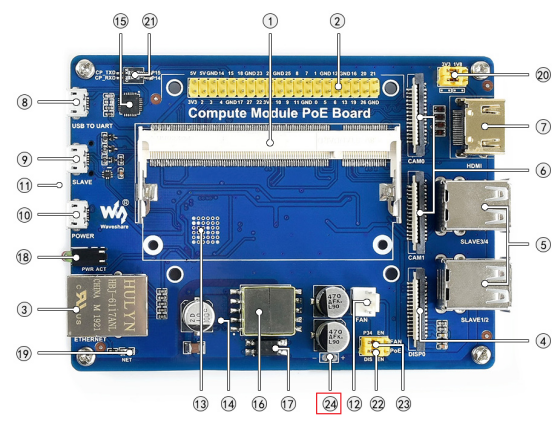
- You can measure the voltage of pad 24 by multimeter, if the voltage is about 5.25V, the PoE function works normally, otherwise, it doesn't.
- 2. DC power
- Except for PoE, you can also power on the Compute PoE board with DC 5V 2.5A (or above) power adapter.
- You should set the jumper 22 to the DIS side and connect a power adapter to the POWER interface.
Write image
- 1. If you use Compute Module 3 or Compute Module 3+ with the EMMC version, you should write an image to the internal eMMC.
- Run rpiboot_setup ( please download it from #Resources) to install driver. After installing, you will get a rpiboot.exe file in the installation directory.
- Jump all the jumpers 20 on the Compute Module PoE Board to the left (3.3V), and jump jumpers 22 and 23 to the left (P34 and DIS).
- Insert your Compute module into the PoE board.
- Connect the SLAVE interface of the PoE board to your PC
- Connect the Power interface of the PoE board to the power adapter
- Run rpiboot.exe as administrator, PC will recognize the eMMC of Compute module as a portable drive.
- Run WinDiskImager software to write an image to eMMC.
- Note: If the image has been burned before, you can use Panasonic_SDFormatter-SD card formatting software to format first, and then program.
- After writing, you can disconnect the USB cable, and re-power the POE board to start the CM3/CM3+.
【Note】
- While writing images, the PC DO NOT write/read other portable storage drives to avoid conflict.
- The default user name and password of the image of Raspberry are pi and raspberry.
- The EMMC of CM3+ is extended, which allows CM3+ to install a common desktop image. However, the eMMC of CM3 is only 4G, therefore if you want to write an image to CM3, please choose Raspbian Lite. You can also install GUI for Lite image separately by commands below (network is required)
sudo apt-get update
sudo apt-get install raspberrypi-ui-mods
If you are unable to program normally with Compute Module PoE Board, please try the following steps:
- Make sure you are using the latest version of RPiboot.
- Use the WIN10 system for programming, most customers report that WIN7 or Linux system programming is unstable.
- Make sure your CM3/CM3+ version is normal, there will be an extra IC on the back of the board. Only the eMMC version can be burned in this method. For the version without eMMC, please refer to step 2.
- Note that the Power interface needs to be connected to a 5V power adapter.
- Replace a USB cable.
- Replace the USB interface of a PC.
- Try restarting the PC.
- Try reseating the CM3/CM3+.
- Try to burn on another computer.
- 2. If you use Compute Module 3 Lite or Compute Module 3+ Lite, you should write the image to an SD card just like a common Raspberry Pi.
- Download the latest version of the image on Raspberry Pi's official website.
- To write an image, you should prepare an SD card (16G or large) and a card reader.
- Use Win32DiskImage software to write images to an SD card. (It is the same as how you write an image for Pi 3B.)
- After writing, insert the SD card into the card slot of the PoE Board.
Connect DSI display
Here we use the 4.3-inch DSI LCD for example, you can also use the official 7-inch LCD.
- Please power off the PoE board.
- Connect 15Pin FPC cable to Compute Module PoE Board and DSI display.
- Connect the power adapter to the PoE board.
- Wait for several seconds to start Raspbian.
Note:
- If you use the Raspberry Pi official Bullseye or Buster system, you need to copy the dt-blob.bin file to /boot directory.
- You can download DT_Bin file here.
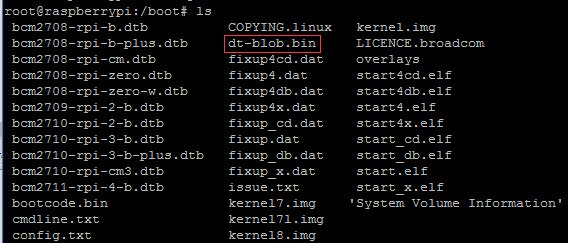
- If you use the official Bookworm system, you need to add the following sentence at the end of config.txt file:
dtoverlay=vc4-kms-dsi-7inch
dtoverlay=cm-swap-i2c0
Connect HDMI display
Here we use 7-inch HDMI LCD (H) as examples.
- Remove the DSI display if you have connected. Connect the HDMI display to the PoE board (both the HDMI interface and Touch interface should be connected)
- Modify /boot/config.txt file:
 max_usb_current=1
 hdmi_force_hotplug=1
 config_hdmi_boost=10
 hdmi_group=2
 hdmi_mode=87
 hdmi_cvt 1024 600 60 6 0 0 0
- Reboot.
Connect CSI Camera
- 1. Test camera with pre-configured image
- 【Note】: Unlike the official Compute Module IO Board V3, the camera pins of this Compute PoE Module are not conflicted with 40Pin GPIO.
- Download the pre-configured image from the Waveshare wiki. The image was pre-configured to use two cameras.
- Connect RPi FPC camera to PoE board.
- Power on the PoE board and test camera.
- Test the camera 1:
sudo raspivid -t 0 -cs 0
- Test camera 2:
sudo raspivid -t 0 -cs 1
【Note】The -cs parameter indicates which camera is connected, but the camera number indicated by the -cs parameter is not exactly the same as the screen printing of the board and the case (the parameter -cs indicates which cameras that are connected. If a camera is connected to the CAM1 interface, check that the -cs parameter of the camera command is 0, indicating the 0th camera connected).
- 2. Test the camera with the original image.
- If you use the original Raspbian image, you should configure an image for using the camera manually.
- Modify /boot/config.txt file, and add a statement to it.
dtparam=arm_i2c
- Run command sudo raspi-config, choose Interfacing Options -> Camera -> Yes.
- Download the official device tree file, Raspberry Pi Foundation Device Tree Introduction Link, Raspberry Pi Foundation Device Tree download link 1 and download link 2.
- After downloading, modify the dts file.


- Compared with the official device tree file, the specific modification is: The LDE and SHUTDOWN of Camera0 are modified from the original 4,5 pins to 32,33 pins.
- After modifying, you need to compile it.
dtc -I dts -O dtb -o dt-blob.bin dt-blob-dualcam.dts
- After compiling, a dt-blob.bin file will be generated, and you can copy (replace) this file directly to the boot directory.
- To test the camera, you can use the commands below:
sudo raspivid -t 0 -cs 0
sudo raspivid -t 0 -cs 1
Connect to cooling fan
- 1. Directly enable the fan
The 12 interface is a Fan port for Fan-4010-5V.
- To directly enable the cooling fan, you need to set the jumper 23 to the right side.
Move the jumper cap 23 to the right to enable the fan directly, otherwise, move it to the left to control the Raspberry Pi through the P34 pin of the Raspberry Pi computing module.
- 2. Control fan speed based on CPU temperature
- To control the fan based on CPU temperature, you should set the jumper 23 to the left side.
- Edit /boot/config.txt file:
sudo nano /boot/config.txt
- Add a line at the end:
dtoverlay=gpio-fan,gpiopin=34,temp=55000
- Reboot. After rebooting, when the CPU temperature is higher than 55 degrees Celsius, the fan will be turned on (the first parameter 34 indicates that the BCM number 34 pin is used to control the fan, and the second parameter 55000 indicates the temperature critical value * 1000).
- You can check the CPU temperature by the following command, the data divided by 1000 is the current temperature.
cat /sys/class/thermal/thermal_zone0/temp
- You can also check it:
watch -n 0.1 cat /sys/class/thermal/thermal_zone0/temp
- 3. Control fan by GPIO
- To control the fan by GPIO P34, you should set the jumper 23 to the left side.
- If you want to use GPIO to control the fan, you need to control it through a demo, in this product, it is controlled through pin P34.
- When the P34 pin is pulled high, the fan rotates, and when the P34 pin is pulled low, the fan stops rotating.
- To control the fan, you should make a script. Here is a script for reference.
#include <bcm2835.h>
#include <stdio.h>
#define PIN 34
int main(int argc, char **argv)
{
    if (!bcm2835_init())
    {
      return 1;
    }

    // Set the pin to be an output
    bcm2835_gpio_fsel(PIN, BCM2835_GPIO_FSEL_OUTP);

    while (1)
    {
        // Turn it on
        bcm2835_gpio_write(PIN, HIGH);

        // wait a bit
        bcm2835_delay(50);

        // turn it off
        bcm2835_gpio_write(PIN, LOW);

        // wait a bit
        bcm2835_delay(50);
    }
    bcm2835_close();
    return 0;
}
- You had better set the frequency higher than 10Hz, the codes above set it to 10Hz.
- If you use the pre-configured image, this code is saved in the path /home/pi
- You can compile code by command:
sudo gcc fan.c -o fan -l bcm2835
- Run the code:
- If you use the official image, you can also download the script manually, before it, please install bcm2835 libraries first.
wget http://www.airspayce.com/mikem/bcm2835/bcm2835-1.60.tar.gz
tar zxvf bcm2835-1.60.tar.gz
cd bcm2835-1.60/
sudo ./configure
sudo make
sudo make check
sudo make install
# For more information of bcm2835 libraries:http://www.airspayce.com/mikem/bcm2835/
Serial port
Compute Module PoE Board integrates CP2102 chip. You can connect the USB to the UART interface of the PoE board to the PC, and turn DIP switches into CPTXD, and CPRXD. In this mode, you can communicate Compute Module board by the serial port in PC.
Level selection jumpers
- The jumper caps of this level conversion are used for the IO ports on the Compute Module, and some of them include the 40Pin of the Raspberry Pi. Jump the jumper caps to the left together, and the 40Pin on the board is 3.3V level. If you jump to the right together, the 40Pin on the board is 1.8V level. Generally, the Raspberry Pi expansion board is 3.3V level, and you can directly jump to the left.
Indicators
- NET: The network indicator, flashing if the network is connected normally.
- PWR: Power indicator, red. The LED keeps on if the board is powered normally, and it flashes if abnormal.
- ACT: Green. This is the indicator for TF card read/write. It is flashing when read/write files.
Resources
Documents
Codes
Software
Drawing
Datasheet
FAQ
You can refer to the following link: https://www.raspberrypi.org/documentation/hardware/computemodule/cm-emmc-flashing.md
Support
Technical Support
If you need technical support or have any feedback/review, please click the Submit Now button to submit a ticket, Our support team will check and reply to you within 1 to 2 working days. Please be patient as we make every effort to help you to resolve the issue.
Working Time: 9 AM - 6 PM GMT+8 (Monday to Friday)


