BME280 Environmental Sensor
| ||
Introduction
Overview
A tiny sensor breakout with BME280 onboard, sensing environmental temperature, humidity, and barometric pressure. It supports both I2C and SPI interfaces and also is compatible with 3.3V/5V voltage levels. Due to its ultra-small form factor, low power consumption, high precision with stability, the BME280 Environmental Sensor is suited for applications such as environment monitoring, weather forecast, altimeter, and IoT projects, and so on.
Fearture
- Supports I2C (default), configurable slave address.
- Supports SPI, switch to SPI via I/O setting.
- Onboard voltage level translator, compatible with 3.3V/5V operating voltage.
- Comes with development resources and manual (examples for Raspberry Pi/Arduino/STM32).
Product parameters
| Operating voltage | 5V/3.3V |
| Communication interface | I2C/SPI |
| Temperature sensing | -40~85°C (resolution 0.01°C, accuracy ±1°C) |
| Humidity sensing | 0~100%RH (resolution 0.008%RH, accuracy ±3%RH, response time 1s, delay ≤2%RH) |
| Barometric pressure sensing | 300~1100 hPa (resolution 0.18Pa, accuracy ±1hPa) |
| Dimension | 27mm x 20mm |
| Mounting hole size | 2.0mm |
Interface definition
| I2C interface | ||||
| Function pin | Arduino interface | STM32 interface | Raspberry | Describe |
| VCC | 3.3V/5V | 3.3V /5V | 3.3V /5V | Power input |
| GND | GND | GND | GND | Ground |
| SDA | A4 | PB7 | SDA | I2C data line |
| SCL | A5 | PB6 | SCL | I2C clock line |
| ADDR | NC/GND | NC/GND | NC/GND | Address chip select (default is high): When the voltage is high, the address is 0 x 77 When the voltage is low, the address is: 0 x 76 |
| CS | NC | NC | NC | NC |
| SPI interface | ||||
| Function pin | Arduino interface | STM32 interface | Raspberry | Describe |
| VCC | 3.3V /5V | 3.3V /5V | 3.3V /5V | 3.3VPower input |
| GND | GND | GND | GND | Ground |
| MOSI | D11 | PA7 | MOSI | SPI data input |
| SCK | D13 | PA5 | SCK | SPI clock input |
| MISO | D12 | PA6 | MISO | SPI data output |
| CS | D10 | PB6 | 27 | SPI Chip select, active when voltage is low |
For Raspberry Pi
Install the necessary function libraries
- The necessary function libraries need to be installed, otherwise, the following sample programs may not work properly. For the installation method, see:
https://www.waveshare.net/wiki/Pioneer600_Datasheets
- Find the corresponding product on the official website, open the download path in the product information, and download the sample program in the wiki:
- Get the decompressed package and decompress it as follows:
- Copy the Raspberry folder to the Raspberry Pi.
Preliminary work and demonstration
Preliminary work
- Execute the following command to configure the Raspberry Pi:
sudo raspi-config
- Select Interfacing Options -> I2C -> yes to start the I2C kernel driver.
- Select Interfacing Options -> SPI -> yes to start the SPI kernel driver.
- After saving and exiting, restart the Raspberry Pi:
sudo reboot
- After restarting, run the command to check whether the I2C and SPI modules have been started:
lsmod
- There will be the following print information.
- If i2c_bcm2835 and spi_bcm2835 are displayed, it means I2C, SPI module has been started.
- Connect the BME280 module to the Raspberry Pi according to the previous I2C bus interface instructions.
- The default I2C device address of the BME280 module is 0 x 77. If the ADDR is grounded, the device address will be changed to 0 x 76.
- Install the i2c-tools tool to confirm:
sudo apt-get install i2c-tools
- Query connected I2C devices
i2cdetect -y 1
- The following information will be printed:
- If 77 is displayed, it means that the BME280 module is successfully connected to the Raspberry Pi.
- If ADDR is connected to GND76 it will print 77:

Note: The above test ensures that there are no other devices on the I2C bus with addresses that coincide with the device's address. If the above test is successful, the I2C module is loaded successfully, and the BME280 module is successfully connected to the Raspberry Pi. At the same time, the BME280 module supports the SPI driver, please refer to the SPI interface description section to connect the BME280 to the Raspberry Pi.
Display
- After successfully connecting the BME280 module to the Raspberry Pi:
- If an I2C driver is used: first determine the I2C device address. The default I2C device address of the BME280 module is 0 X 77.If the ADDR is grounded (or the solder bridge is connected with a 0-ohm resistor), its I2C device address will be changed to 0 X 76.
- Open the main.c file:
- Go to the BME280-Environmental-Sensor-Demo-Code path:
cd BME280-Environmental-Sensor-Demo-Code
- Open the main.c file:
vim main.c
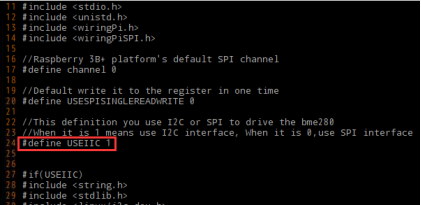
- Make sure the macro definition of USEIIC is in the main. c is 1 to use the I2C driver.
- At the same time, check the I2C device address in main.c to ensure that it is consistent with the current BME280 module device address (the default I2C device address is 0x77, if the ADDR is grounded, the device address is 0 x 76):
- If using SPI driver: connect the BME280 module according to the SPI bus wiring method in the interface description, and change the USEIIC macro definition in the main.c file to 0.
- Save and quit editing, then recompile:
sudo make clean
sudo make
- run:
sudo ./bme280
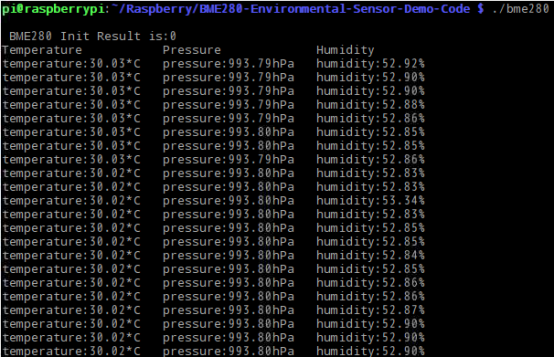
- The following data will be displayed:
- The temperature (degrees Celsius), atmospheric pressure (hectopascals), and relative humidity (%RH) measured by the BME280 are shown from left to right. If the data is not displayed successfully, or the data display is abnormal, please check the connection, communication mode, and device address for errors.
For Arduino
- After decompressing the downloaded sample program, copy the BME280-Arduino-Library in the Arduino folder to the Arduino third-party library directory. Then restart ArduinoIDE, enter and open File -> Example -> BME280_Libreay -> bme280test.
- Wire according to the Arduino interface section in the interface instructions.
- The default drive of the BME280 module is I2C, and the default I2C device address is 0 x 77.
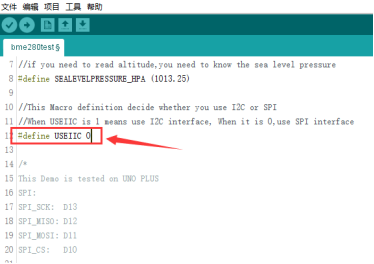
- If you need to use SPI to drive the BME280 module, please change the macro definition USEIIC in bme280test.ino to 0:
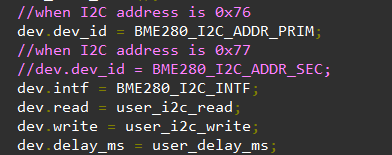
- If you need to change the address of the I2C device to 0 x 76, connect the ADDR pin to GND (or connect the solder bridge with a 0-ohm resistor), and change the BME280_ADDRESS device address in Adafruit.h to 0 x 76:
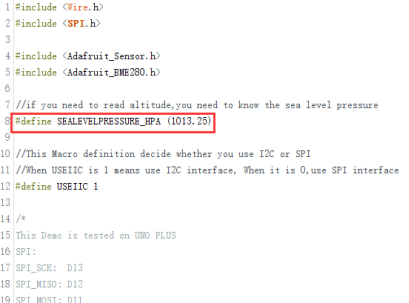
- If you need to obtain the accurate altitude of the quasi-measurement, you also need to measure the atmospheric pressure at the local sea level, and modify the SEALEVELPRESSURE_HPA macro definition:
- After correct wiring, determining the communication method and device address, compile and download to Arduino.
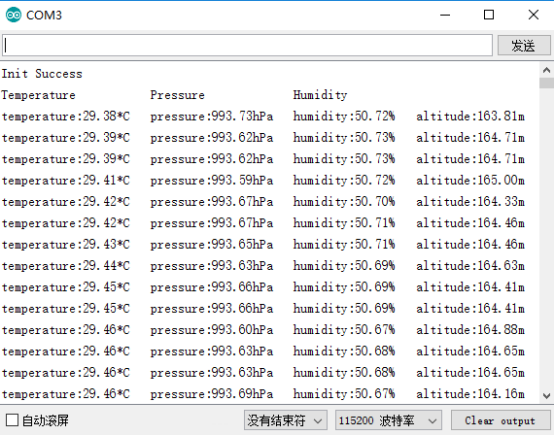
- Open: Tools -> Serial Monitor, select the baud rate as 115200, and you can get the following information.
- The temperature (degree Celsius), atmospheric pressure (hectopascal), relative humidity (%RH), and altitude (m) measured by the BME280 sensor are displayed from left to right.
- If the data is not displayed successfully, or the data display is abnormal, please check the connection, communication mode, and device address for errors.
For STM32
- After decompressing the compressed package of the downloaded sample program, open the project file in the STM32-STM32_BME280->USR path under the STM32 folder: connect according to the STM32 interface part in the interface description. By default, I2C is used to drive the BME280 module, and the default I2C device address is 0 x 77.
- If you need to use SPI to drive the BME280 module, please change the macro definition USEIIC in main.c to 0:
- If you need to change the address of the I2C device to 0X76, connect the ADDR pin to GND (or connect the solder bridge with a 0 ohm resistor), and set dev.dev_id = BME280_I2C_ADDR_SEC; note:
- Compile and download, the chip used this time is STM32F103RBT6, and the sensor data obtained by USART2 output is used.
- Open the serial port debugging assistant, select the corresponding COM port, and set the baud rate to 115200, 8 data bits, 1 stop bit, and no parity bit. The following data can be obtained:
- The temperature (degree Celsius), atmospheric pressure (hPascal), and relative humidity (%RH) measured by the BME280 sensor are displayed from left to right.
- If the data is not displayed successfully, or the data display is abnormal, please check the connection, communication mode, and device address for errors.
Code Analysis
- The demo mainly uses the library provided by the official (Bosch Sensortec): https://github.com/BoschSensortec/BME280_driver
Implement its underlying functions for different platforms for the upper layer to call.
- The initialization part of using SPI to drive BME280 is:
struct bme280_dev dev;
int8_t rslt = BME280_OK;

/* Sensor_0 interface over SPI with native chip select line */
dev.dev_id = 0;
dev.intf = BME280_SPI_INTF;
dev.read = user_spi_read;
dev.write = user_spi_write;
dev.delay_ms = user_delay_ms;

rslt = bme280_init(&dev);
- Use I2C to drive the BME280 initialization part:
struct bme280_dev dev;
int8_t rslt = BME280_OK;

dev.dev_id = BME280_I2C_ADDR_PRIM;
dev.intf = BME280_I2C_INTF;
dev.read = user_i2c_read;
dev.write = user_i2c_write;
dev.delay_ms = user_delay_ms;

rslt = bme280_init(&dev);
- Among them, bme280_dev is the BME280 device structure given in the official library. It is used for initialization and data acquisition. The following functions need to be implemented for different platforms:
user_i2c_read()
user_i2c_write()
user_spi_read()
user_spi_write()
user_delay_ms()
- And pass the function pointer of this function to the structure bme280_dev.
The function to read BME280 data is:
int8_t stream_sensor_data_forced_mode(struct bme280_dev *dev)
int8_t stream_sensor_data_normal_mode(struct bme280_dev *dev)
- And the above functions all call the print function:
void print_sensor_data(struct bme280_data *comp_data)
- The delay function of different platforms, I2C read, I2C write, SPI read, SPI write implementation ideas are:
void user_delay_ms(uint32_t period)
{
    /*
     * Return control or wait,
     * for a period amount of milliseconds
     */
}

int8_t user_spi_read(uint8_t dev_id, uint8_t reg_addr, uint8_t *reg_data, uint16_t len)
{
    int8_t rslt = 0; /* Return 0 for Success, non-zero for failure */

    /*
     * The parameter dev_id can be used as a variable to select which Chip Select pin has
     * to be set low to activate the relevant device on the SPI bus
     */

    /*
     * Data on the bus should be like
     * |----------------+---------------------+-------------|
     * | MOSI           | MISO                | Chip Select |
     * |----------------+---------------------|-------------|
     * | (don't care)   | (don't care)        | HIGH        |
     * | (reg_addr)     | (don't care)        | LOW         |
     * | (don't care)   | (reg_data[0])       | LOW         |
     * | (....)         | (....)              | LOW         |
     * | (don't care)   | (reg_data[len - 1]) | LOW         |
     * | (don't care)   | (don't care)        | HIGH        |
     * |----------------+---------------------|-------------|
     */

    return rslt;
}

int8_t user_spi_write(uint8_t dev_id, uint8_t reg_addr, uint8_t *reg_data, uint16_t len)
{
    int8_t rslt = 0; /* Return 0 for Success, non-zero for failure */

    /*
     * The parameter dev_id can be used as a variable to select which Chip Select pin has
     * to be set low to activate the relevant device on the SPI bus
     */

    /*
     * Data on the bus should be like
     * |---------------------+--------------+-------------|
     * | MOSI                | MISO         | Chip Select |
     * |---------------------+--------------|-------------|
     * | (don't care)        | (don't care) | HIGH        |
     * | (reg_addr)          | (don't care) | LOW         |
     * | (reg_data[0])       | (don't care) | LOW         |
     * | (....)              | (....)       | LOW         |
     * | (reg_data[len - 1]) | (don't care) | LOW         |
     * | (don't care)        | (don't care) | HIGH        |
     * |---------------------+--------------|-------------|
     */

    return rslt;
}

int8_t user_i2c_read(uint8_t dev_id, uint8_t reg_addr, uint8_t *reg_data, uint16_t len)
{
    int8_t rslt = 0; /* Return 0 for Success, non-zero for failure */

    /*
     * The parameter dev_id can be used as a variable to store the I2C address of the device
     */

    /*
     * Data on the bus should be like
     * |------------+---------------------|
     * | I2C action | Data                |
     * |------------+---------------------|
     * | Start      | -                   |
     * | Write      | (reg_addr)          |
     * | Stop       | -                   |
     * | Start      | -                   |
     * | Read       | (reg_data[0])       |
     * | Read       | (....)              |
     * | Read       | (reg_data[len - 1]) |
     * | Stop       | -                   |
     * |------------+---------------------|
     */

    return rslt;
}

int8_t user_i2c_write(uint8_t dev_id, uint8_t reg_addr, uint8_t *reg_data, uint16_t len)
{
    int8_t rslt = 0; /* Return 0 for Success, non-zero for failure */

    /*
     * The parameter dev_id can be used as a variable to store the I2C address of the device
     */

    /*
     * Data on the bus should be like
     * |------------+---------------------|
     * | I2C action | Data                |
     * |------------+---------------------|
     * | Start      | -                   |
     * | Write      | (reg_addr)          |
     * | Write      | (reg_data[0])       |
     * | Write      | (....)              |
     * | Write      | (reg_data[len - 1]) |
     * | Stop       | -                   |
     * |------------+---------------------|
     */

    return rslt;
}
To sum up, based on the official library, the basic process for obtaining BME280 data for different platforms is as follows:
- Step 1: System and peripheral initialization of different platforms.
- Step 2: Implement I2C read, I2C write, SPI read, SPI writes, and delay functions on different platforms, assign the function pointer to the bme280_dev structure member variable, and pass the structure pointer to the initialization * function int8_t bme280_init( struct bme280_dev *dev), initialize the BME280 device.
- Step 3: Call int8_t stream_sensor_data_forced_mode(struct bme280_dev *dev) or
The int8_t stream_sensor_data_normal_mode(struct bme280_dev *dev) function obtains the BME280 sensor data and prints it to the host computer or console.
Resources
Document
Code
Software
Datasheet
FAQ
If it needs to be used in absolute occasions, you can input the height of the current position as the initial value of the calculation, and then the movement observation height change is accurate. However, if the time is long, it is also prone to the problem of height drift.
If the project requires the acquisition of accurate altitude values for a long time and the frequency requirements are high, it is necessary to integrate other sensors for processing, such as GPS.
{{{5}}}
Support
Technical Support
If you need technical support or have any feedback/review, please click the Submit Now button to submit a ticket, Our support team will check and reply to you within 1 to 2 working days. Please be patient as we make every effort to help you to resolve the issue.
Working Time: 9 AM - 6 PM GMT+8 (Monday to Friday)


