2-CH CAN HAT
| ||
Overview
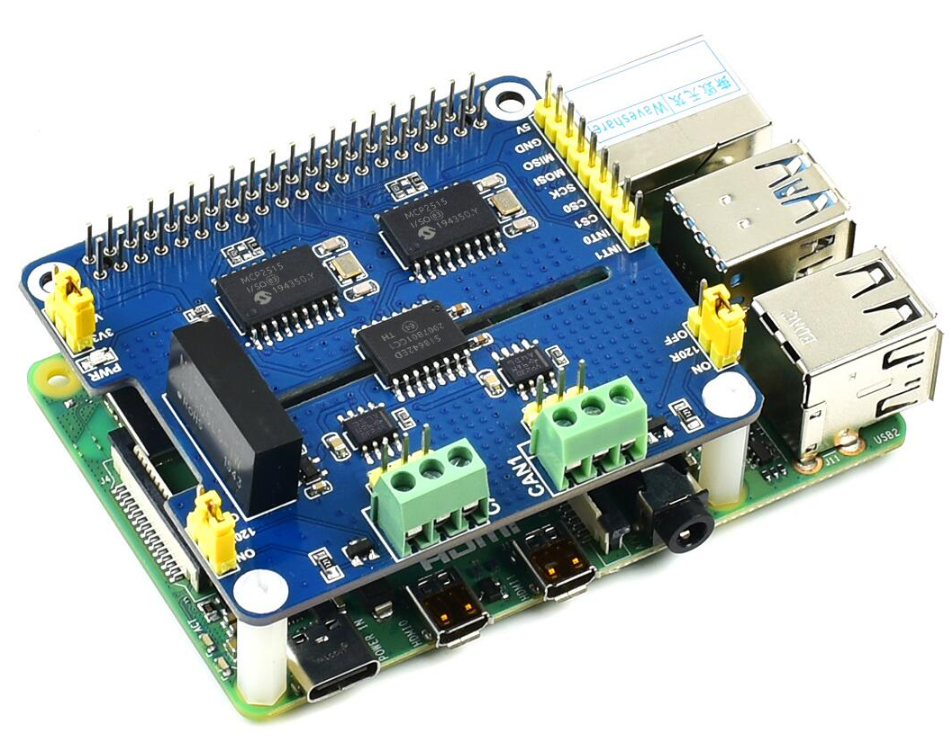
2-Channel Isolated CAN Bus Expansion HAT For Raspberry Pi, MCP2515 + SI65HVD230(or SN65HVD230) Dual Chips Solution, Multi Onboard Protection Circuits.
Introduction
This is a 2-Channel CAN bus expansion HAT designed for Raspberry Pi, supports CAN2.0, features multi-onboard protection circuits, high anti-interference capability, and stable operation. It suits fields such as automotive devices or industrial automation.
Features
- Standard Raspberry Pi 40PIN GPIO extension header, supports Raspberry Pi Zero/Zero W/Zero WH/2B/3B/3B+/4B.
- Adopts MCP2515 and SI65HVD230(or SN65HVD230) dual chips combined solution, allowing 2-channel CAN communication.
- Integrated power isolation, providing stable isolated voltage, requires no extra power supply for the isolated terminal.
- Onboard digital isolator, signal isolation makes communication safer, more stable, and better anti-interference.
- Onboard SM24CANB (Transient Voltage Suppressor) diode, provides ESD protection and transient peak voltage protection.
- Onboard voltage translator, select 3.3V/5V operating voltage by jumper.
- Onboard 120Ω terminal resistor, configured by jumper.
- Breakout SPI control pins, for connecting with host control boards like STM32/Arduino.
- Comes with online development resources and a manual.
Specifications
- CAN controller: MCP2515
- CAN transceiver: SI65HVD230 (or SN65HVD230)
- Operating voltage: 5V
- Logic level: 3.3V/5V
- Dimensions: 65.0 x 56.5 mm
- Mounting hole diameter: 3.0mm
Interfaces
CAN Interface Bus
| PIN | Raspberry Pi (BCM) |
Raspberry Pi (WPI) |
Description |
| 5V | 5V | 5V | 5V Power input |
| GND | GND | GND | Ground |
| MISO | 9 (MISO) | 13 (MISO) | SPI clock input |
| MOSI | 10 (MOSI) | 12 (MOSI) | SPI data input |
| SCK | 11 (SCLK) | 14(SCLK) | SPI data output |
| CS_0 | 8 (CE0) | 10 (CE0) | CAN_0 chip select |
| INT_0 | 23 (Default)/22 | 6 (Default)/5 | CAN_0 interrupt output |
| CS_1 | 7 (CE1) | 11 (CE1) | CAN_1 chip select |
| INT_1 | 25 (Default)/24 | 4 (Default)/3 | CAN_1 interrupt output |
NOTE:
INT_0 is soldered by PIN23 by default, and INT_1 is soldered by PIN25 by default. If you need to modify the pins, you need to modify the soldering pad of the PCBA board, and also modify the setting of /boot/config.txt. Take the modification of INT_0 as an example: if PIN23 is changed to PIN22, then the soldering pad of the red frame on the left board in the figure below needs to be modified to the soldering pad of the board on the right in the figure below:Similarly, if you need to change INT_1 from the default PIN25 to PIN24, you need to solder the 0 ohm at the arrow of PIN25 to PIN24.
CAN bus
CAN module could process packets transmitted/received on the CAN bus. Packets transmit the first store packet to the related buffer and control register.
Use the SPI interface to set the bits on the control register or enable the transmit pin for transmitting.
Registers could be read to detect communication states and errors. It will first check if there are any errors of packets detected on the CAN bus,
then verify it with a filter that is defined by the user. And store the packet in one of the buffers if it has no errors.
Since the Raspberry Pi itself does not support the CAN bus, you can use a CAN controller with an SPI interface along with a transceiver for CAN functionality.
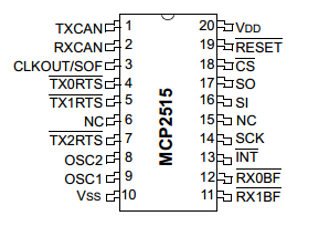
Microchip Technology's MCP2515 is a stand-alone Controller Area Network (CAN) controller that implements the CAN specification, version 2.0B.
It is capable of transmitting and receiving both standard and extended data and remote frames.
The MCP2515 has two acceptance masks and six acceptance filters that are used to filter out unwanted messages,
thereby reducing the host MCUs overhead. The MCP2515 interfaces with microcontrollers (MCUs) via an industry-standard Serial Peripheral Interface (SPI),
that is Raspberry Pi can communicate with MCP2515 via SPI interface without an external driver. What we need to do is to enable the kernel driver on the devices tree.
For more details, please refer to the datasheet.

Note: Since October 2021, due to the lack of stock of the SN65HVD230 chip and the price increase, the chip has been replaced with SI65HVD230, and the software and hardware functions are compatible.
SN65HVD230 from TEXAS INSTRUMENTS is a CAN transceiver, which is designed for high communication frequency, anti-jamming, and high-reliability CAN bus communication.
SN65HVD230 provides three different modes of operation: high-speed, slope control, and low-power modes. The operation mode can be controlled by Rs pin.
Connect the Tx of the CAN controller to SN65HVD230's data input pin D, which can transmit the data of the CAN node to the CAN network;
And connect the RX of the CAN controller to SN65HVD230's data input pin R to receive data.

Working with Raspberry Pi
The working voltage level of Raspberry Pi is 3.3V, therefore we need to set the VIO of 2-CH CAN HAT to 3.3V as below:

Note: When connecting to the Raspberry Pi 2b, 3b, and 4b boards, please connect the booster and nylon post to fix it to avoid the back of the CAN terminal touching the HDMI interface causing a short circuit, and avoid wrong connection or poor contact:

When connecting to the Raspberry Pi, you must add a booster seat, and then pass the needle through the bottom plate, the effect is as follows:

Install libraries
- bcm2835
Open the terminal and run the commands below to install the bcm2835 library:
wget http://www.airspayce.com/mikem/bcm2835/bcm2835-1.60.tar.gz
tar zxvf bcm2835-1.60.tar.gz
cd bcm2835-1.60/
sudo ./configure
sudo make
sudo make check
sudo make install
# For More: http://www.airspayce.com/mikem/bcm2835/
wiringPi
For 32-bit Raspberry Pi system
#Open the Raspberry Pi terminal and run the following command
cd
sudo apt-get install wiringpi
#For Raspberry Pi systems after May 2019 (earlier than that can be executed without), an upgrade may be required:
wget https://project-downloads.drogon.net/wiringpi-latest.deb
sudo dpkg -i wiringpi-latest.deb
gpio -v
# Run gpio -v and version 2.52 will appear, if it doesn't it means there was an installation error

# Bullseye branch system using the following command:
git clone https://github.com/WiringPi/WiringPi
cd WiringPi
. /build
sudo gpio -v
# Run gpio -v and version 2.70 will appear, if it doesn't it means there was an installation error
For 64-bit Raspberry Pi System
Copy the resource package to the Raspberry Pi using the command:
wget https://files.waveshare.com/upload/8/8c/WiringPi-master.zip
(optional, you can skip this step if you have used the unzip command) Install the unzip environment:
sudo apt-get install unzip
Go to the file location and execute the unzip command:
unzip WiringPi-master.zip
Go to the file directory (go to the "WiringPi-master" folder):
cd WiringPi-master/
Run sudo . /build:
sudo ./build
(optional, see point 4 for errors) If . /build does not work, execute "chmod +x . /build" and then "sudo . /build":
chmod +x ./build
- Python
Install python library:
#python2
sudo apt-get update
sudo apt-get install python-pip
sudo apt-get install python-pil
sudo apt-get install python-numpy
sudo pip install RPi.GPIO
sudo pip install spidev
sudo pip2 install python-can
#python3
sudo apt-get update
sudo apt-get install python3-pip
sudo apt-get install python3-pil
sudo apt-get install python3-numpy
sudo pip3 install RPi.GPIO
sudo pip3 install spidev
sudo pip3 install python-can
- WiringPi is no longer in the Debian package manager. Here are alternative instructions to install WiringPi:
https://forums.raspberrypi.com/viewtopic.php?t=350016#p2097654
Preparation
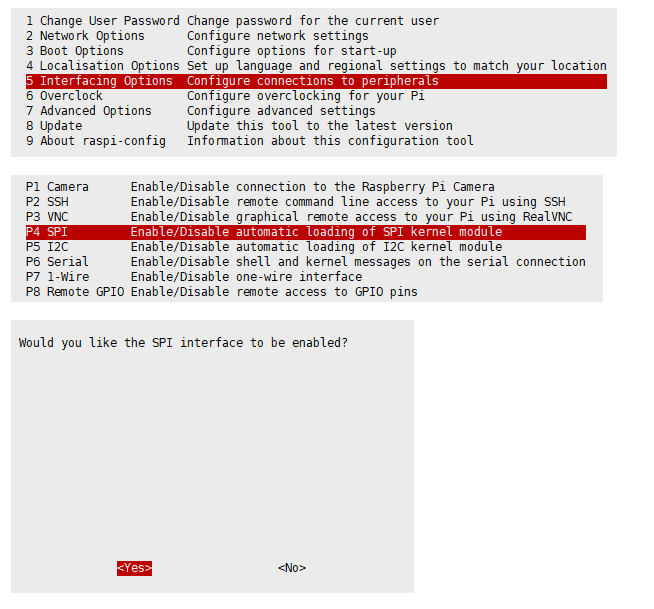
Enable SPI Interface
- Open the Raspberry Pi terminal and enter the following command to access the configuration interface:
sudo raspi-config
Select Interfacing Options -> SPI -> Yes to enable the SPI interface

And then reboot the Raspberry Pi:
sudo reboot
Please ensure SPI is not occupied by other devices, and you can check it in the "/boot/config.txt".
Modify config.txt
Insert the module into Raspberry Pi, and then modify the config.txt file:
sudo nano /boot/config.txt
Append these statements to the file:
dtparam=spi=on
dtoverlay=mcp2515-can1,oscillator=16000000,interrupt=25
dtoverlay=mcp2515-can0,oscillator=16000000,interrupt=23
dtoverlay=spi-bcm2835-overlay
- Save and exit, then restart your Pi:
sudo reboot
- After restart, check if initialize successfully:
dmesg | grep spi
- Set up CAN:
sudo ip link set can0 up type can bitrate 1000000
sudo ip link set can1 up type can bitrate 1000000
sudo ifconfig can0 txqueuelen 65536
sudo ifconfig can1 txqueuelen 65536
- For more information about CAN kernel instructions, please check:
https://www.kernel.org/doc/Documentation/networking/can.txt
- Run "ifconfig":
ifconfig
- Turn off CAN device:
sudo ifconfig can0 down
sudo ifconfig can1 down
Testing
If there is only one 2-CH CAN HAT on hand, you can connect CAN0_H and CAN1_H and CAN0_L and CAN1_L of the module as shown in the following figure:

- install can-utils:
sudo apt-get install can-utils
- Open two terminal windows:
One terminal input receives the CAN0 data command:
candump can0
Another terminal input sends the CAN1 data command:
cansend can1 000#11.22.33.44
- The demonstration effect is as follows: (receiving on the left, sending on the right.)

If you have two 2-CH CAN HAT on hand, you can directly connect CAN_H and CAN_L two by two. The effect is the same as the above, pay attention to match the communication rate, identify the ID, and output the interface serial number.
Python example
- Enter the directory of the Python example:
- Run the receiver.py script in the receiver terminal:
sudo python reveive.py
- Run the send.py script in the sender terminal:
sudo python send.py
【Note】The CAN1 is used as sender, and CAN0 is used as receiver.
Codes analysis
【Python example】
The demo codes provided are based on Python, please check that you installed the python-can library.
Before you send data, you should create a CAN device first as the above only boots MCP2515 kernel:
os.system('sudo ip link set can0 type can bitrate 100000')
os.system('sudo ifconfig can0 up')
This above code is used to initialize CAN0 as the receiver/sender. If you want to change it to CNA1, you can use the following one:
os.system('sudo ip link set can1 type can bitrate 100000')
os.system('sudo ifconfig can1 up')
- Step 1: Connect to CAN BUS:
can0 = can.interface.Bus(channel = 'can0', bustyp = 'socketcan_ctypes')
can1 = can.interface.Bus(channel = 'can0', bustype = 'socketcan')
- or you can change it to CAN1 as shown below:
can0 = can.interface.Bus(channel = 'can1', bustyp = 'socketcan_ctypes')
- Ste 2: Create message:
msg = can.Message(arbitration_id=0x123, data=[0, 1, 2, 3, 4, 5, 6, 7], extended_id=False)
msg = can.Message(is_extended_id=False, arbitration_id=0x123, data=[0, 1, 2, 3, 4, 5, 6, 7])
- Step 3: Send message:
can0.send(msg)
- or modify it to CAN1 as shown below:
can1.send(msg)
- Finally, close the CAN device:
os.system('sudo ifconfig can0 down')
- or modify it to CAN1 as shown below:
os.system('sudo ifconfig can1 down')
- Receive message:
msg = can0.recv(10.0)
The variable of "recv()" function is the timeout of receiving.
For more information, please refer to: https://python-can.readthedocs.io/en/stable/interfaces/socketcan.html
【WringPi example】
- Blocking the reception: the Raspberry Pi opens the terminal and runs:
cd 2-CH_CAN_HAT_Code/wiringPi/receive/
make clean
sudo make
sudo ./can_receive
- Send: Raspberry Pi opens the terminal and runs:
cd 2-CH_CAN_HAT_Code/ wiringPi/receive/
make clean
sudo make
sudo ./can_send
Resources
Documentation
Datasheet
3D Drawing
FAQ
{{{5}}}
{{{5}}}
{{{5}}}
sudo apt update
sudo apt upgrade
uname --all
{{{5}}}
Check whether the hardware connections are in poor contact. Check the software configuration to see if SPI is turned on, etc.
Yes, It works with the RPI 5 board.
{{{5}}}
Support
Technical Support
If you need technical support or have any feedback/review, please click the Submit Now button to submit a ticket, Our support team will check and reply to you within 1 to 2 working days. Please be patient as we make every effort to help you to resolve the issue.
Working Time: 9 AM - 6 PM GMT+8 (Monday to Friday)


