10 DOF IMU Sensor (D)
| ||
Overview
This is a 10-axis sensor with onboard low-power ICM20948 (low-power 3-axis gyroscope, 3-axis accelerometer, and 3-axis compass/magnetometer), Internal Digital Motion Processing™ (DMP™) engine, offloads complicate fusion calculation, sensor synchronization, gesture recognition, etc. Compared with MPU9250, it has higher precision, lower power consumption, and is more suitable for wearable devices. The onboard BMP280 (barometric altimeter), a built-in temperature sensor, can perform temperature compensation and has stronger performance and lower power consumption than BMP180. You can get the 10 DOF data through the I2C interface.
Features
- Power supply: 3.3V~5V (internal voltage regulation with low dropout)
- Accelerometer Features:
- Resolution: 16 bit
- Measurement range (configurable): ±2, ±4, ±8, ±16g
- Operating current: 68.9uA
- Gyroscope Features:
- Resolution: 16 bit
- Measurement range (configurable): ±250, ±500, ±1000, ±2000°/sec
- Operating current: 1.23mA
- Compass/Magnetometer Features:
- Resolution: 16 bit
- Measurement range: ±4900µT
- Operating current: 90uA
- Barometric pressure sensor Features:
- Barometric resolution: 0.0016hPa
- Temperature Resolution: 0.01°C
- Measurement range: 300~1100hPa (Altitude: +9000m ~ -500m)
- Barometric relative accuracy (700hPa~900hPa, 25°C~40°C): ±0.12hPa (±1m)
- Operating current (1Hz update rate, ultra-low power mode): 2.8uA
Pinouts
| PIN | Symbol | Description |
| 1 | VCC | 3.3V~5.5V power supply |
| 2 | GND | Power ground |
| 3 | SDA | I2C data input |
| 4 | SCL | I2C clock pin |
| 5 | INT | ICM20948 digital interrupt output |
| 6 | FSYNC | ICM20948 frame sync signal |
Sensor introduction
Introduction
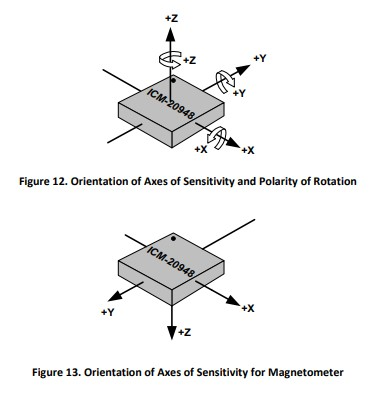
The onboard ICM20948 chip includes a 3-axis gyroscope, a 3-axis accelerometer, and a 3-axis compass/magnetometer. The following figure shows the coordinate axis definition of the sensor:

Basic settings
Accelerometer
- The data output by the acceleration sensor is the composite value of the motion acceleration and the gravitational acceleration.
- When the sensor is placed at rest, the motion acceleration is 0, and the 3-axis value output by the sensor is the component of the gravitational acceleration on each coordinate axis.
- If it is placed horizontally, the theoretical output value is 0g for the X axis, 0g for the Y axis, and -1g for the Z axis. The negative value of the Z-axis output is because the direction of the gravitational acceleration is downward, and the direction of the sensor Z-axis is upward, so it is a negative value. Positive and negative only indicate the relationship between the acceleration direction and the coordinate axis direction.
- It should be noted here that even if the sensor is placed absolutely horizontally, the output value of the acceleration sensor will not be equal to the theoretical value (0g, 0g, -1g), because each sensor has its own unique zero offsets. In the actual use process, the zero bias error can be appropriately removed according to the situation. Generally, the data can be removed by data fitting and other methods.
ICM20948 Acceleration range setting
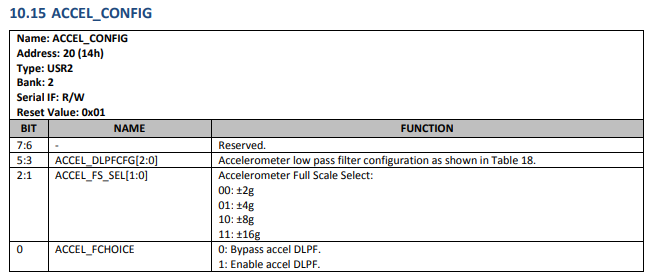
- The ICM20948 supports a variety of ranges, including ±2g, ±4g, ±8g, and ±16g. The sample program uses ±2g. If you need to change the range, you can modify the <ACCEL_CONFIG> register. The following figure shows the correspondence between the value of the <ACCEL_CONFIG> register and the range in the datasheet relation:
- Taking the STM32 sample code as an example, the setting method of ±2g in the code is as follows:
I2C_WriteOneByte( I2C_ADD_ICM20948, REG_ADD_ACCEL_CONFIG,
                  REG_VAL_BIT_ACCEL_DLPCFG_6 | REG_VAL_BIT_ACCEL_FS_2g | REG_VAL_BIT_ACCEL_DLPF);
- If you need to modify it to ±8g, make the following modifications:
 I2C_WriteOneByte( I2C_ADD_ICM20948, REG_ADD_ACCEL_CONFIG,
                  REG_VAL_BIT_ACCEL_DLPCFG_6 | REG_VAL_BIT_ACCEL_FS_8g | REG_VAL_BIT_ACCEL_DLPF);
Angular velocity sensor
- The value obtained by the angular velocity sensor is the angular velocity of rotation around each coordinate axis. When the rotation direction is the same as the coordinate axis marked direction, it is positive, and when the rotation direction is opposite to the coordinate axis marked direction, it is negative. There is also a zero bias error in the angular velocity, which can generally be removed by static placement and averaging.
ICM20948 Acceleration unit conversion
- For different ranges, the original value read from the sensor register needs to be divided by the corresponding conversion coefficient, which can be converted into acceleration in g. The coefficient values corresponding to each range are in the following table:
- When the range is ±2g, the original value of the sensor/16384 can get the acceleration value in g.
ICM20948 Angular Velocity Range Setting
- ICM20948 supports a variety of ranges, including ±250, ±500, ±1000, ±2000°/sec, and ±1000°/sec is used in the sample program. If you need to change the range, you can modify the <GYRO_CONFIG_1> register, as shown in the figure below The corresponding relationship between the value of the <GYRO_CONFIG_1> register and the range in the datasheet:
- Taking the STM32 sample code as an example, the setting method of ±1000°/sec in the code is as follows:
I2C_WriteOneByte( I2C_ADD_ICM20948, REG_ADD_GYRO_CONFIG_1,
                  REG_VAL_BIT_GYRO_DLPCFG_6 | REG_VAL_BIT_GYRO_FS_1000DPS | REG_VAL_BIT_GYRO_DLPF);
- If you need to modify it to ±2000°/sec, do the following modifications:
I2C_WriteOneByte( I2C_ADD_ICM20948, REG_ADD_GYRO_CONFIG_1,
                  REG_VAL_BIT_GYRO_DLPCFG_6 | REG_VAL_BIT_GYRO_FS_2000DPS | REG_VAL_BIT_GYRO_DLPF);
ICM20948 Angular Velocity Unit Conversion
- For different ranges, the original value read from the sensor register needs to be divided by the corresponding conversion coefficient, which can be converted into angular velocity in °/sec. The following table shows the coefficient values corresponding to each range:
- When the range is ±1000°/sec, the original value of the sensor/32.8 can get the angular velocity in °/sec.
Magnetometer sensor
- The magnetometer sensor measures the magnetic field around the sensor. When there is no strong magnetic field (motor, etc.) nearby, the output value of the magnetometer sensor is the component of the earth's magnetic field in the three coordinate axes.
ICM20948 Magnetometer
- The original value read from the sensor register needs to multiply with the conversion factor to convert to the magnetic field strength in μT ($10^-6$Tesla). The following table shows the conversion factor of the magnetometer in ICM20948:

That is, the original value of the sensor * 0.15 can get the magnetic field strength in μT.
User Guides of RPI
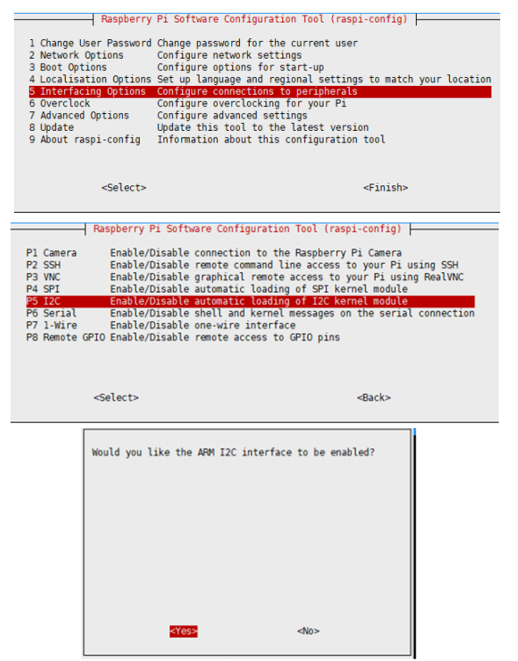
Enable I2C interfaces
- Open the terminal, and use the command to enter the configuration page:
sudo raspi-config
Choose Interfacing Options -> I2C -> Yes to enable I2C interface.
sudo reboot
Install Library
If you use bookworm system, only the lgpio library is available, bcm2835 and wiringPi libarary cannot be installed or used. Please note that the python library does not need to install, you can directly run the demo.
BCM2835
#Open the Raspberry Pi terminal and run the following command
wget http://www.airspayce.com/mikem/bcm2835/bcm2835-1.71.tar.gz
tar zxvf bcm2835-1.71.tar.gz
cd bcm2835-1.71/
sudo ./configure && sudo make && sudo make check && sudo make install
# For more, you can refer to the official website at: http://www.airspayce.com/mikem/bcm2835/
WiringPi
#Open the Raspberry Pi terminal and run the following command
cd
sudo apt-get install wiringpi
#For Raspberry Pi systems after May 2019 (earlier than that can be executed without), an upgrade may be required:
wget https://project-downloads.drogon.net/wiringpi-latest.deb
sudo dpkg -i wiringpi-latest.deb
gpio -v
# Run gpio -v and version 2.52 will appear, if it doesn't it means there was an installation error

# Bullseye branch system using the following command:
git clone https://github.com/WiringPi/WiringPi
cd WiringPi
. /build
gpio -v
# Run gpio -v and version 2.70 will appear, if it doesn't it means there was an installation error
lgpio
wget https://github.com/joan2937/lg/archive/master.zip
unzip master.zip
cd lg-master
sudo make install
#for more details, you can refer to https://github.com/gpiozero/lg
Download examples
Open a terminal of the Raspberry Pi:
sudo apt-get install p7zip-full -y
sudo wget https://files.waveshare.com/upload/c/c1/10_DOF_IMU_Sensor_D_Code.7z
7z x 10_DOF_IMU_Sensor_D_Code.7z -O./10_DOF_IMU_Sensor_D_Code
cd 10_DOF_IMU_Sensor_D_Code/RaspberryPi/
Hardware connection
| Sensor | Raspberry Pi | Description |
| Board order | ||
| VCC | 5V | Power input |
| GND | GND | Power ground |
| SDA | 3 | I2C data input |
| SCL | 5 | I2C clock pin |
Run examples
Please execute the following commands under RaspberryPi, otherwise, the directory will not be indexed.
C examples
- Recompile, the compilation process may take a few seconds.
BCM2835
cd BCM2853
sudo make clean
sudo make
sudo ./10Dof-D_Demo
wiringPi
cd wiringPi
sudo make clean
sudo make
sudo ./10Dof-D_Demo
Note: If you have run BCM2835, please restart wiringPi before running.
Expected result
After running the demo on the Raspberry Pi, it will output the following data:
About the output data
| Roll, Pitch, Yaw | Roll (°), Pitch (°), Yaw (°) |
| Acceleration | LSB, can be transferred to g① |
| Gyroscope | GLSB, can be transferred to °/s② |
| Magnetic | LSB, can be transferred μT③) |
| Angle | Direction (°), it is equal to Yaw degree |
| Pressure | hPa |
| Altitude | m |
| Temperature | ℃ |
Note:
①: The acceleration output by the serial port of the sample demo is the original value of the register (the value of the register). After this value is divided by 16384, it can be converted into a value in g (gravitational acceleration constant).
②: The angular velocity output by the serial port of the sample demo is the original value of the register (the value of the register). After this value is divided by 32.8, it can be converted into a value in DPS (angle/second).
③: The value of the magnetic sensor output by the serial port of the sample demo is the original value of the register (the value of the register). This value is multiplied by 0.15 to convert it into a value in μT (10-6 Tesla).
The example we provide is based on STM32F103RBT6, and the connection method provided is the corresponding pin of STM32F103RBT6 as an example. If you need to use other STM32, please connect according to the actual pin.
User Guides of STM32
Hardware connection
| Sensor | STM32 | Description |
|---|---|---|
| VCC | 3.3V | Power input |
| GMD | GND | Power ground |
| SDA | SDA/PB9 | I2C data input |
| SCL | SCL/PB8 | I2C clock pin |
Software Description
The examples are developed based on the HAL library. Please download the program in the data, find the STM32 program file directory, and open
PCF8591-Code\STM32\STM32F103RB\MDK-ARM.
PCF8591 AD DA Board.uvprojx in the directory, then you can see the demo.

Open main.c, recompile and download.

After the download is successful, run SSCOM to view the real-time status of the sensor.

Serial output data meaning
| Roll, Pitch, Yaw | Roll (°), Pitch (°), Yaw (°) |
| Acceleration | LSB, can be transferred to g① |
| Gyroscope | GLSB, can be transferred to °/s② |
| Magnetic | LSB, can be transferred μT③) |
| Angle | Direction (°), it is equal to Yaw degree |
| Pressure | hPa |
| Altitude | m |
| Temperature | ℃ |
Note:
①: The acceleration output by the serial port of the sample demo is the original value of the register (the value of the register). After this value is divided by 16384, it can be converted into a value in g (gravitational acceleration constant).
②: The angular velocity output by the serial port of the sample demo is the original value of the register (the value of the register). After this value is divided by 32.8, it can be converted into a value in dps (angle/second).
③: The value of the magnetic sensor output by the serial port of the sample demo is the original value of the register (that is, the value of the register). This value is multiplied by 0.15 to convert it into a value in μT (10-6 Tesla).
The Arduino example is written for the Arduino UNO. If you want to connect it to other Arduino boards, you may need to change the connection.
User Guides of Arduino
Hardware connection
| Sensor | Arduino | Description |
|---|---|---|
| VCC | 5V | Power input |
| GND | GND | Power ground |
| SDA | SDA | I2C data inpu |
| SCL | SCL | I2C clock pin |
Examples
- Arduino_IDE_Installation_Steps.
- Download the Demo Code to your PC and unzip.
- Install the Arduino IDE on your PC.
- Go into 10_DOF_IMU_Sensor_D_Code/Arduino/10Dof-D_Demo.
- Run the 10Dof-D_Demo.ino file.
- Select the correct Board and the Port.
- Build the project and upload it to the board.
- Open the serial monitor of the Arduino IDE or the SSCOM software and check the serial data.
Serial output data meaning
| Roll, Pitch, Yaw | Roll (°), Pitch (°), Yaw (°) |
| Acceleration | LSB, can be transferred to g① |
| Gyroscope | GLSB, can be transferred to °/s② |
| Magnetic | LSB, can be transferred μT③) |
| Angle | Direction (°), it is equal to Yaw degree |
| Pressure | hPa |
| Altitude | m |
| Temperature | ℃ |
Note:
①: The acceleration output by the serial port of the sample program is the original value of the register (the value of the register). After this value is divided by 16384, it can be converted into a value in g (gravitational acceleration constant).
②: The angular velocity output by the serial port of the sample program is the original value of the register (the value of the register). After this value is divided by 32.8, it can be converted into a value in dps (angle/second).
③: The value of the magnetic sensor output by the serial port of the sample program is the original value of the register (that is, the value of the register). This value is multiplied by 0.15 to convert it into a value in μT (10-6 Tesla).
Resources
Document
Program
Datasheet
FAQ
Acceleration: 0-4000Hz
Angular velocity: 0-8000Hz
Generally, the accelerometer does not need to be calibrated. Do you want to do a temperature drift? It can be simply placed in the incubator for segmented and zero drift collection of each temperature. If the ambient temperature does not change much, calibration is not necessary.
{{{5}}}
The barometer can only be used to measure relative altitude, and the measured value is not repeatable (unless it is a specific laboratory environment). Therefore, barometers are generally used to measure short-term altitude differences.
{{{5}}}
Support
Technical Support
If you need technical support or have any feedback/review, please click the Submit Now button to submit a ticket, Our support team will check and reply to you within 1 to 2 working days. Please be patient as we make every effort to help you to resolve the issue.
Working Time: 9 AM - 6 PM GMT+8 (Monday to Friday)


