Details
Description
The MPLAB® PICkit™ 4 In-Circuit Debugger/Programmer allows fast and easy debugging and programming of PIC® and dsPIC® flash microcontrollers, using the powerful graphical user interface of MPLAB X Integrated Development Environment (IDE), version 4.15.
The MPLAB PICkit 4 programs faster than its predecessor PICkit3. Along with a wider target voltage, the PICkit 4 supports more advanced interfaces.
An additional micro SD card slot and the ability to be self-powered from the target means you can take your code with you and program on the go.*, and never worry about the code size.
Features
- 8-pin single in-line header (compatible with ICSP/2-wire JTAG/4-wire JTAG/SWD)
- Matches silicon clocking speed, programs as fast as the device will allow
- Wide target voltage (1.20V~5.5V)
- Can be powered from the target (2.7V~5.5V)
- Minimal current consumption at <100µA from target
- Powered by a high-speed USB 2.0, no external power required
- Can supply up to 50mA of power to the target through USB
- The firmware is continually being upgraded to add support for new devices
- Programmer-to-Go (PTG) support*
- SD card slot to hold program data
- Press on the logo to program the target
- CE and RoHS compliant
* The PICkit 4 now supports Programmer-to-Go functionality. To use it, MPLAB X IDE v5.30 or later is required for firmware update, and a Micro SD Card is also included for your convenience to hold the program data.
Software Requirements
- MPLAB X IDE version 4.15 or later
- Microsoft Windows® 7 or later, Mac OSX® and Linux® operating systems
- Programs code files generated by MPLAB IDE
Supported Devices
To check supported devices: If you have MPLAB X IDE installed, you can browse to the “docs” folder under your MPLAB X installation directory and open the file “Device Support.htm”. Alternatively, you can download it from this link: http://www.microchip.com/mplabx-ide-release-notes
How to Use
1. Install the latest MPLAB X IDE (www.microchip.com/mplabx)
2. Connect to Target Device
- Connect the MPLAB PICkit 4 to the computer using the supplied Micro-B USB cable.
- Attach the communications cable between the debugger and target board.
- Connect external power to target board.
Typical Debugger System – Device with On-Board Debug Circuitry

Alternative Debugger System – ICE Device

3. Create, Build and Run Project
- Refer to the MPLAB X IDE User's Guide or online help for instructions to install language tools, create or open a project, and configure project properties.
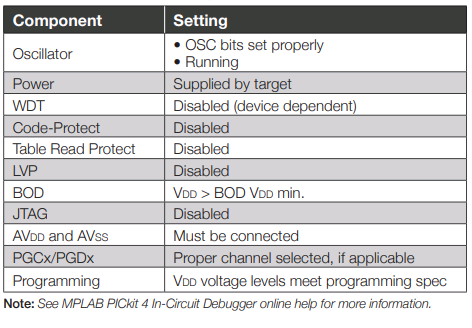
- Check that the configuration bits in your code match the Recommended Settings below.
- To execute your code in Debug mode, perform a debug run. To execute your code in Non-Debug (release) mode, perform a run. To hold a device in Reset after programming, use the Hold in Reset icon in the toolbar.
Recommended Settings

PICkit 4 Interfaces Pinouts

** Target device must be running with an oscillator for the debugger to function as a debugger.
*** If the device has AVdd and AVss lines, they must be connected for the debugger to operate.
Target Circuit Design Precautions

- Do not use pull-ups on PGC/PGD: they will disrupt the voltage levels, since these lines have programmable pull-down resistors in the debugger.
- Do not use capacitors on PGC/PGD: they will prevent fast transitions on data and clock lines during programming and debug communications.
- Do not use capacitors on MCLR: they will prevent fast transitions of VPP. A simple pull-up resistor is generally sufficient.
- Do not use diodes on PGC/PGD: they will prevent bidirectional communication between the debugger and the target device.
- Do not exceed recommended cable lengths: Refer to the Hardware Specification of the MPLAB PICkit 4 online help or user's guide for cable lengths.
Development Resources
PICkit 4 resources official link: http://www.microchip.com/developmenttools/productdetails.aspx?partno=pg164140


