
Zero LCD HAT (A)
| ||

Overview
Introduction
Zero LCD HAT (A) features a primary screen with a 1.3-inch LCD display, which uses the ST7789 driver chip and communicates through the SPI interface. It supports 65,000 colors and has a resolution of 240x240, ensuring clear and vibrant displays. Additionally, it includes dual auxiliary screens with 0.96-inch LCD displays, employing the ST7735S driver chip and SPI communication, with a resolution of 160x80. These smaller screens can be used for displaying critical information, status indicators, or small graphics.
Furthermore, Raspberry Pi demos and examples are provided to facilitate easy integration and usage.
Specification
| Parameter Name | Parameters | |
| Power Supply | 3.3V | |
| Working Current | 840mA | |
| Dimensions | 65.00 x 31.00(mm) | |
| Screen Types | 0.96inch LCD | 1.3inch LCD |
| Controller | ST7735S | ST7789 |
| Communication Interface | SPI | |
| Resolution | 160 × 80 | 240 × 240 |
| Display Size | 21.7mm × 10.8mm | 23.4mm × 23.4mm |
| Pixel Size | 0.1356mm × 0.135mm | 0.0975mm × 0.0975mm |
Pinout
| Pinout | Board No. |
| VCC | 3.3V |
| GND | GND |
| MOSI0 | 38 |
| MOSI1 | 19 |
| SCLK0 | 40 |
| SCLK1 | 23 |
| CS0 | 12 |
| CS1 | 24 |
| CS2 | 26 |
| DC0 | 15 |
| DC1 | 7 |
| DC2 | 29 |
| RST0 | 13 |
| RST1 | 18 |
| RST2 | 16 |
| BL0 | 35 |
| BL1 | 33 |
| BL2 | 32 |
| KEY1 | 22 |
| KEY2 | 37 |
Hardware Description
Communication Protocol
- SPI communication protocol:

From the above content, you can learn that the 4-wire SPI communication is used. You can refer to the datasheet for the following communication sequence diagram. Here, we take RGB556 as example:
Note: The difference from the traditional SPI protocol is that the data line sent from the slave to the host is hidden because it only needs to be displayed.
RESX is reset, it is pulled low when the module is powered on, usually set to 1;
CSX is the slave chip select, and the chip will be enabled only when CS is low.
D/CX is the data/command control pin of the chip, when DC = 0, write command, when DC = 1, write data.
SDA is the transmitted data, that is, RGB data;
SCL is the SPI communication clock.
For SPI communication, data is transmitted with timing, that is, the combination of clock phase (CPHA) and clock polarity (CPOL):
The level of CPHA determines whether the serial synchronization clock is collected on the first clock transition edge or the second clock transition edge. When CPHA = 0, data acquisition is performed on the first transition edge;
The level of CPOL determines the idle state level of the serial synchronous clock. CPOL = 0 indicates a low level.
As can be seen from the figure, when the first falling edge of SCLK starts to transmit data, 8-bit data is transmitted in one clock cycle, using SPI0, bit-by-bit transmission, high-order first, low-order last.
Working with Raspberry Pi
Enable SPI Interface
sudo raspi-config nonint do_spi 0
Library Installtion
Python
#python2
sudo apt-get update
sudo apt-get install python-pip
sudo apt-get install python-pil
sudo apt-get install python-numpy
sudo pip install RPi.GPIO
sudo pip install spidev
#python3
sudo apt-get update
sudo apt-get install python3-pip
sudo apt-get install python3-pil
sudo apt-get install python3-numpy
sudo apt install python3-luma.oled
sudo apt install python3-luma.lcd
sudo apt install python3-RPi.GPIO
sudo apt install python3-spidev
Download Test Demo
Open the Raspberry Pi terminal and execute:
sudo apt-get install unzip -y
sudo wget https://files.waveshare.com/wiki/Zero-LCD-HAT-A/Zero_LCD_HAT_A_Demo.zip
sudo unzip ./Zero_LCD_HAT_A_Demo.zip
cd Zero_LCD_HAT_A_Demo
Run The Demo
Python
- Enter python demo directory:
cd python/example
- Run the sample demo:
#Run 0inch96 screen 1:
sudo python 0inch96_spi0ce0.py

#Run 0inch96 screen 2:
sudo python 0inch96_spi0ce1.py

#Run 1inch3 screen:
sudo python 1inch3_spi1ce0.py
(Before running this command, you need to add "dtoverlay=spi1-1cs" to the config.txt file for opening the SPI device.)

#Run two 0.96inch screens at the same time:
sudo python double_0inch96_spi.py
Or
sudo python3 CPU.py

#Run the button demo:
sudo python3 key_double.py
FBCP Porting
For Bullseye System
Download Drivers
Open the Raspberry Pi terminal and execute:
sudo apt-get install unzip -y
sudo apt-get install cmake -y
sudo wget  https://files.waveshare.com/wiki/Zero-LCD-HAT-A/Zero_LCD_HAT_A_fbcp.zip
sudo unzip ./Zero_LCD_HAT_A_fbcp.zip
sudo cp Zero_LCD_HAT_A.dtbo /boot/overlays/
sudo wget https://files.waveshare.com/wiki/OLED-LCD-HAT-A/Rpi-fbcp.zip
sudo unzip ./Rpi-fbcp.zip
cd rpi-fbcp/
sudo mkdir build
cd build
sudo cmake ..
sudo make -j8
sudo install fbcp /usr/local/bin/fbcp
sudo ./fbcp
Edit the config.txt file:
sudo nano /boot/config.txt
Please block the following sentence:

Add the following code at the end of config.txt:
dtparam=spi=on
dtoverlay=spi1-1cs
dtoverlay=Zero_LCD_HAT_A

hdmi_force_hotplug=1
max_usb_current=1
hdmi_group=2
hdmi_mode=1
hdmi_mode=87
hdmi_cvt 320 320 60 6 0 0 0
hdmi_drive=2
display_rotate=0
Set up to Boot Automatically
sudo cp ~/rpi-fbcp/build/fbcp /usr/local/bin/fbcp
sudo nano /etc/rc.local
Add fbcp& in front of exit 0. Be sure to add the "&" and run it in the background, otherwise, the system may not boot.

A reboot is then required:
sudo reboot
After rebooting, it can normally displays.
For Bookworm System
The operation must be based on bookworm-lite system, 64-bit lite, 32-bit lite.
Download Needed Software
- Update system:
sudo apt update && sudo apt upgrade && sudo apt full-upgrade -y
- Install xorg service:
sudo apt-get install --no-install-recommends xserver-xorg -y
sudo apt-get install --no-install-recommends xinit -y
- Install Desktop Manager:
sudo apt install lightdm -y
- Install Raspberry Pi official GUI:
sudo apt install raspberrypi-ui-mods -y
- Install browser (optional):
sudo apt install chromium-browser -y
Download Driver
Open the Raspberry Pi terminal and execute:
sudo apt install libraspberrypi-dev -y
sudo apt-get install unzip -y
sudo apt-get install cmake -y
sudo wget https://files.waveshare.com/wiki/Zero-LCD-HAT-A/Zero_LCD_HAT_A_fbcp.zip
sudo unzip ./Zero_LCD_HAT_A_fbcp.zip
sudo cp Zero_LCD_HAT_A.dtbo /boot/overlays/
sudo wget https://files.waveshare.com/wiki/OLED-LCD-HAT-A/Rpi-fbcp.zip
sudo unzip ./Rpi-fbcp.zip
cd rpi-fbcp/
sudo rm -rf build
sudo mkdir build
cd build
sudo cmake ..
sudo make
sudo install fbcp /usr/local/bin/fbcp
Edit config.txt file:
sudo nano /boot/firmware/config.txt
Block the following sentences:
Add the following codes at the end of "config.txt":
dtparam=spi=on
dtoverlay=spi1-1cs
dtoverlay=Zero_LCD_HAT_A
hdmi_force_hotplug=1
max_usb_current=1
hdmi_group=2
hdmi_mode=87
hdmi_cvt 320 320 60 6 0 0 0
hdmi_drive=2
Set Auto-start startx and fbcp
- Open ".bash_profile". If there is no ".bash_profile" file, you can create one:
sudo nano ~/.bash_profile
Add the following code at the bottom of ".bash_profile" file:
if [ "$(cat /proc/device-tree/model | cut -d ' ' -f 3)" = "5" ]; then
    # rpi 5B configuration
    export FRAMEBUFFER=/dev/fb1
    startx  2> /tmp/xorg_errors
else
    # Non-pi5 configuration
    export FRAMEBUFFER=/dev/fb0
    fbcp &
    startx  2> /tmp/xorg_errors
fi
Set CLI Auto-login
sudo raspi-config nonint do_boot_behaviour B2
sudo raspi-config nonint do_wayland W1
sudo reboot
After rebooting, the main screen can normally display.
Note 1: Please ensure the username of the Raspberry Pi is "pi", otherwise, it cannot automatically log in.
Note 2: After setting the above configuration, it may take a while to reboot the system and load SSH.
API (C and Python are optional)
Raspberry Pi series can all share a common set of programs as they are embedded systems with better compatibility.
The demo is divided into the bottom hardware interface, the middle layer LCD driver, and the upper layer application.
Python (For Raspberry Pi)
It is for Python and Python3.
For Python, its invocation isn't as complex as C.
lcdconfig.py
- Module initialization and exit processing.
def module_init()
def module_exit()
Note:
1. Here is some GPIO processing before and after using the LCD screen.
2. The module_init() function is automatically called in the init() initializer on the LCD, but the module_exit() function needs to be called by itself.
- GPIO read and write:
def  digital_write(pin, value)
def  digital_read(pin)
- SPI write data.
def spi_writebyte(data)
About Rotation Settings
If you need to set the screen rotation in the Python program, you can set it by the statement im_r= image1.rotate(270).
im_r= image1.rotate(270)
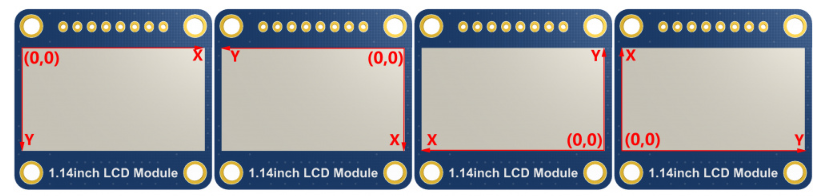
- Rotation effect, take 1.14 as an example, the order is 0°, 90°, 180°, 270°.

GUI Functions
Python has an image library PIL official library link, it does not need to write code from the logical layer like C and can directly call the image library for image processing. The following will take a 1.54-inch LCD as an example, we provide a brief description of the demo.
- It needs to use the image library and install the library.
sudo apt-get install python3-pil
And then import the library.
from PIL import Image,ImageDraw,ImageFont.
Among them, Image is the basic library, ImageDraw is the drawing function library, and ImageFont is the font library.
- Define an image cache to facilitate drawing, writing, and other functions on the picture.
image1 = Image.new("RGB", (disp.width, disp.height), "WHITE")
The first parameter defines the color depth of the image and is defined as "RGB" which means RGB888 colorful image. The second parameter is a tuple that defines the width and height of the image. The third parameter defines the default color of the buffer, which is defined as "WHITE".
- Create a drawing object based on image1 on which all drawing operations will be performed.
draw = ImageDraw.Draw(image1)
- Draw a line.
draw.line([(20, 10),(70, 60)], fill = "RED",width = 1)
The first parameter is a 4-element tuple, with (20, 10) as the starting point and (70, 60) as the ending point, to draw a straight line. fill="RED" indicates that the line is red, and width=1 specifies a line width of 1 pixel.
- Draw a rectangle.
draw.rectangle([(20,10),(70,60)],fill = "WHITE",outline="BLUE")
The first parameter is a 4-element tuple, with (20, 10) as the coordinates of the upper-left corner of the rectangle, and (70, 60) as the coordinates of the lower-right corner of the rectangle. fill="WHITE" specifies that the interior is filled with white color, and outline="BLUE" indicates that the outer border is blue.
- Draw a circle.
draw.arc((150,15,190,55),0, 360, fill =(0,255,0)
Draw an inscribed circle in the square, the first parameter is a tuple of 4 elements, with (150, 15) as the upper left corner vertex of the square, (190, 55) as the lower right corner vertex of the square, specifying the level median line of the rectangular frame is the angle of 0 degrees, and the angle becomes larger clockwise; the second parameter indicates the starting angle; the third parameter indicates the ending angle, and fill = (0,255,0) indicates that the color of the line is green. If the figure is not square according to the coordination, you will get an ellipse.
Besides the arc function, you can also use the ellipse function for drawing a solid circle.
draw.ellipse((150,65,190,105), fill = (0,255,0))
In essence, it's drawing an ellipse. The first parameter specifies the bounding rectangle of the chord, and fill = (0, 255, 0) indicates that the interior is filled with green color. If the bounding rectangle of the ellipse is a square, the ellipse becomes a circle.
- Write characters.
The ImageFont module needs to be imported and instantiated:
Font1 = ImageFont.truetype("../Font/Font01.ttf",25)
Font2 = ImageFont.truetype("../Font/Font01.ttf",35)
Font3 = ImageFont.truetype("../Font/Font02.ttf",32)
You can use the fonts of Windows or other fonts which is in ttf format.
Note: Each character library contains different characters; If some characters cannot be displayed, it is recommended that you refer to the encoding set to be used.
To draw English characters, you can directly use the fonts; for Chinese characters, you need to add a symbol u:
draw.text((40, 50), 'WaveShare', fill = (128,255,128),font=Font2)
text= u"微雪电子"
draw.text((74, 150),text, fill = "WHITE",font=Font3)
The first parameter is a 2-element tuple with (40, 50) as the left-top point. The font is set to Font2, and you can specify the font color with fill. You can directly use fill = "WHITE", as standard color values are already defined. Alternatively, you can use fill = (128, 255, 128), where the values in parentheses correspond to the RGB values for precise color control.
The second line displays "微雪电子" using Font3, with the font color set to white.
- Read local pictures.
image = Image.open('../pic/LCD_1inch28.jpg')
The parameter is the image path.
- Other functions.
Python's image library is very powerful, if you need to implement more, you can learn on the website: https://pillow.readthedocs.io/en/stable/.
Resource
Document
Datasheet
Demo
Drawing
Software
Pre-install image
FAQ
a) Check whether the SPI is enabled.
b) Check whether the backlight pin has any output, and you can try to make the BL control pin not connected if there is no output.
{{{5}}}
If the wiringPi demo is running normally, the screen may not refresh normally before running the Python or BCM2835 demo as the bcm2835 library is the library function of the Raspberry Pi CPU chip, whose underlying layer can directly control the register. As the underlying layer of the wiringPi and python library operate the device through reading and writing the device files of the Linux system, the GPIO headers may run abnormally. You can reboot the Raspberry Pi to solve this problem.
{{{5}}}
In C language, you can control rotation using the function Paint_SetRotate(Rotate), but the rotation angles are limited to 0, 90, 180, and 270 degrees. In Python, you can use the rotate(Rotate) function to rotate at any desired angle.
{{{5}}}
For some Raspberry Pi systems, there is no "image" library, and you can run: sudo apt-get install python-imaging to install the python-imaging library.
{{{5}}}
Support
Technical Support
If you need technical support or have any feedback/review, please click the Submit Now button to submit a ticket, Our support team will check and reply to you within 1 to 2 working days. Please be patient as we make every effort to help you to resolve the issue.
Working Time: 9 AM - 6 PM GMT+8 (Monday to Friday)