WM8960 Audio HAT
| ||
Introduction
This is a sound card HAT designed for Raspberry Pi, has low power consumption, supports stereo encoding/decoding, features Hi-Fi playing/recording, what's more, it can directly drive speakers to play music.
Features
- Standard Raspberry Pi 40PIN GPIO extension header, supports Raspberry Pi series boards.
- Integrates WM8960 low power stereo CODEC, communicates via I2S interface.
- Integrates dual high-quality MEMS silicon Mic, supports left & right double channels recording nice sound quality.
- Onboard standard 3.5mm earphone jack, play music via external earphones.
- Onboard dual-channel speaker interface, directly drives speakers.
- Supports sound effects such as stereo, 3D surroundings, etc.
Specifications
- CODEC: WM8960
- Power supply: 5V
- Logic voltage: 3.3V
- Control interface: I2C
- Audio interface: I2S
- DAC signal-noise ratio: 98dB
- ADC signal-noise ratio: 94dB
- Earphone driver: 40mW (16Ω@3.3V)
- Speaker driver: 1W per channel (8Ω BTL)
Dimension
Hardware Resource
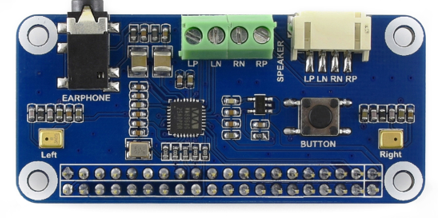
LP and LN correspond to the positive and negative poles of the left speaker respectively; RP and RN correspond to the positive and negative poles of the right speaker respectively.
| Functional Pins | Raspberry Pi Pins (BCM) | Description |
| 5V | 5V | Power positive (5V power input) |
| GND | GND | Power Ground |
| SDA | P2/SDA | I2C data input |
| SCL | P3/SCL | I2C clock Input |
| CLK | P18 | I2S bit clock input |
| LRCLK | P19 | I2S frame clock input |
| DAC | P21 | I2S serial data output |
| ADC | P20 | I2S serial data input |
| BUTTON | P17 | Custom buttons |
User Guide
The guides can only be used with Raspberry Pi OS (Raspbian).
Install Driver
Update system:
sudo apt-get update
sudo apt-get upgrade
Clone driver:
git clone https://github.com/waveshare/WM8960-Audio-HAT
Install WM8960 driver:
cd WM8960-Audio-HAT
sudo ./install.sh
sudo reboot
Check if the driver is installed.
sudo dkms status
pi@raspberrypi:~ $ sudo dkms status
wm8960-soundcard, 1.0, 4.19.58-v7l+, armv7l: installed
Note: If the WM8960 Audio HAT has a noise problem, please reinstall the driver and test it again.
In addition, you can use this pre-configured image os for a try.
https://drive.google.com/file/d/1D1WE30Ijsxu3f4NpLtQKYrX_D4gkEOFT/view?usp=drive_link
If the 3.5mm jack has no audio output, please run the following command to restart the service.
sudo systemctl restart wm8960-soundcard.service
Check the Soundcard
- Test playing:aplay -l
pi@raspberrypi:~ $ aplay -l
**** List of PLAYBACK Hardware Devices ****
card 0: wm8960soundcard [wm8960-soundcard], device 0: bcm2835-i2s-wm8960-hifi wm8960-hifi-0 []
  Subdevices: 1/1
  Subdevice #0: subdevice #0
- Test recording:arecord -l
pi@raspberrypi:~ $ arecord -l
**** List of CAPTURE Hardware Devices ****
card 0: wm8960soundcard [wm8960-soundcard], device 0: bcm2835-i2s-wm8960-hifi wm8960-hifi-0 []
  Subdevices: 1/1
  Subdevice #0: subdevice #0
Test record/play
Record & Play
sudo arecord -f cd -Dhw:0 | aplay -Dhw:0
After running the command, you can hear the sound recorded by mic from earphones or speakers. Note that the speaker should be away from the mic to void from noise.
Record
sudo arecord -D hw:0,0 -f S32_LE -r 16000 -c 2 test.wav
test.wav is the file name outputed.
Play
sudo aplay -Dhw:0 test.wav
Play the audio.
Adjust the volume
The default volume is small, and you can install the alsamixer to adjust it.
sudo alsamixer
If WM8960 is not the default sound card, you should press F6 to choose an audio device.

In fact, there are many options on the right that can be adjusted.
mpg123 palyer
aplay command can only support wav files, if you want to play MP3 file, you can install the mpg123 tool:
sudo apt-get install mpg123
sudo mpg123 music.mp3
You can replace the music.mp3 with the actual file name.
smplayer for GUI controlling
Note that this software can only work for:
sudo apt-get install smplayer
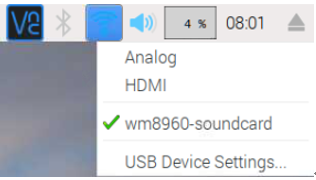
Right-click and set the wm8960-soundcard as the default device.
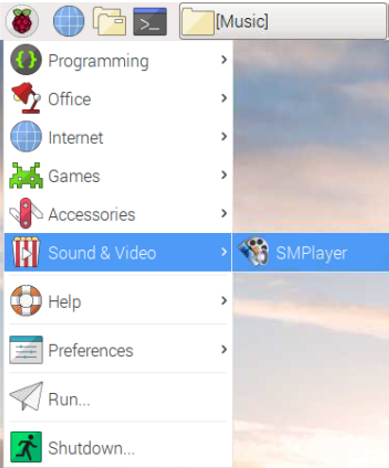
Open the smplayer software in Menu, choose an audio file and play.

Examples
We provide examples for testing.
- Install ibraries
sudo apt-get install libasound2-dev
git clone https://github.com/larsimmisch/pyalsaaudio
cd pyalsaaudio
sudo python3 setup.py build
sudo python3 setup.py install
- Download examples:
wget https://files.waveshare.com/upload/1/19/WM8960_Audio_HAT_Code.tar.gz
tar zxvf WM8960_Audio_HAT_Code.tar.gz
sudo chmod 777 -R WM8960_Audio_HAT_Code
- Play:
sudo python playwav.py music.wav
- Record:
sudo python recordwav.py out.wav
WM8960
Try printing to the position shown in the picture in U-boot, and press any key to switch to the device tree.
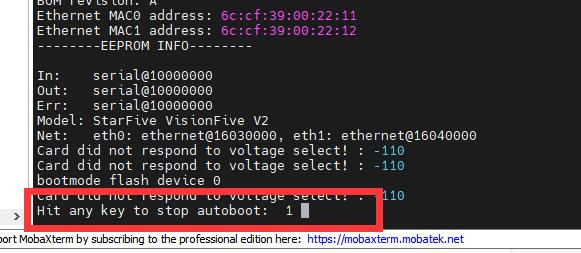
Replace the command at startup with the following:
ext4load mmc 1:3 a0000000 /boot/uEnv.txt
env import a0000000 17c
setenv fdtfile starfive/jh7110-visionfive-v2-wm8960.dtb
sysboot mmc 1:3 ext2 b0000000 /boot/extlinux/extlinux.conf
202302 System, Driver Loading
Boot and enter the system, and input the commands:
nano /boot/uEnv.txt
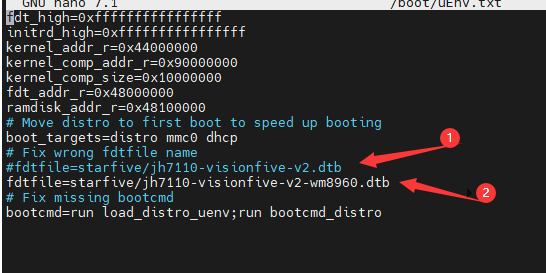
Go to the system boot configuration file, comment out section 1, and add section 2:
fdtfile=starfive/jh7110-visionfive-v2-wm8960.dtb
Start to Use
Install alsa-utils
apt install alsa-utils
If the module is not connected at the beginning, you need to restart VisionFive2 to detect the audio device.
Type aplay -l to list sound cards and digital audio devices.
Pay attention to the position marked on the picture, which indicates the device number of the sound card and digital audio equipment, where card0 and device0 are the headphone jacks on the VisionFive2 board, card0 and device2 are the headphone jacks on the WM8960 module.

Type arecord -l to list sound cards and recording devices.
Pay attention to the position marked on the picture, which indicates the device number of the sound card and recording device, card0 and device1 are the two patch microphones on the WM8960 module.

Input the command:
arecord -Dhw:0,1 -f S32_LE -r16000 -c2 -d 10 -t wav sound_32b_16k.wav
Start recording 10 seconds of 32-bit, 16kHz audio, and save it in the current directory, the file name is sound_32b_16k.wav.
input the command:
aplay -Dhw:0,2 -f S32_LE -r16000 -t wav sound_32b_16k.wav
Use the WM8960 module onboard headphone interface to play audio.
Note that the headphone jack on the VisionFive2 board only supports audio output in 16-bit audio format.
RDK X3 Module Usage
Recording Playback Function
If you are using the server image, please import the latest two audio packages to the system, if not please skip to the driver installation.
wget https://files.waveshare.com/upload/3/39/Audio_Driver_HAT_V2.zip
unzip Audio_Driver_HAT_V2.zip
sudo dpkg -i *.deb
sync
sudo reboot
Install the driver:
git clone [email protected]:HorizonRDK/hobot-audio.git
cd hobot-audio
sudo ./install.sh
What type of audio board do you have?
1. WM8960 Audio HAT
2. Audio Driver HAT
Select "1".
Run "sync && reboot" and reboot the development board. If the following device node appears under "/dev/snd", the adapter board is successfully installed.
root@ubuntu:~# ls /dev/snd/
by-path  controlC0  pcmC0D0c  pcmC0D0p  pcmC0D1c  pcmC0D1p  timer
Recording Playback Test
Channel 2 microphone recording:
tinycap ./2chn_test.wav -D 0 -d 0 -c 2 -b 16 -r 48000 -p 512 -n 4 -t 5
Dual channel audio playback:
tinyplay ./2chn_test.wav -D 0 -d 1
Resources
Documents
Codes
3D Drawing
FAQ
The default setting missed several libraries.
Please use this pre-configured image os for a try.
https://drive.google.com/file/d/1D1WE30Ijsxu3f4NpLtQKYrX_D4gkEOFT/view?usp=drive_link
{{{5}}}
Add the following line to the /boot/config.txt, reboot, and install the driver again for a try.
arm_64bit=0
- Check the kernel version first
uname --all
- If the kernel version of your system is lower than 5.0 (that is, the Raspberry Pi system version is before 2020-05-27), please download the following driver:
git clone -b rpi-4.9.y https://github.com/waveshare/WM8960-Audio-HAT.git
- If the kernel version is higher than 5.0, please download the following driver:
git clone https://github.com/waveshare/WM8960-Audio-HAT
【Note】Please do not run both of the above two commands!
{{{5}}}
Please run the following command to restart the sound card service and test it again.
sudo systemctl restart wm8960-soundcard.service
{{{5}}}
The headphone holder is a 4-segment national standard (also known as OMTP) headphone jack. If it is an American standard (also known as CTIA) headphone, there may be no sound from the microphone.
{{{5}}}
24Mhz.
{{{5}}}
Both speakers are 8 ohm 5W.
{{{5}}}
Yes, as detailed in the recording test section of the instructions.
{{{5}}}
1. Check if the /boot/config.txt file has blocked the default audio of the Raspberry Pi.
2. Pay attention to whether the driver version is used.
3. Make sure that no errors are reported during the driver installation.
4. Be sure to restart after installation.
{{{5}}}
Please check the 64-bit OS and you need to install the driver twice if you get the kernel error.
Add the following line to the config file, reboot, and install the driver again for a try.
arm_64bit=0
{{{5}}}
The WM8960 Audio HAT doesn't feature external MIC input pins even on the 3.5mm jack.
{{{5}}}
Please flash the original bookworm OS again and install the driver with the attached script for a try. The script drive link:
https://drive.google.com/file/d/1FHFUeeKJfOtTUBplh2MFb94kkeRkd7wK/view?usp=sharing
{{{5}}}
If possible, please use the fresh SD card for testing with WM8960 Audio Hat Raspberry Pi 5.
{{{5}}}
Support
Technical Support
If you need technical support or have any feedback/review, please click the Submit Now button to submit a ticket, Our support team will check and reply to you within 1 to 2 working days. Please be patient as we make every effort to help you to resolve the issue.
Working Time: 9 AM - 6 PM GMT+8 (Monday to Friday)


