MarsBoard AM335X
| ||
Introduction
MarsBoard AM335X, Flexible Designed Development Board Powered by TI AM335X
| More |
Getting started
MarsBoard AM335X supports the System Firmware of Debian, Angstrom, etc. And the source codes are also provided. MarsBoard AM335X comes with a preloaded Debian OS, which is supporting an external HDMI monitor. Other versions of system image can also be downloaded into AM335X, as required.
System Firmware downloads
You can get the related system firmware resource from:
Firmware descriptions:
- “eMMC” means the firmware is used for onboard eMMC, that is, at the first time of boot up from TF card, the image will be written into the eMMC automatically.
- “TF” means the firmware used for TF card will not be written into eMMC. and has no effect to the original eMMC system.
- “HDMI” means the firmware supports external HDMI.
- “LCD” means the firmware supports LCD display of 4.3inch or 7inch.
How to write OS to a TF card
- Unzip the firmware.
- A file archiver software, such as 7-Zip, is required to unzip the corresponding image file.
- Format your TF card.
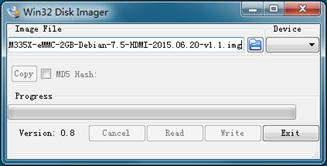
- Write the system firmware.
Boot up from the TF card system
Note: a 5V/2A adapter is used for power supply.
- Insert the TF card into the TF card socket;
- Set the boot up switch (hereafter BOOT) to “SD”;
- Power up to start the system.
Program the eMMC system from the TF card
- Insert the TF card, in which firmware should be eMMC , into the TF card socket;
- Set the BOOT to “SD”;
- Power up and then the LED1 and LED2 blink.
- The eMMC programming isn’t completed until both the LED1 and LED2 are lighten steady or extinguished (The programming process lasts about 30 min);
- Disconnect the power and remove the TF card.
- Set the BOOT to “NAND”.
- Power up to start the system.
Using the serial port for debugging
- First install the CP2102 driver on a PC and then connect the DEBUG port to the PC using a mini-USB cable.
- Run the software PuTTY.exe, and set the COM number, baud: 115200. The corresponding COM port can be confirmed by device manager. Click the button Open to enter the terminal.
Using the OTG port
- Install the driver which is located in the drive recognized as “boot” or “TI_AM335X”.
- Power up and wait until the system is ready;
- Connect the onboard OTG to the PC using a Mini USB cable;
- Run PuTTY and set the Host Name (or IP address) as “192.168.7.2” then click Open.
- Input “root” and press Enter to enter the system.
System development
Note: the compiling environment is ubuntu12.04.
Getting Linux source code resource
You can get the related system resource code from:
Linux kernel compilation
- To upgrade and download the necessary library, enter the terminal and input the command without newline:
sudo apt-get install git-core gnupg flex bison gperf libsdl-dev libesd0-devlibwxgtk2.8-dev build-essential zip curl libncurses5-dev zlib1g-dev ia32-libs lib32z1-dev lib32ncurses5-dev gcc-multilib g++-multilib sharutils lzop
- Extract the tar file:
tar -xjvf MarsBoard-AM335X-Debian-kernel-HDMI-3.8.tar.bz
- Enter the root directory of the kernel:
cd kernel/kernel
- Copy the configuration file:
cp ../../config/beaglebone .config
- Modify the Makefile:
vi Makefile +192
- Make the kernel:
make uImage dtbs –j4
Resources
MarsBoard AM335X Schematic
MarsBoard AM335X Image
- Click to download the Angstrom image and follow the section about Getting started
- Click to download the Debian image and follow the section about Getting started
MarsBoard AM335X Source Code
- Click to download the source code of the distribution Angstrom
- Click to download the source code of the distribution Debian
Development tools for the AM335X
- CP2102 Driver
- Win32DiskImager, a Windows program for saving and restoring images from removable drives.
- 7-Zip, an open source file archiver
- Panasonic SD Formatter
- PuTTY, a free and open-source terminal emulator, serial console and network file transfer application.
Cross compiler tool chain
Technical Support
If you need technical support or have any feedback/review, please click the Submit Now button to submit a ticket, Our support team will check and reply to you within 1 to 2 working days. Please be patient as we make every effort to help you to resolve the issue.
Working Time: 9 AM - 6 PM GMT+8 (Monday to Friday)


