4.3inch e-Paper UART Module
| ||
Introduction
The 4.3-inch e-Paper UART Module adopts a serial port, with a resolution of 800 × 600, built-in Chinese and English fonts, and low power consumption. If you don't want to learn the complex details of the bottom of the e-paper screen and don't pay attention to the specific display algorithms of graphics, text and pictures, then this product is born for you. Just one serial port can realize all functions, free you from complicated details, and release your creativity.
Feature
It is easy to use, only one serial port is needed to complete the display, including drawing geometric figures and displaying text and pictures. Built-in font library supports 32, 48, 64 dot matrix GBK Chinese font library; 32, 48, 64 dot matrix English font library has built-in 128MB NandFlash. The font library and picture data can be stored in the external TF card, or imported into the internal NandFlash 4-level grayscale display, with a resolution of up to 800 × 600. The serial port baud rate can be customized. After the system is powered on, the default is 115200. 5V, the logic level is compatible with low power consumption, and the current is less than 5mA after the system sleeps. With the host computer software, the display can be completed directly by using the computer.
Application
E-book reader, shopping mall POS, shelf label, industrial instrument display.
Interface Introduction
VCC: 3.3V~5.5V GND: GND DOUT: Serial port data transmission DIN: Serial port data reception WAKE_UP: External wake-up pin RST: External reset pin.
Important notices
- System power up
After powered up, the screen is refreshed to white. At this moment, if no external TF card is in use, the state indicator will flicker 3 times and then keep on. When there is an external TF card in use, the state indicator will light up and keep on without flickering.
- Storage
After powering up, the system reads the font and the image data from the internal NandFlash by default.
When using an external TF card, you should format the TF card into a FAT32 system, and place the font libraries provided by Waveshare and the images you want to display on the external TF card before using it.
When using the internal NandFlash, you should import the font libraries and image files you want to display to the internal NandFlash in advance. For more detailed information, please refer to the Section 2.2.
- State indicator
The state indicator is on when the system is working properly, and off when the system enters sleep mode. A rising edge on the WAKE_UP pin from the external MCU can wake up the system. And the state indicator will light up and remain on after resuming sleep mode.
- Font libraries
The system built-in 32, 48, and 64 dots English font is always available without using the TF card or the NandFlash; however, for the 32, 48, and 64 dots Chinese font, you should store the relative library file to the TF card or the NandFlash before using it.
- Image display
The system supports 1-bit and 2-bit bitmap image display. For other image formats, you should convert these images into the specified format with the tool on the Demos so as to display them.
The name of the image should be in uppercase English character(s) with a length of less than 10 characters, in which the symbol "." is included.
For example:
PIC7.BMP and PIC789.BMP are the correct image names;
PIC7890.BMP is the wrong image name.
How to use
Power supply
If the e-Paper module is powered by 3.3V from a certain serial module, the refresh of the e-Paper may cause instability of the serial module due to high current. In this case, please try a 5V power supply from the serial module, or try another serial module.
How to generate bitmap images
- Make sure the resolution of the image is less than 800 x 600 pixels. Start the tool mspaint.exe on Windows to open the image to be converted;
- Select the option 24-bit bitmap' in the Save as Type list, to save the image as a BMP format file;
- Start the software tool provided by Waveshare: uC-GUI-BitmapConvert.exe;
- Click File -> Open, and select the bitmap image you want to convert;
- Click Image -> Convert Into -> Gray4 (2 BPP);
- Click File -> Save As, and select the option Windows Bitmap file(*.bmp)' in the Save as Type list, and then enter the correct file name and save the image. Please take note of the format of the file name.
How to work with PC
We have designed the software for E-Paper to work with PCs. With this software, users can easily operate different basic displays on the E-Paper via a PC. In addition, a USB-to-serial module should be applied to build up the communication between the e-paper and the PC. Here, we will take the serial module CP2102 USB UART Board(mini) as an example to illustrate the application. For more detailed information about this serial module, please refer to the Appendix.
- Hardware connection
- Set the pin VCCIO on the CP2102 to 5V;
- Connect the CP2102 to the E-Paper with jump wire, in which the red wire of the cable is connected to the pin VCCIO on the CP2102, the black wire to the pin GND, the white wire to the pin RXD, the green wire to the pin TXD.
| CP2102 USB UART Board | 4.3inch e-Paper |
| VCCIO | Red |
| GND | Black |
| RXD | White |
| TXD | Green |
- Connect the CP2102 to the PC via a USB cable. Now, the E-Paper is powered up, and its state indicator lights up.
- Software installation
Unzip the software to the installation directory, and then double-click the file "install.bat". Then, you will see a dialog box pop up as the figure shows below if the software is installed successfully.
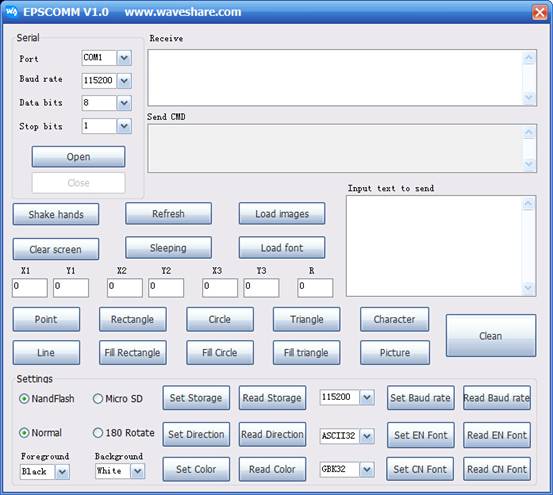
Double click the EPSCOMM.exe to start the software:
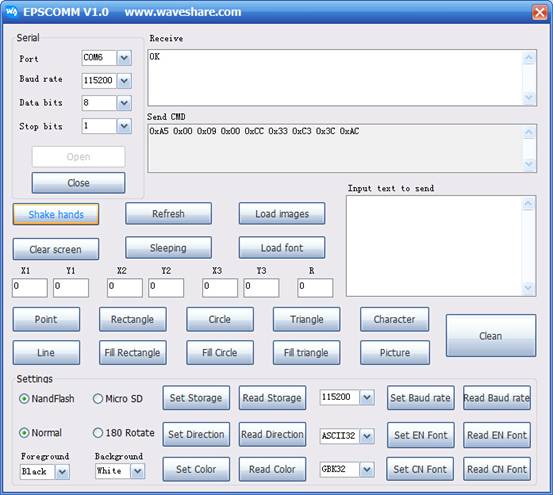
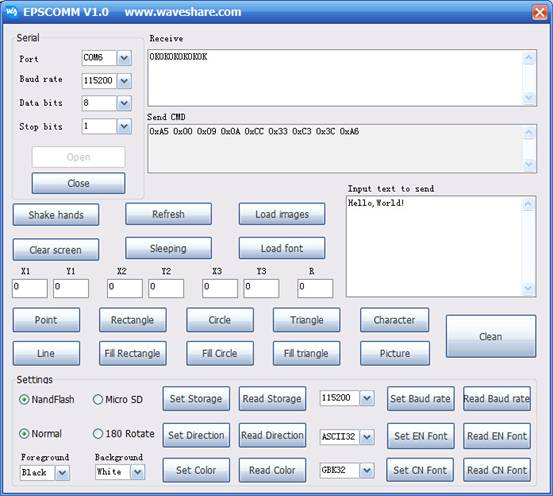
Check the Device Manager, and configure the corresponding serial port. Click the button Open, and then the button Shake hands. The E-Paper module will return the message "OK" if the communication is built up.
- Font libraries and image importation
- Prepare a micro SD card (here we take an 8G micro SD card as an example), and format the micro SD card into a FAT32 system with a 4096-byte allocation unit size. Copy the font libraries and image files provided by Waveshare into the micro SD card. When finished, insert the micro SD card into the E-Paper.
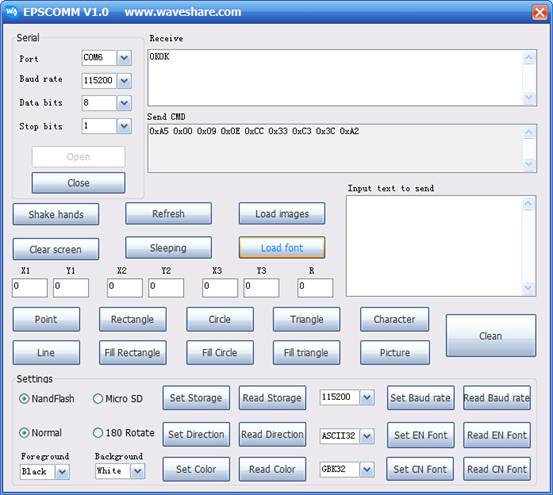
- Click the button Load font. Then, the state indicator on the e-paper will flicker 3 times, indicating the importation starts. When finished, the state indicator will flicker 3 times again and the e-Paper module will return the message "OK", indicating that the importation of the font library is completed successfully.
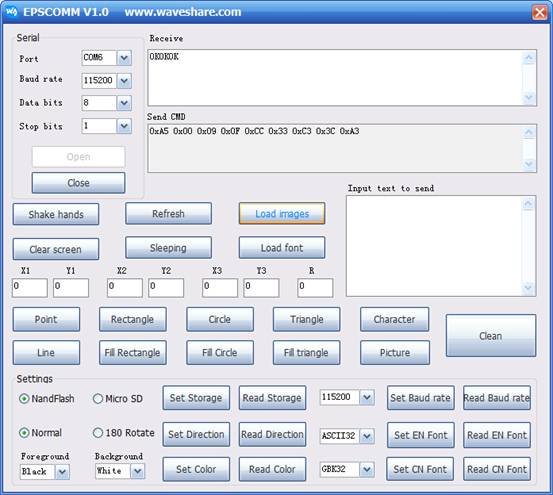
- Click the button Load image. Then, the state indicator on the e-paper will flicker 3 times, indicating the importation starts. When finished, the state indicator will flicker 3 times again and the e-Paper module will return the message "OK", indicating that the importation of image(s) is completed successfully.
Remarks:
[1] Once you do the operation, please check the state indicator. It flickers when the importation starts. Now, wait for the importation to finish.
[2] Normally, you only need to import the image(s) you want, but not need to import the font library, since it has been imported by default.
- Display testing
- Display text
Enter the text "Hello, World!" into the Input box, and set the coordinate options X1 and Y1 to 100. Then, click the button Character and then the button Refresh. Now, you can see the text inputted shown on the screen.
- Display image
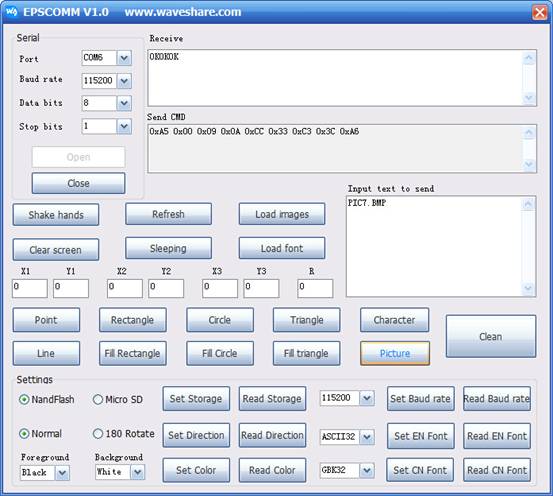
Enter the name of the image you want to display into the Input box and set the coordinate options X1 and Y1 to 0. Then, click the button Picture, and then the button Refresh. Now, you can see the corresponding image shown on the screen.
- Display shape
To draw shapes, you may need to input the parameters listed in the table below:
| Coordinate(X1, Y1) | Coordinate(X2,Y2) | Coordinate(X3,Y3) | Radius (R) | |
| Point | ● | |||
| Line | ● | ● | ||
| Rectangle | ● | ● | ||
| Filled rectangle | ● | ● | ||
| Circle | ● | ● | ||
| Filled circle | ● | ● | ||
| Tri-angle | ● | ● | ● | |
| Filled tri-angle | ● | ● | ● |
- Other settings
- Set the storage area, select the storage locations of font library and images, default location: NandFlash.
- Set the display direction.
- Set the drawing color, the option Foreground color for the text is set to Black and the option Background color for the background is set to White by default.
- Set Baud rate, default: 115200; it is not recommended to modify this option frequently.
- Set the font size of the English character.
- Set the font size of the Chinese character.
Remarks:
[1] When finishing each command, there will be the corresponding response. Normally, it will return "OK".
[2] For drawing point(s) or line(s), or displaying text(s) or image(s), you should click the button Refresh to update the display on the E-Paper screen whenever you finish each drawing.
[3] You may need to wait for the response for a while after clicking the button Display image since the image data is large.
For Arduino
- Hardware connection
Here, we take the Arduino UNO development board as an example to illustrate the application. Connect the development board to the e-Paper with a serial cable as shown in the following table. For more information about this development board, please refer to the Appendix.
The connection between Arduino UNO and 4.3inch e-Paper:
| Arduino UNO | 4.3inch e-Paper |
| 5V | Red |
| GND | Black |
| RX/D0 | White |
| TX/D1 | Green |
| D2 | Yellow |
| Reset, you can keep it unconnected | Blue |
- Program compiling and uploading
Open the Arduino program on the Demo. Then, compile and upload it. Please take note that the white cable should be removed on program uploading.
For NUCLEO
- Hardware connection
Here, we take NUCLEO-F103RBdevelopment board as an example to illustrate the application. Connect the development board to the e-Paper with a serial cable as shown in the following table. For more information about this development board, please refer to the Appendix.
Connection between NUCLEO-F103RB and 4.3inch e-Paper:
| NUCLEO-F103RB | 4.3inch e-Paper |
| 5V | Red |
| GND | Black |
| RX/D0 | White |
| TX/D1 | Green |
| D2 | Yellow |
| Reset, you can keep it unconnected | Blue |
- Program compiling and programming
Open the NUCLEO-F103RB program on the Demo. Then, compile and program it.
Note: You should set the JP4 jumper between A and B.
Open103Z
- Hardware connection
Here, we take the Open103Z development board as an example to illustrate the application. Connect the development board to the e-Paper with a serial cable as shown in the following table. For more information about this development board, please refer to the Appendix.
Connection between NUCLEO-F103RB and 4.3inch e-Paper:
| Open103Z | 4.3inch e-Paper |
| 5v | Red |
| GND | Black |
| PA10 | White |
| PA9 | Green |
| PA11 | Yellow |
| Reset, you can keep it unconnected | Blue |
- Program compiling and programming
Open the Open103Z program on the Demo. Then, compile and program it.
Serial communication protocol
Basic rules
Serial port
This e-Paper module adopts full-duplex asynchronous UART communication with an adjustable Baud rate.
Command frame format
| Command | 0xA5 | 0xXX XX | 0xXX | 0xXX… | 0xCC 33 C3 3C | 0xXX |
| Meaning (Description) | Frame header
(1 byte) |
Frame length[1]
(2 bytes) |
Command Type
(1 byte) |
Parameter or data
(0~1024 bytes) |
Frame end
(fixed 4 bytes) |
Parity
(1 byte)[2] |
[1] The frame length is calculated by the length beginning with the frame header and ending with the parity byte.
[2] The parity byte is the final result of the XOR operation on the bytes from the frame header to the frame end.
Transmission sequence
The data of the module is transmitted in the Network byte sequence, which means a higher byte is sent at first, then a lower byte follows. For example, a parameter, 0x1234, is transmitted in two parts: 0x12 is sent at first, and then 0x34 follows.
Command parameters
- Byte: 8 bits, single byte;
- Short: 16 bits, double bytes;
- Dword: 32 bits, four bytes;
- String: the character string ends with "\0".
Color definition
This e-Paper module supports a 4-level gray display and 2 bits for each pixel.
0x00: Black
0x01: Dark gray
0x02: Light gray
0x03: White
Command set
Command look-up table
| Functions | Frame Length | Command | Command Parameter | Descriptions |
| System control | 0x0009 | 0x00 | Null | Handshake command. If the module is ready, it will return an "OK". |
| 0x000D | 0x01 | Dword: Set the serial Baud rate | Set the serial Baud rate | |
| 0x0009 | 0x02 | Null | Return the current Baud rate value in ASCII format | |
| 0x0009 | 0x06 | Null | Return the information about the currently used storage area. 0: NandFlash 1: MicroSD | |
| 0x000A | 0x07 | Byte: Set the storage area | 0x00: NandFlash 0x01: MicroSD | |
| 0x0009 | 0x08 | Null | System enters sleep mode | |
| 0x0009 | 0x0A | Null | Refresh and update the display at once | |
| 0x0009 | 0x0C | Null | Return the current display direction 0: Normal 0x01: 90° 0x02: 180° 0x03: 270° | |
| 0x000A | 0x0D | Byte: Set the display direction | 0x00: Normal 0x01: 90° 0x02: 180° 0x03: 270° | |
| 0x0009 | 0x0E | Null | Import font library: 48MB | |
| 0x0009 | 0x0F | Null | Import image: 80MB | |
| Display parameter configuration | 0x000B | 0x10 | Byte0: foreground color Byte1: background color |
Set the drawing color |
| 0x0009 | 0x11 | Null | Return the current drawing color | |
| 0x0009 | 0x1C or 0x1D (may differ depending on Firmware) | Null | Get the English font size 1: 32 dots matrix 2: 48 dots matrix 3: 64 dots matrix | |
| 0x0009 | 0x1D | Null | Get the font size 1: 32 dots matrix 2: 48 dots matrix 3: 64 dots matrix | |
| 0x000A | 0x1E or 0x1F (may differ depending on Firmware) | Byte0: Set the English font size | Set the English font size 0x01: 32 dots matrix 0x02: 48 dots matrix 0x03: 64 dots matrix | |
| 0x000A | 0x1F | Byte0: Set the font size | Set the font size 0x01: 32 dots matrix 0x02: 48 dots matrix 0x03: 64 dots matrix | |
| Basic drawings | 0x000D | 0x20 | Short0: coordinate x Short1: coordinate y |
Display a point on a given coordination Default: foreground color |
| 0x0011 | 0x22 | Short0: coordinate x0 Short1: coordinate y0 Short2: coordinate x1 Short3: coordinate y1 |
Draw a line | |
| 0x0011 | 0x24 | Short0: coordinate x0 Short1: coordinate y0 Short2: coordinate x1 Short3: coordinate y1 |
Fill a rectangle | |
| 0x0011 | 0x25 | Short0: coordinate x0 Short1: coordinate y0 Short2: coordinate x1 Short3: coordinate y1 |
Draw a rectangle | |
| 0x000F | 0x26 | Short0: coordinate x0 Short1: coordinate y0 Short2: r radius |
Draw a circle | |
| 0x000F | 0x27 | Short0: coordinate x0 Short1: coordinate y0 Short2: r radius |
Fill a circle | |
| 0x0015 | 0x28 | Short0: coordinate x0 Short1: coordinate y0 Short2: coordinate x1 Short3: coordinate y1 Short4: coordinate x2 Short5: coordinate y2 |
Draw a triangle | |
| 0x0015 | 0x29 | Short0: coordinate x0 Short1: coordinate y0 Short2: coordinate x1 Short3: coordinate y1 Short4: coordinate x2 Short5: coordinate y2 |
Fill a tri-angle | |
| 0x0009 | 0x2E | Null | Clear the screen with the background color | |
| Display text | 0x0D + string length | 0x30 | Short0: coordinate x Short1: coordinate y String: bitmap name |
Support English and Chinese fonts mixed display Maximum string length = 1024 – 4 |
| Display image
(.bmp and .jpg Only) |
0x0D + string length | 0x70 | Short0: coordinate x0 Short1: coordinate y0 String: .BMP file name |
Support bitmap file: .BMP, .JPG |
| UART input stream (new) | 0x0D + string length | 0x40 | String: file name | Send a file to the SD card using UART and specify a file name for saving |
| Storage manager (new) | 0x09 | 0x50 | Nand Flash full erase |
Remarks:
[1] The string length is the length of the character string ending with "\0", in which the ending "\0" is included.
[2] The name of the image should be in uppercase English character(s) with a length of less than 10 characters (the symbol "." is included). The string length of the image name should be less than 11 characters, in which the ending "0" is included.
Command explanations
System control
- Handshake command (0x00)
After powered up, you can send this command to the terminal to make sure whether the terminal is ready and able to receive commands or data.
Example: A5 00 09 00 CC 33 C3 3C AC
Descriptions: Handshake command
- Set the Baud rate (0x01)
After powering up, the default Baud rate is 115200. This command is used to set the Baud rate. You may need to wait 100ms for the module to return the result after sending this command, since the host may take a period of time to change its Baud rate.
Example: A5 00 0D 01 00 00 25 80 CC 33 C3 3C 0C
Descriptions: 0x2580: set the Baud rate to 9600. The parameter of the Baud rate consists of 4 bytes, so you need to complete the rest by yourself.
- Read the current Baud rate (0x02)
Example: A5 00 09 02 CC 33 C3 3C AE
Descriptions: Read the current Baud rate of the system.
- Return the information about the currently used storage area (0x06)
Example: A5 00 09 06 CC 33 C3 3C AA
Descriptions: When returns 0x00, the currently used storage area is internal NandFlash; when returns 0x01, the currently used storage area is external TF card.
- Set the storage area (0x07)
Set the storage area to select the storage locations of the font library and images, either the external TF card or the internal NandFlash is available.
Example: A5 00 0A 07 00 CC 33 C3 3C A8
Descriptions: 0x00: set the currently used storage area as NandFlash.
- Sleep mode (0x08)
The system will enter the sleep mode and reduce system power consumption by this command. Under sleep mode, the state indicator is off, and the system does not respond to any commands. Only the rising edge on the pin WAKE_UP can wake up the system.
Example: A5 00 09 08 CC 33 C3 3C A4
Descriptions: Switch the system to sleep mode.
- Refresh (0x0A)
Refresh and update the display on the screen. After the host sends out the drawing command, the system will only write the relative data into the internal video memory, but not update the display on the screen. So you should operate this command whenever you finish each drawing.
Example: A5 00 09 0A CC 33 C3 3C A6
Descriptions: Refresh and update the display on the screen
- Get the display direction (0x0C)
Example: A5 00 09 0C CC 33 C3 3C A0
Descriptions: When returns 0, the screen is in the normal display; when returns 1 or 2, the display on the screen will be rotated by 180°.
- Set the display direction (0x0D)
Set the display direction, only a 180° rotation display is supported.
Example: A5 00 0A 0D 01 CC 33 C3 3C A3, or, A5 00 0A 0D 02 CC 33 C3 3C A0
Descriptions: 0x01: The display on the screen will be switched from normal display to 180° rotation display.
- Import font library (0x0E)
Import the font library files from the TF card to the internal NandFlash. The font library files include GBK32.FON/GBK48.FON/GBK64.FON. The state indicator will flicker 3 times when the importation is starting and ending.
Example: A5 00 09 0E CC 33 C3 3C A2
Descriptions: Import the font library
- Import image (0x0F)
Import the image files from the TF card to the internal NandFlash. The state indicator will flicker 3 times when the importation is starting and ending.
Example: A5 00 09 0F CC 33 C3 3C A3
Descriptions: Import the images
Display parameter configuration
- Set the pallet (0x10)
Set the foreground color and the background color on the drawing, in which the foreground color can be used to display the basic drawings and text, while the background color is used to clear the screen.
Example: A5 00 0B 10 00 03 CC 33 C3 3C BD
Descriptions: 0x00: The foreground color is set to Black
0x03: The background color is set to White
- Get the pallet data (0x11)
Example: A5 00 09 11 CC 33 C3 3C BD
Descriptions: For example, when returns "03", "0" means the foreground color is Black, and "3" means the background color is White.
- Get the English font size (0x1C or 0x1D, may differ depending on version)
Example: A5 00 09 1C CC 33 C3 3C B0, or, A5 00 09 1D CC 33 C3 3C B1
Descriptions: Return the index of the currently used English font size.
- Get the Chinese font size (0x1D)
Example: A5 00 09 1D CC 33 C3 3C B1
Descriptions: Return the index of the currently used Chinese font size.
- Set the English font size (0x1E or 0x1F, may differ depending on version)
Set the English font size, which currently supports 32/48/64 dots matrix.
Example: A5 00 0A 1E 03 CC 33 C3 3C B2, or, A5 00 0A 1F 03 CC 33 C3 3C B3
Descriptions: 0x03: Set the English font size to 64 dots matrix
- Set the Chinese font size (0x1F)
Set the Chinese font size, which currently supports a 32/48/64 dots matrix.
Example: A5 00 0A 1F 01 CC 33 C3 3C B1
Descriptions: 0x01: Set the Chinese font size to 32 dots matrix
Basic drawings
- Draw a point (0x20)
Display a point on a specified coordination position with foreground color.
Example: A5 00 0D 20 00 0A 00 0A CC 33 C3 3C 88
Descriptions: Display a point on the position (0x0A, 0x0A) with foreground color.
- Draw a line (0x22)
Draw a line between two specified point coordinates with foreground color.
Example: A5 00 11 22 00 0A 00 0A 00 FF 00 FF CC 33 C3 3C 96
Descriptions: Draw a line between the point coordinates (0x0A, 0x0A) and (0xFF, 0xFF) with foreground color.
- Fill a rectangle (0x24)
Fill a rectangle according to two point coordinates with foreground color, in which these two points serve as the diagonal points of the rectangle.
Example: A5 00 11 24 00 0A 00 0A 00 FF 00 FF CC 33 C3 3C 90
Descriptions: Fill a rectangle according to the point coordinates (0x0A, 0x0A) and (0xFF, 0xFF), in which these two points serve as the diagonal points of the rectangle.
- Draw a rectangle (0x25)
Draw a rectangle according to two point coordinates with foreground color, in which these two points serve as the diagonal points of the rectangle.
Example: A5 00 11 25 00 0A 00 0A 00 FF 00 FF CC 33 C3 3C 91
Descriptions: Draw a rectangle according to the point coordinates (0x0A, 0x0A) and (0xFF, 0xFF), in which these two points serve as the diagonal points of the rectangle.
- Draw a circle (0x26)
Draw a circle based on the given center coordination and radius.
Example: A5 00 0F 26 00 FF 00 FF 00 80 CC 33 C3 3C 0C
Descriptions: Draw a circle with the center coordination (0xFF, 0xFF), and radius 0x80.
- Fill a circle (0x27)
Fill a circle based on the given center coordination and radius.
Example: A5 00 0F 27 00 FF 00 FF 00 80 CC 33 C3 3C 0D
Descriptions: Fill a circle whose center coordination is (0xFF, 0xFF) and radius is 0x80.
- Draw a tri-angle (0x28)
Draw a triangle according to three given point coordinates.
Example: A5 00 15 28 00 0A 00 0A 00 20 00 80 00 80 00 FF CC 33 C3 3C 47
Descriptions: The three point coordinates of the tri-angle are (0x0A, 0x0A), (0x20, 0x80) and (0x80, 0xFF).
- Fill a tri-angle (0x29)
Fill a tri-angle according to three given point coordinates.
Example: A5 00 15 29 00 0A 00 0A 00 20 00 80 00 80 00 FF CC 33 C3 3C 46
Descriptions: The three point coordinates of the tri-angle are (0x0A, 0x0A), (0x20, 0x80), (0x80, 0xFF)
- Clear the screen (0x2E)
Clear the screen with the background color.
Example: A5 00 09 2E CC 33 C3 3C 82
Descriptions: Clear the screen
Display text
- Display character string (0x30)
Display a character string on a specified coordination position. Chinese and English mixed display is supported.
Example: A5 00 17 30 00 0A 00 0A C4 E3 BA C3 57 6F 72 6C 64 00 CC 33 C3 3C 9E
Descriptions: 0x0A, 0x0A: This is the given coordination position
0xC4E3: 你
0xBAC3: 好
0x57 6F 72 6C 64:World
After executing this command, the screen will show the text:你好World
Each character string should end with a "0". So, you should add a "00" at the end of the string C4 E3 BA C3 57 6F 72 6C 64.
UART input Stream (new)
- Send a file to the SD card using UART (0x40)
Example: A5 00 12 40 50 49 43 37 2E 42 4D 50 00 CC 33 C3 3C EB
Descriptions:
50 49 43 37 2E 42 4D 50 are the ASCII codes of "PIC7.BMP". After this command is executed, any data from UART will be saved into the SD card and saved as PIC7.BMP. If the transmission stops more than 1s, this function will stop too. After the file is sent, file size and Xor check will be returned and you should compare them to check if the file was sent properly. Last, if the file was sent properly, you should send the character 'y' to confirm. If the file is an image (.JPG or .BMP), you should set the storage area to SD card (A5 00 0A 07 01 CC 33 C3 3C A9), and then use the display image command to display it. UART input stream command is not affected by the storage area settings. Files are only going to be saved into the Micro SD card.
Display image
- Display bitmap (0x70)
Before executing this command, please make sure the bitmap file you want to display is stored in the storage area (either TF card or internal NandFlash).
Example: A5 00 16 70 00 00 00 00 50 49 43 37 2E 42 4D 50 00 CC 33 C3 3C DF
Descriptions: Image start coordination position: (0x00, 0x00)
0x50 49 43 37 2E 42 4D 50: Bitmap name: PIC7.BMP
Each character string should end with a "0". So, you should add a "00" at the end of the string 50 49 43 37 2E 42 4D 50.
The name of the bitmap file should be in uppercase English character(s). The string length of the bitmap name should be less than 11 characters, in which the ending "0" is included. For example, PIC7.BMP and PIC789.BMP are correct bitmap names, while PIC7890.BMP is a wrong bitmap name.
FAQ
On a 64-bit system, you need to copy MSCOMM32.OCX to C:\Windows\SysWOW64 and run the registration script.
Note: If the same error is prompted after the above operation, you also need to copy MSCOMM32.OCX to C:\Windows\System32 and run the registration script. (Sometimes it may be necessary to run as an administrator to register successfully!
{{{5}}}
{{{5}}}
250 is an undefined error. It may be that the name of the picture entered is wrong when displaying the picture, pay attention to the capitalization, and if the TF card is pulled out when the TF card is connected for the next time, it can be used normally after powering on again.
{{{5}}}
{{{5}}}
1. Please make sure the SD card has been formatted correctly. Allocation unit size of 2048 bytes or 4096 bytes is no problem.
2. Please use an independent power supply, do not use the serial port module to supply power. Because the current required to refresh the screen is large, when using the serial port module for power supply, it may cause serial port problems or SD card problems. In this case, using the SD card will report an error: Error: 1, Error: 3, or Error: 4.
{{{5}}}
- 【Working conditions】Temperature range: 0~40°C; (seven-color screen: 15~35°C) Humidity range: 35%~65%RH.
- 【Storage conditions】Temperature range: below 30°C; Humidity range: below 55%RH; Maximum storage time: 6 months.
- 【Transportation conditions】Temperature range: -25~70°C; Maximum transportation time: 10 days.
- 【After unpacking】Temperature range: 20°C±5°C; Humidity range: 50±5%RH; Maximum storage time: Assemble within 72 hours.
{{{5}}}
- refresh mode
- Full refresh: The e-Paper screen will flicker several times during the refresh process (the number of flickers depends on the refresh time), and the flicker is to remove the afterimage to achieve the best display effect.
- Partial refresh: The e-Paper screen has no flickering effect during the refresh process. Users who use the partial brushing function note that after refreshing several times, a full refresh operation should be performed to remove the residual image, otherwise the residual image problem will become more and more serious, or even damage the screen (currently only some black and white e-Paper screens support partial refreshing, please refer to product page description).
- refresh rate
- During use, it is recommended that customers set the refresh interval of the e-Pape screen to at least 180 seconds (except for products that support the local brush function).
- During the standby process (that is, after the refresh operation), it is recommended that the customer set the e-Paper screen to sleep mode, or power off (the power supply part of the e-Paper screen can be disconnected with an analog switch) to reduce power consumption and prolong the life of the e-Paper screen. (If some e-Paper screens are powered on for a long time, the screen will be damaged beyond repair.)
- During the use of the three-color e-Paper screen, it is recommended that customers update the display screen at least once every 24 hours (if the screen remains the same screen for a long time, the screen burn will be difficult to repair).
- Full refresh: The e-Paper screen will flicker several times during the refresh process (the number of flickers depends on the refresh time), and the flicker is to remove the afterimage to achieve the best display effect.
- Application
- The e-Paper screen is recommended for indoor use. If it is used outdoors, it is necessary to avoid direct sunlight on the e-ink screen, and at the same time, take UV protection measures, because charged particles will dry out under strong light for a long time, resulting in loss of activity and failure to refresh. This situation is irreversible. When designing e-ink screen products, customers should pay attention to determining whether the use environment meets the requirements of an e-ink screen.
- The e-Paper screen is recommended for indoor use. If it is used outdoors, it is necessary to avoid direct sunlight on the e-ink screen, and at the same time, take UV protection measures, because charged particles will dry out under strong light for a long time, resulting in loss of activity and failure to refresh. This situation is irreversible. When designing e-ink screen products, customers should pay attention to determining whether the use environment meets the requirements of an e-ink screen.
{{{5}}}
Ideally, with normal use, it can be refreshed 1,000,000 times (1 million times).
{{{5}}}
{{{5}}}
Yes, but you need to re-initialize the electronic paper with software.
{{{5}}}
Maybe the SPI rate is too high, resulting in data loss, try to reduce the SPI rate.
Insufficient or unstable power supply leads to data loss.
The data cable is too long to cause data loss, the extension cable should not exceed 20cm.
{{{5}}}
The display gray scale of electrophoretic electronic paper is determined by the spatial position of the particles in the Microcapsule or Microcup. The electrophoresis phenomenon occurs between black particles and white particles under the action of voltage. This voltage sequence that promotes the electrophoretic movement of the particles is the driving force of the electronic paper. waveform. The driving waveform is the core part of the electronic paper display, and the optimization of the driving waveform will directly affect the display effect of the display. The driving waveform file is used to describe the parameters formed by the voltage sequence that promotes the electrophoretic movement of the particles, and it needs to be called regularly when the electronic paper is refreshed. Different batches of e-paper diaphragms and electrophoretic matrices require different voltage values when driving the display due to materials, manufacturing processes, etc. The waveform of the e-ink screen is reflected in the relationship between grayscale, voltage, and temperature. Generally speaking, after each batch of electrophoresis matrix is generated, there will be a corresponding waveform file in the form of a .wbf file. The film manufacturer will provide the waveform file and electrophoresis matrix to the manufacturer of the electronic paper screen, and then the manufacturer of the electronic paper screen integrates the protection board, substrate, and driver and then provides it to customers; if the waveform file does not correspond to the screen, likely, the display cannot be displayed or the display effect is unsatisfactory. Generally, the waveform file has OTP built into the driver IC of the ink screen when leaving the factory, and some programs we provide also call external waveform files to drive the e-ink screen.
{{{5}}}
{{{5}}}
- There are mainly two types of ink screens.
- One is to refresh the background image first.
- The other is to alternately refresh old data and new data.
- One is to refresh the background image first.
{{{5}}}
Simultaneous brushing in different locations needs to be operated in the program design, that is, first brushing the data of different locations into the electronic paper IC, and finally doing the Update/TurnOnDisplay uniformly.
{{{5}}}
Yes, when the e-paper is batched, there will be some color difference, which is a normal phenomenon. Store the e-paper faces up to reduce the reddish/yellowishness to a certain extent.
{{{5}}}
Resources
Support
Technical Support
If you need technical support or have any feedback/review, please click the Submit Now button to submit a ticket, Our support team will check and reply to you within 1 to 2 working days. Please be patient as we make every effort to help you to resolve the issue.
Working Time: 9 AM - 6 PM GMT+8 (Monday to Friday)


